
Re-designed Trackers Module
Capture, track and manage organizational business data faster with the power of the newly redesigned trackers module
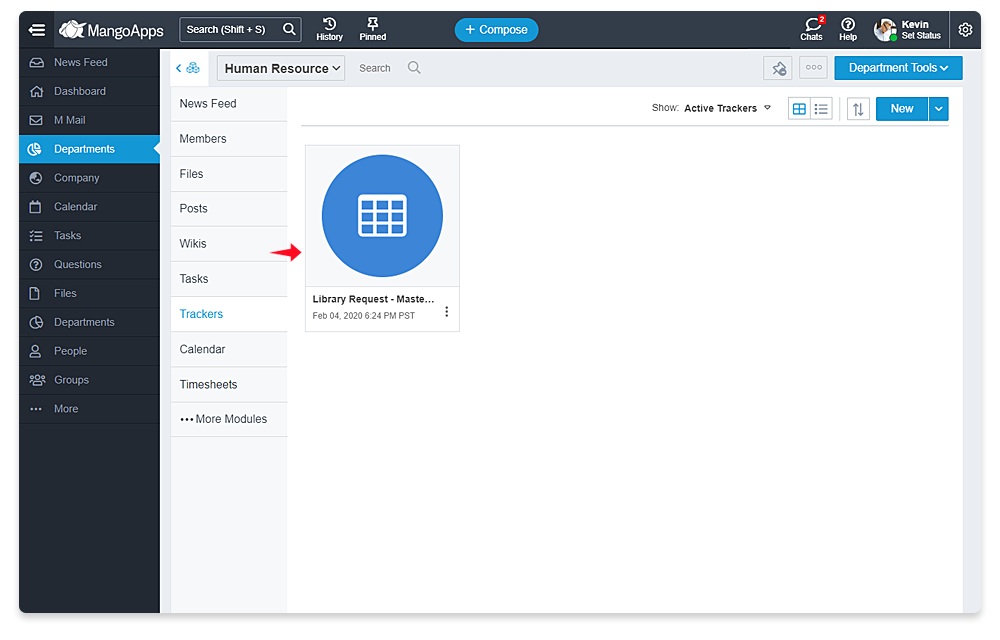
Trackers Module
- The new design comes with features that make using trackers a delight. At a high level these include,
- Out of the box tracker templates for common tracker use cases
- Familiar and flexible view to easily sort, filter, search and support for specialized column types like email address, currency, date, people, teams and more
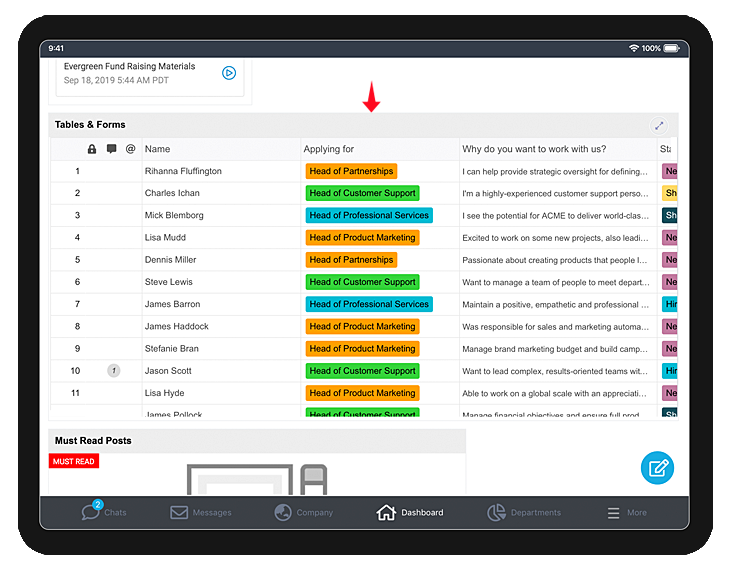
- View & share comments, @mention a person on specific rows in the tracker enabling you to keep the conversation together with the data
- Built-in support for formulas, link to a row, team specific views to a tracker, attachment support and many more capabilities to empower your users
- Full screen view of the tracker to make it easier to work with
- Available in the MangoApps mobile apps to maximize productivity wherever you work
![]()
![]()
![]()
Domain Admin Settings
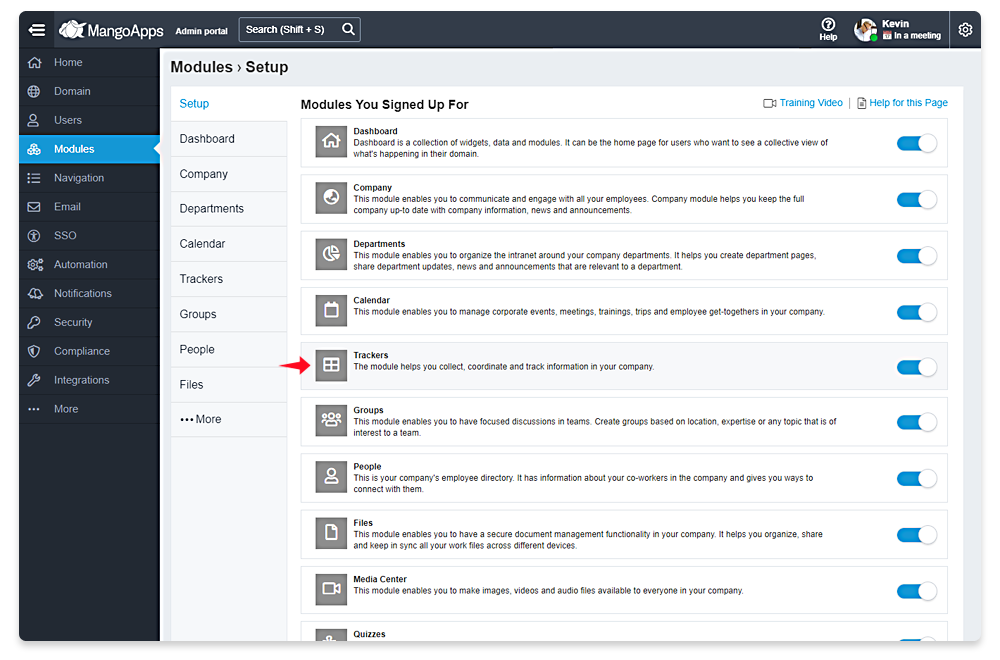
- Domain admins have the following settings to customize the trackers module
- Who can create new trackers?
- Can tables & forms be shared publicly on the internet with no sign-in requirements
- Automation message (e.g., confirmation message when a form is submitted) to be sent from which user
- Name for the trackers module
- Ability to add the trackers module to the primary navigation for all users is available (like it is for other modules in MangoApps)

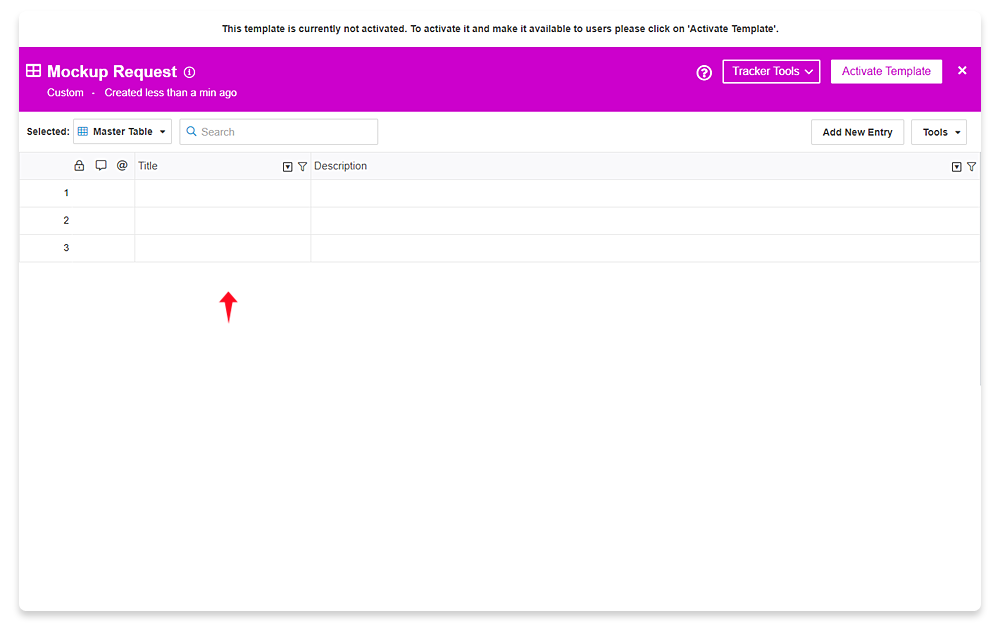
Templates
- Get started fast with 21 out of the box tracker templates for common use cases. These templates & screenshots are listed here
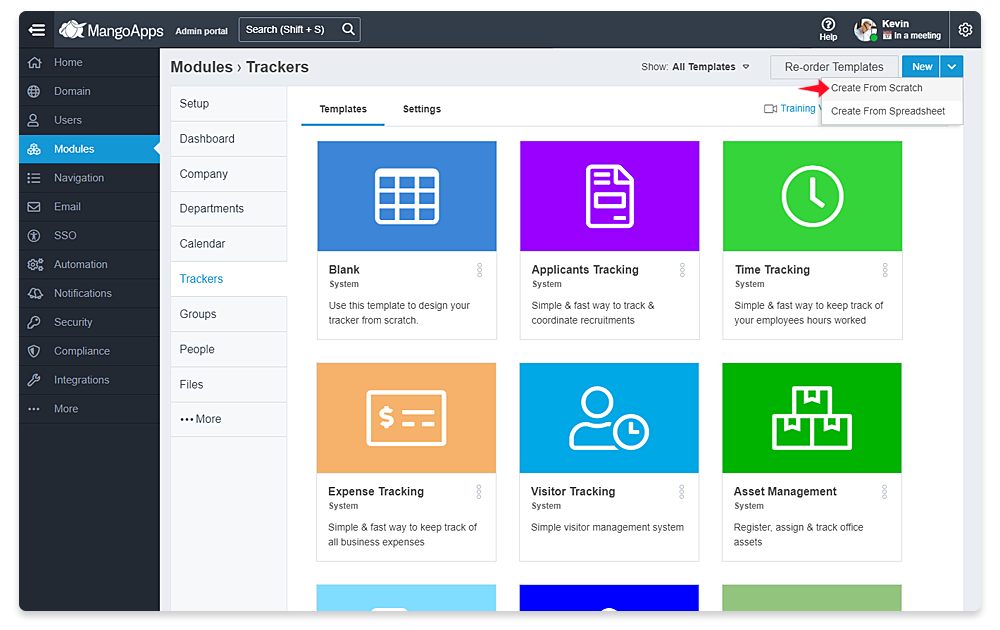
- Ability to create your own tracker template with custom columns and forms in a few minutes. The two options that domain admins have to create their own templates are
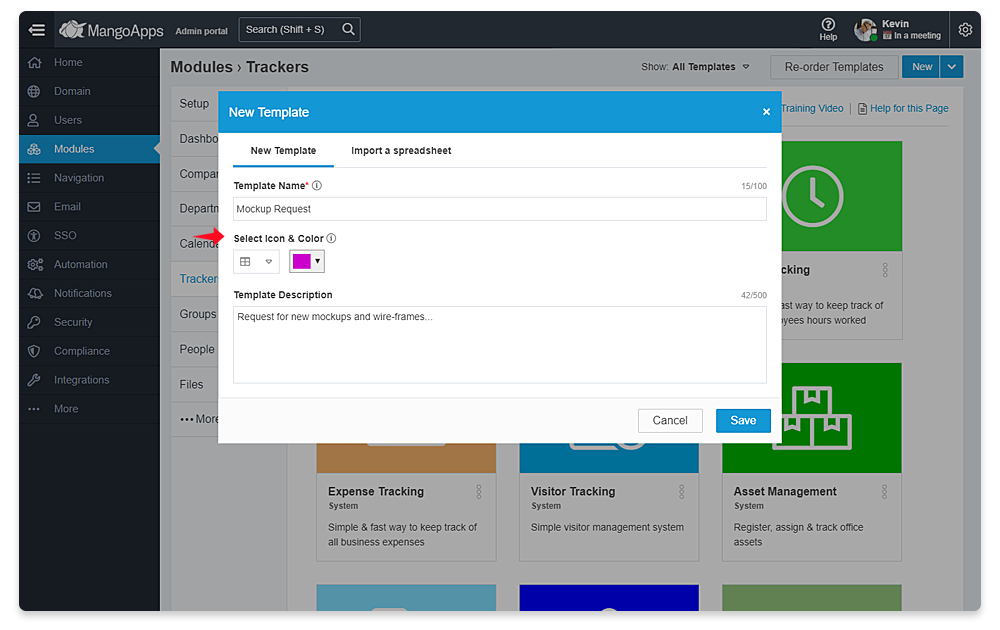
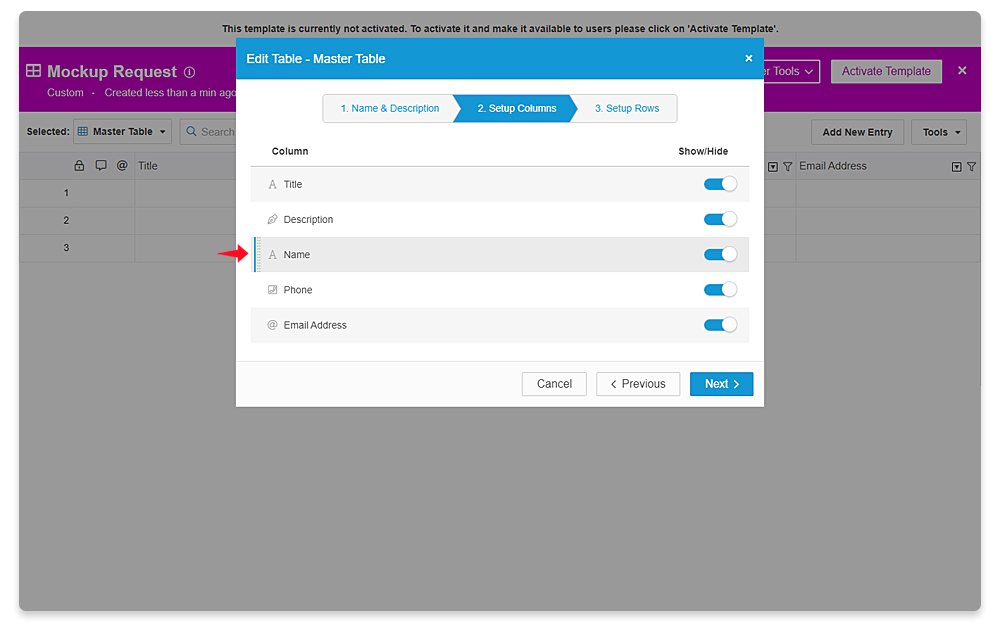
- Create template using the UI designer
- With this option use the template UI to add columns, set column types, column order and much more
- By default the template is created in draft state.
- Once you add the columns you need, the template can be published and made available to tracker creators to use.
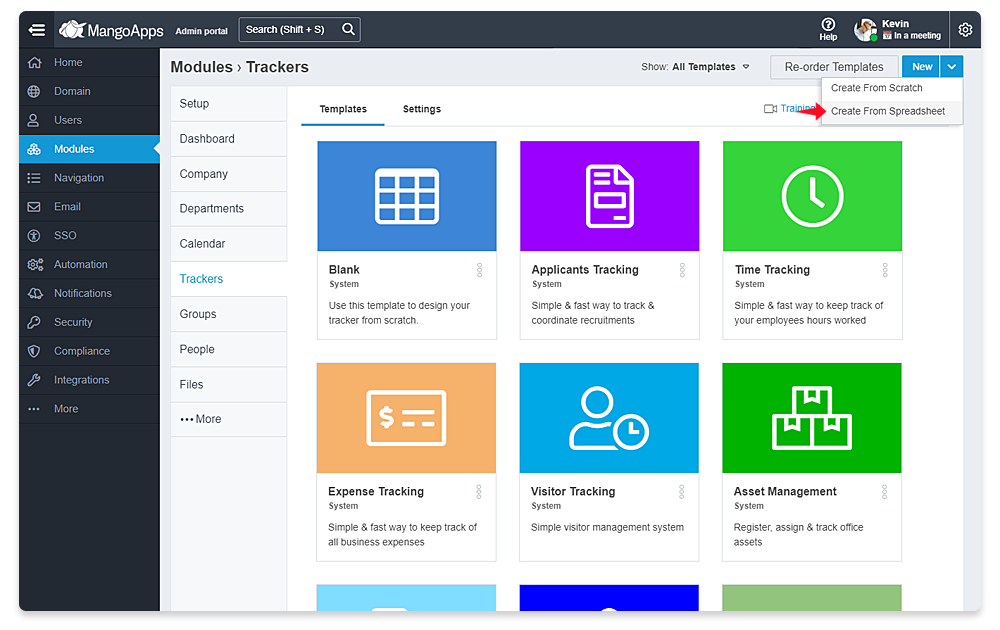
- Create template from a spreadsheet (excel, csv or ods file)
- With this option have named columns in the spreadsheet and then import the file to create the custom tracker template.
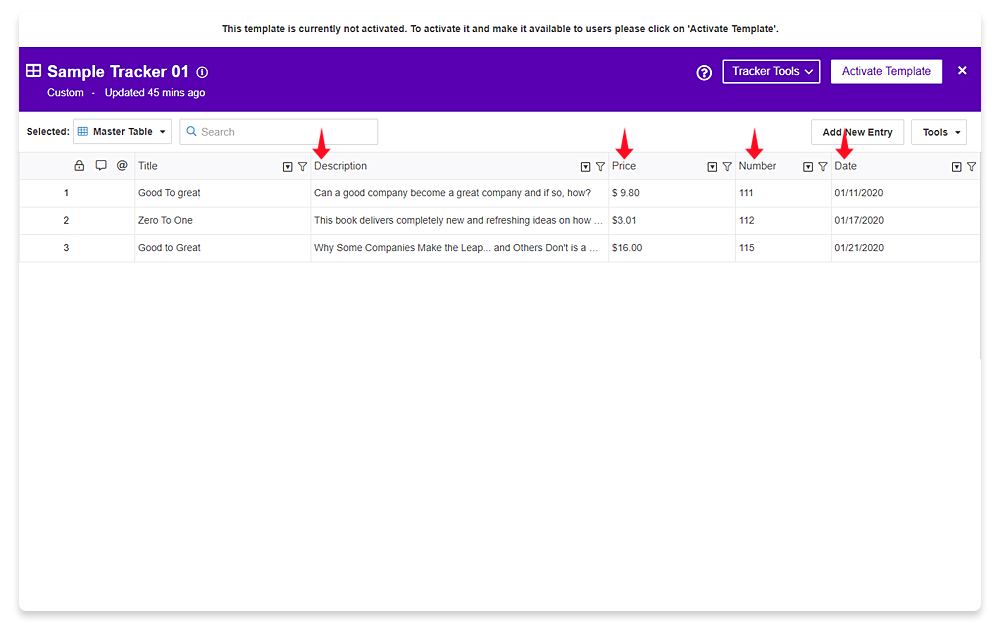
- Import from Microsoft Excel will do a best-effort mapping of the following excel column types to the corresponding MangoApps column type
- Date
- Currency
- Number
- Text
- A sample excel file is available to the domain admins on the admin UI to get started easily
- Create template using the UI designer
- Custom templates created from any of the above options can further be edited in MangoApps by domain admins
- Domain admins have the ability to re-order the templates as seen by the tracker creators


Trackers
- A tracker captures all the information you need to track and manage different kinds of data in your organization. It’s kind of like the traditional spreadsheet but with the power to
- Easily create multiple tables (which gives different filtered views of data),
- Create online forms (which allows to submit structured data),
- Share comments & mentions (which enables having a conversation on data in context) and much more
- Users who have permissions to create can create a new tracker from a
- System or Custom Template
- Microsoft excel, Google spreadsheet or a CSV file
- Users who have permissions to create can also clone an existing tracker to get started. Cloning a tracker gives a choice to
- Copy only the structure (columns, tables & forms) or
- Copy both the structure & data
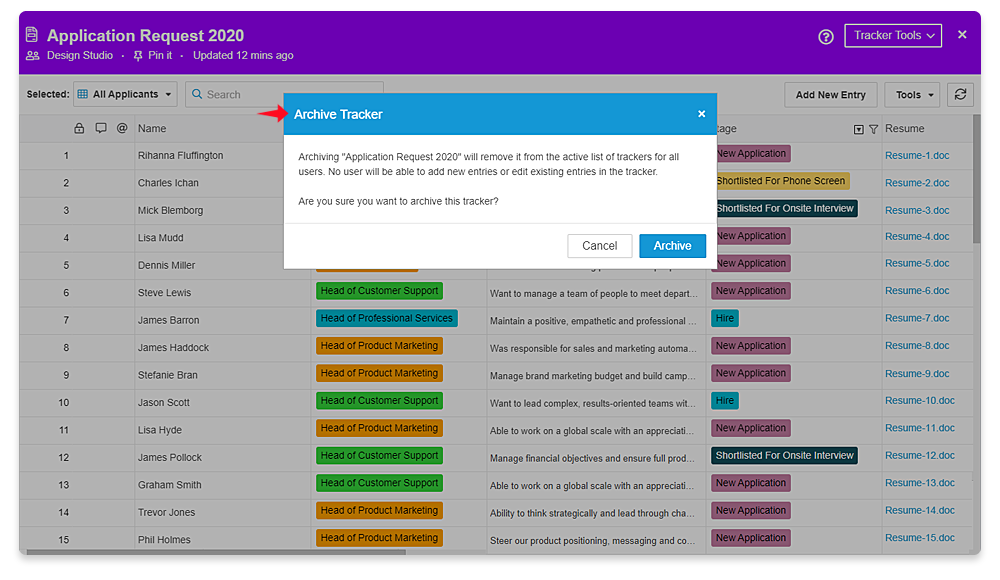
- Ability to move, archive or delete a tracker is available to the tracker creator and team admins
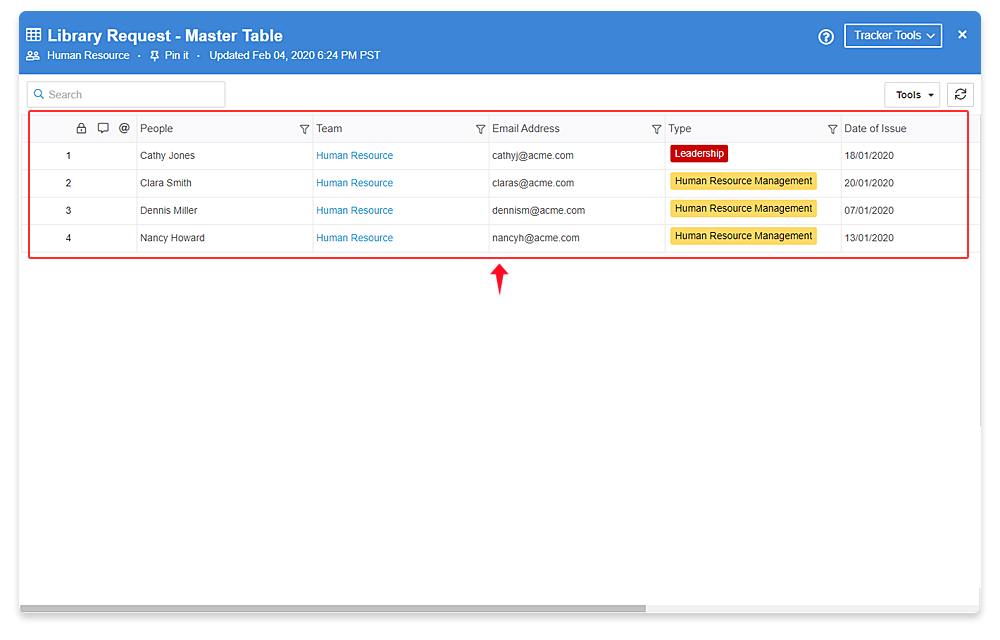
Tables
- In a traditional spreadsheet, every user sees the contents of your sheet in the same way. If you want to hide or freeze columns, for example, everyone else will be forced to see those changes as well. In MangoApps, however, you can create tables, which are set, specified ways of looking at your information. A table is just a different way of looking at the same underlying data in the tracker. This means that
- If you have a tracker of action items, you could create a table in the tracker which would show each team member only the action items assigned to them.
- If you have a tracker with many, many columns, you can create a table which will hide certain columns and make the table a little easier to navigate.
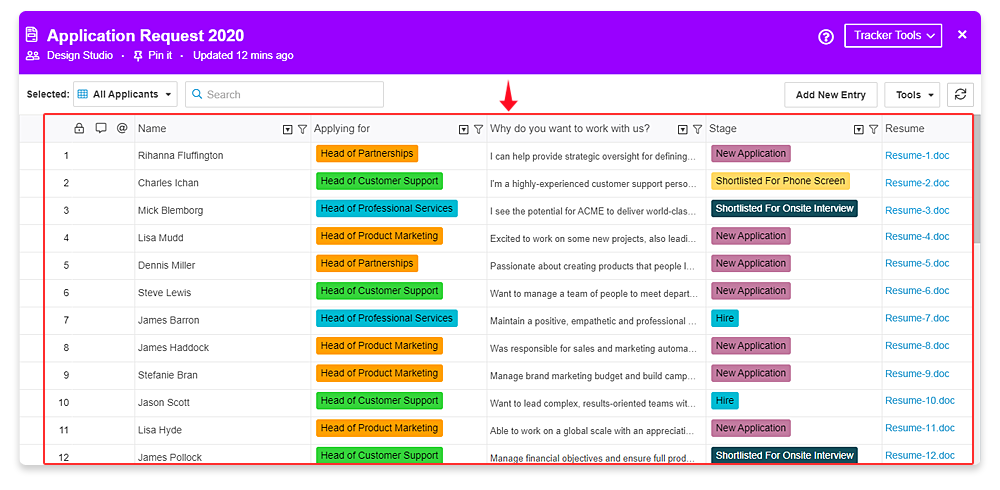
- In fact, whenever you’re looking at your data in a tracker, you’re always looking at your data through a table. Even if you’re looking at your data through the default “Main Table” that comes with every tracker, you’re still looking at your data through a table. It closely resembles a spreadsheet as the records and fields are organized into rows and columns, respectively.
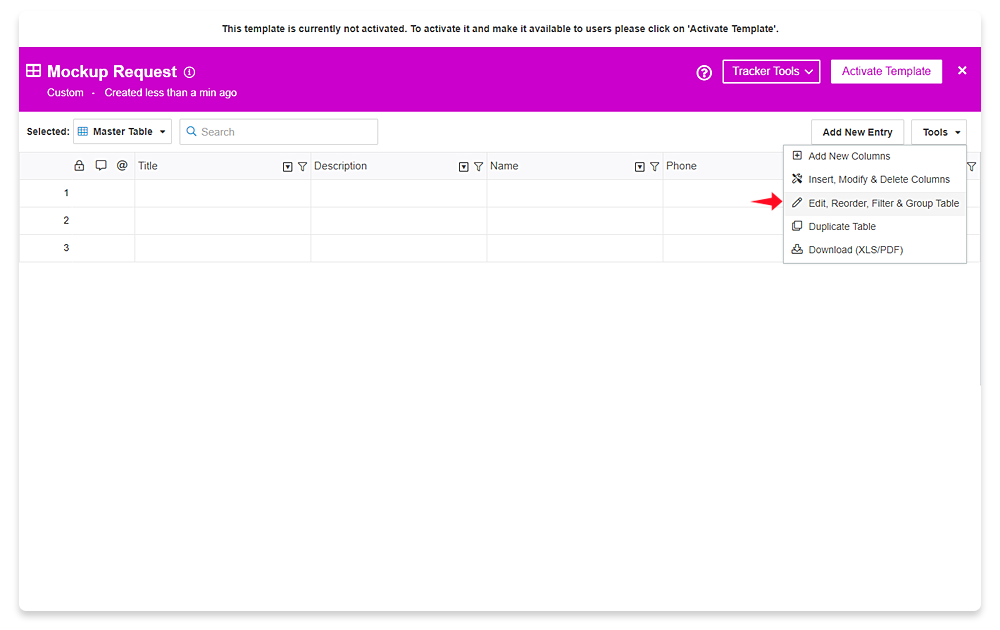
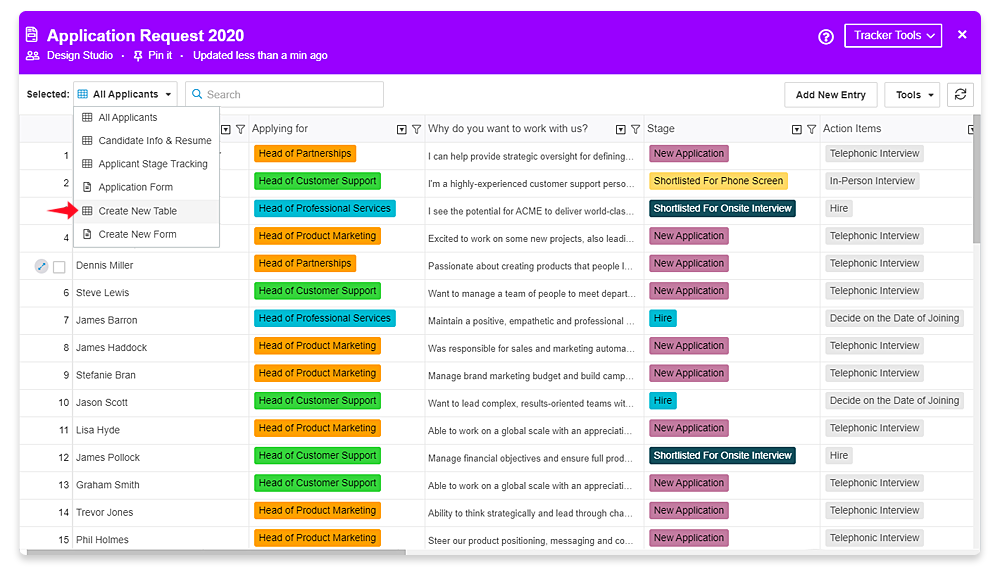
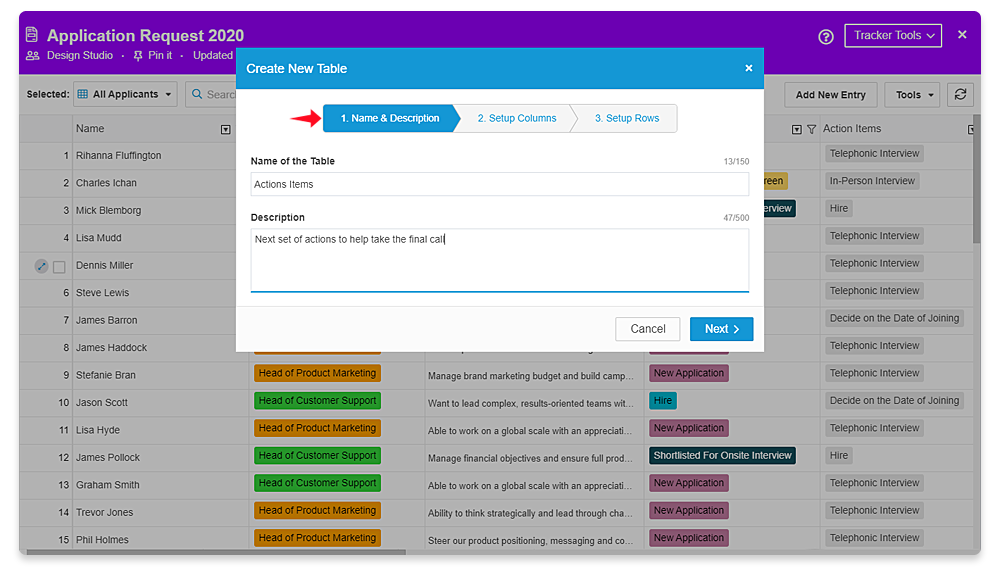
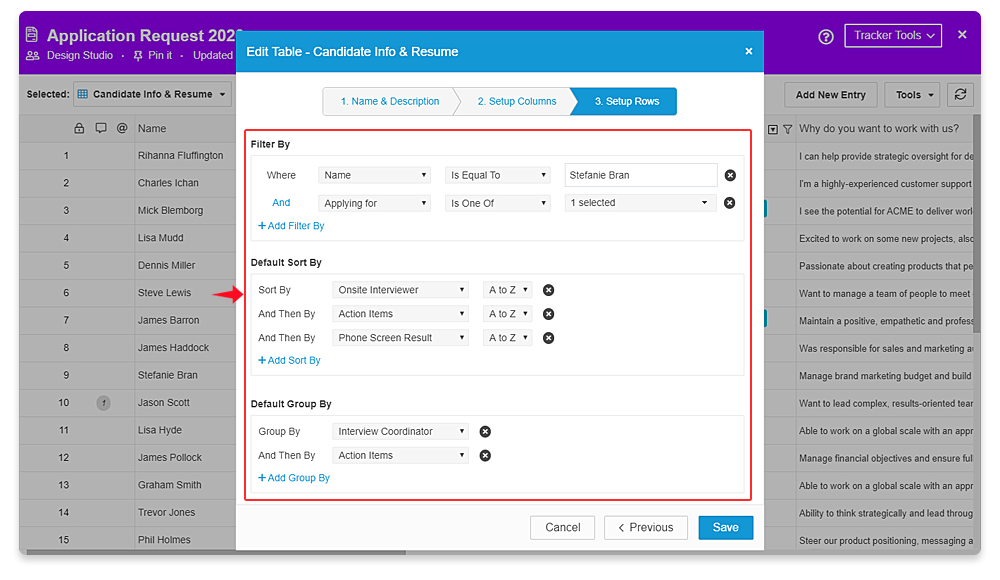
- Creating a new table allows you to specify the following attributes
- Which rows (entries) have been filtered
- Which fields (columns) are hidden or shown
- The sorting / order of the rows (entries) and fields (columns)
- The grouping of the rows (entries) by fields (columns)
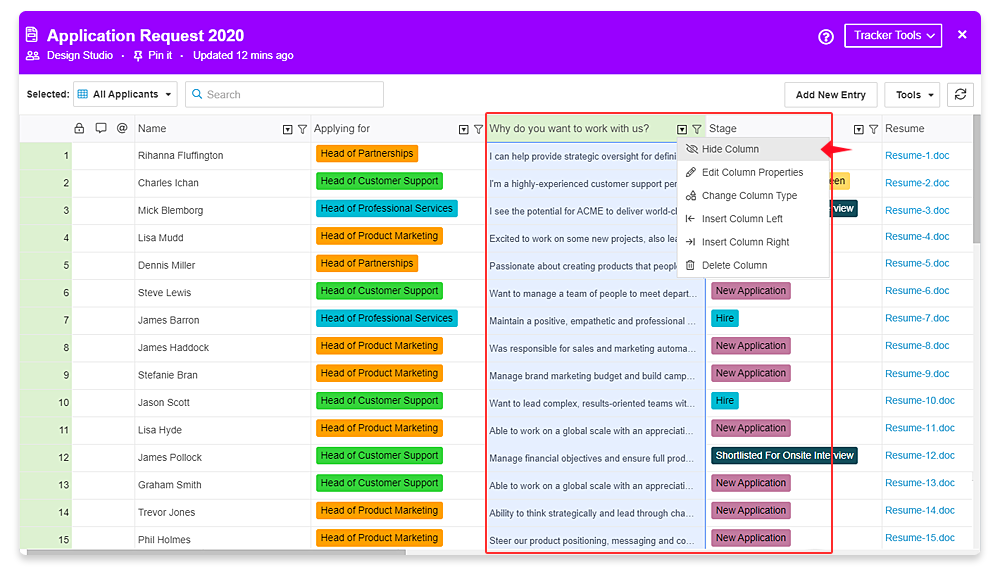
- Add, edit or delete of columns & column properties can be be performed on the ‘Master Table’ only and they will automatically get applied to all tables in the tracker
- Columns can be hidden from a specific table
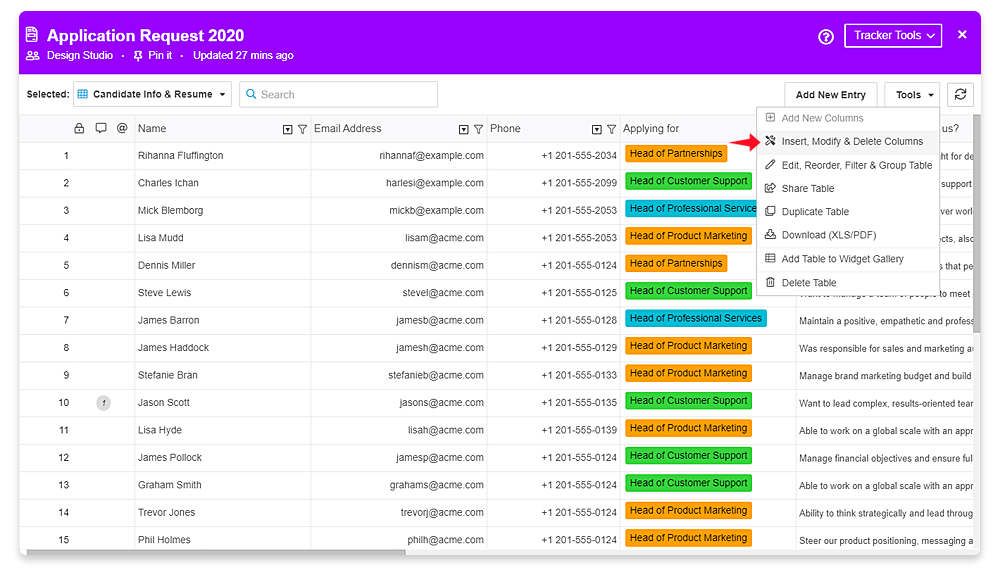
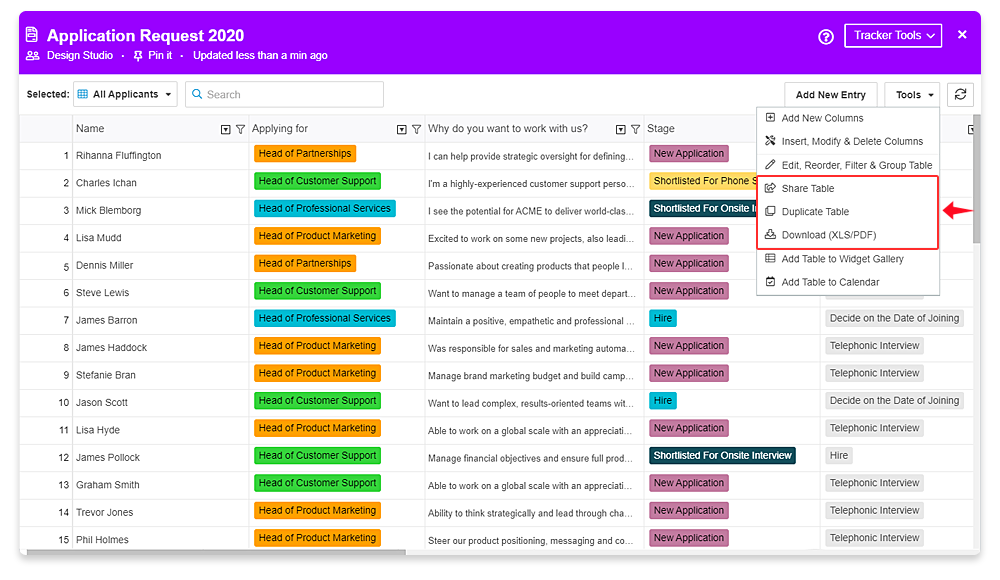
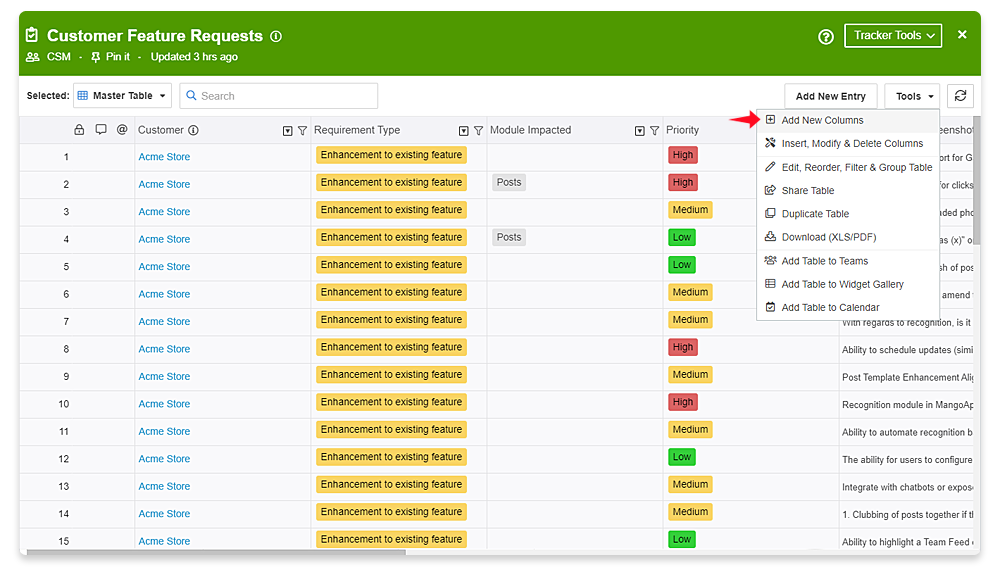
- Tables can be shared, duplicated and downloaded (xls/csv)
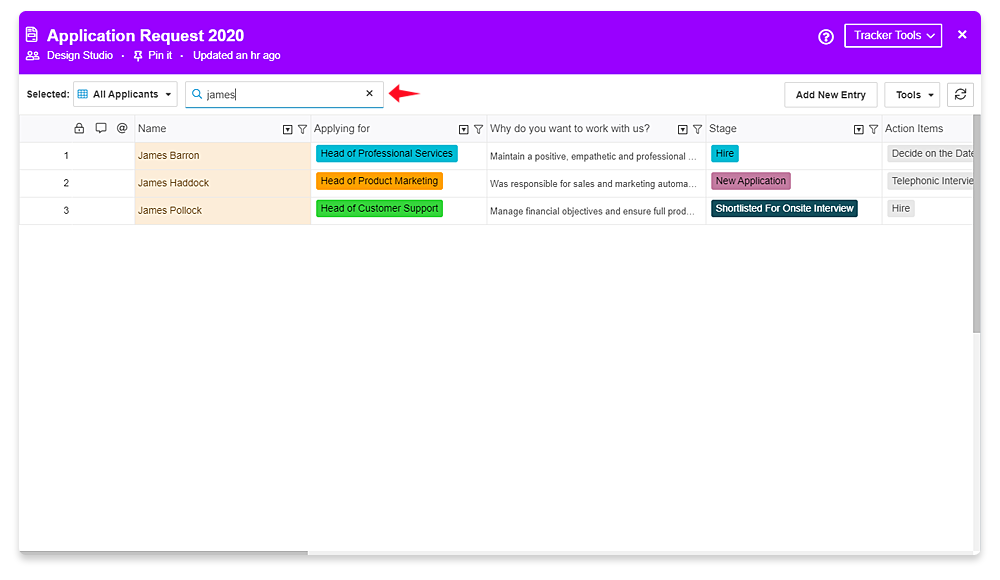
- Tables can be searched for records (entries) using the search bar
- Any number of tables can be created for a tracker


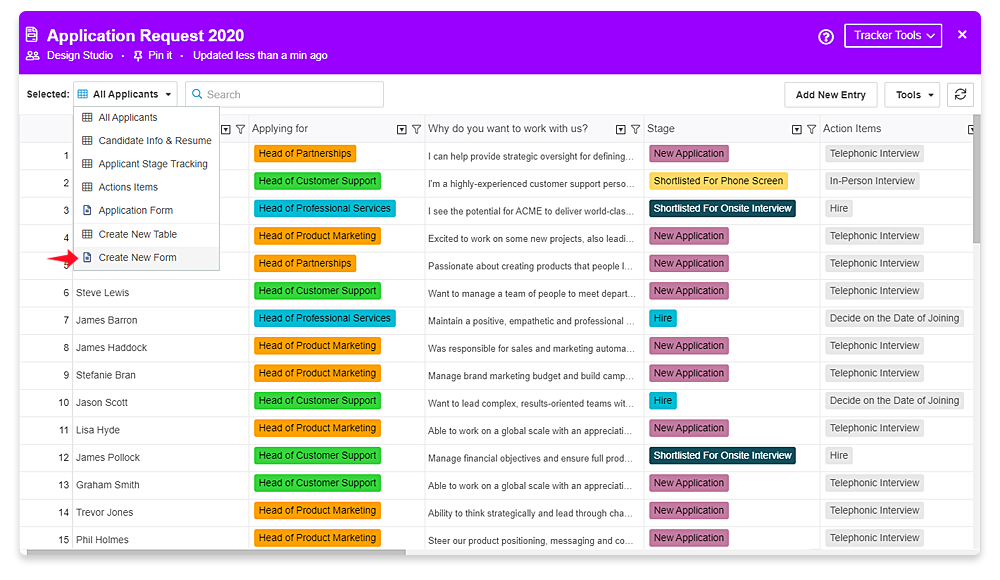
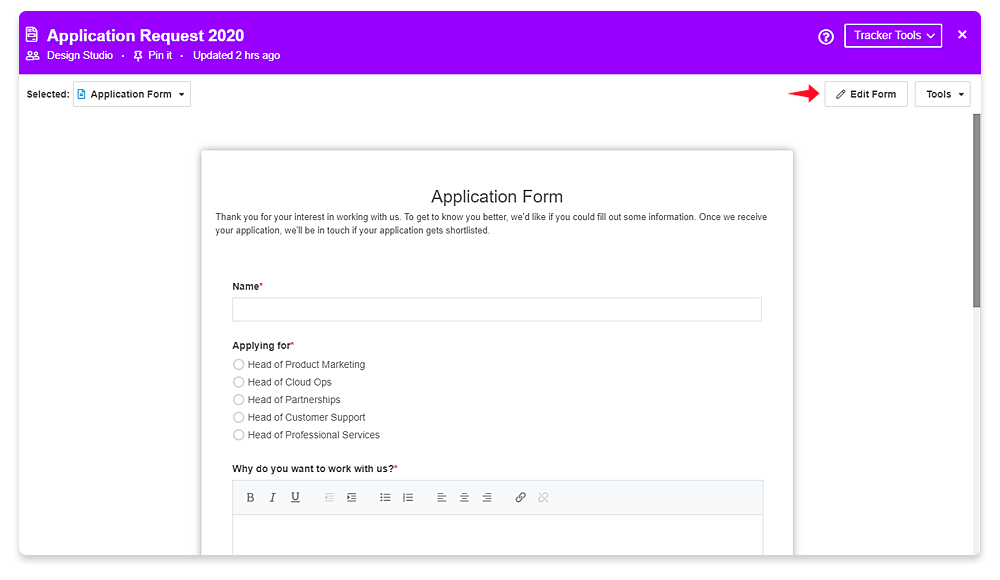
Forms
- Forms let you collect information from anyone and save it automatically to a tracker. They’re perfect for logging expenses, collecting customer information, tracking contracts, managing company assets and for many more use cases. MangoApps forms support file attachments and work beautifully on mobile devices as well.
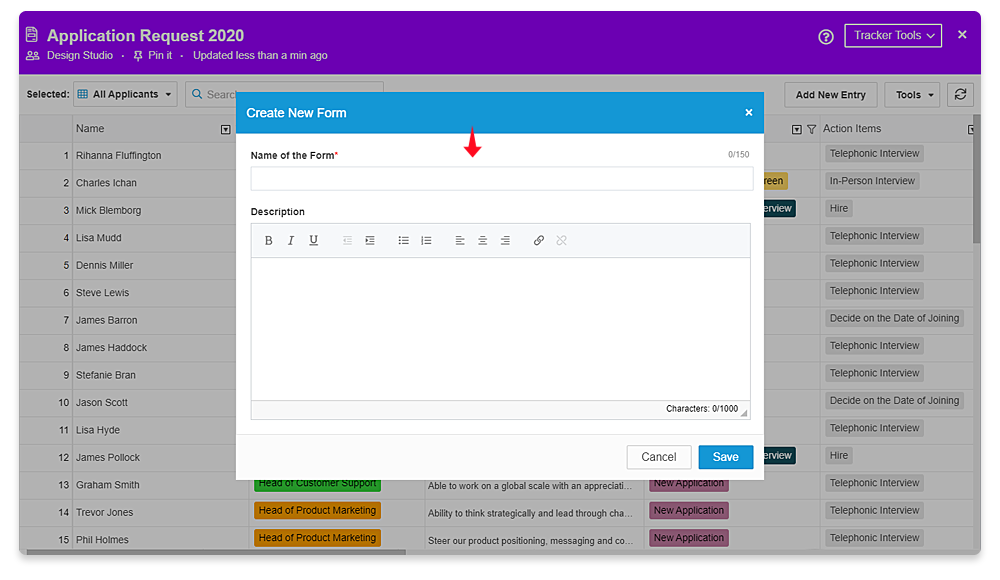
- Create a new form by just giving it a name & description and you have a form with the tracker fields ready to go
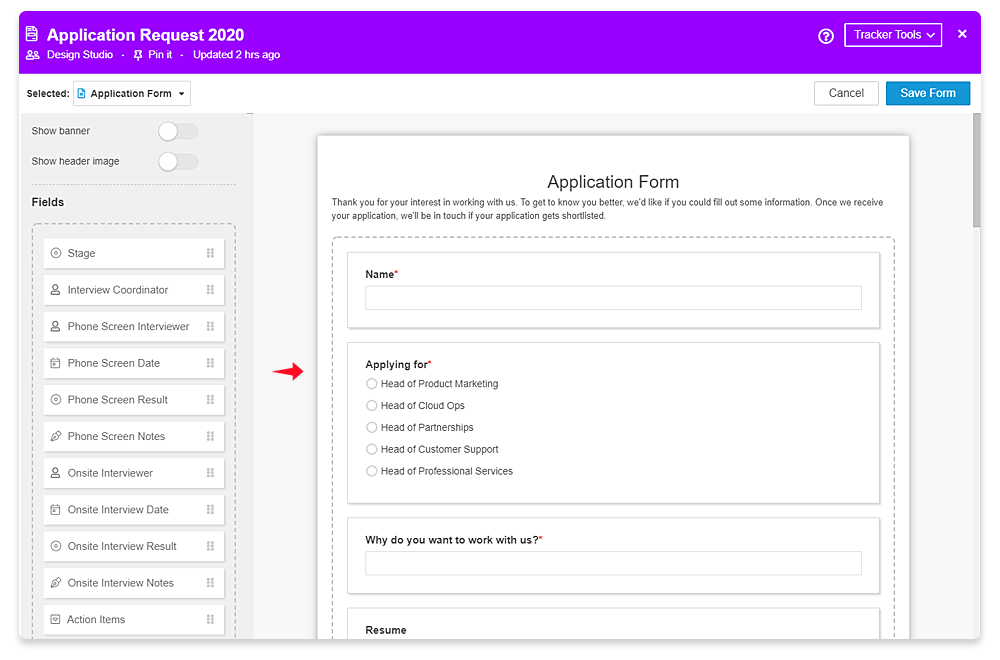
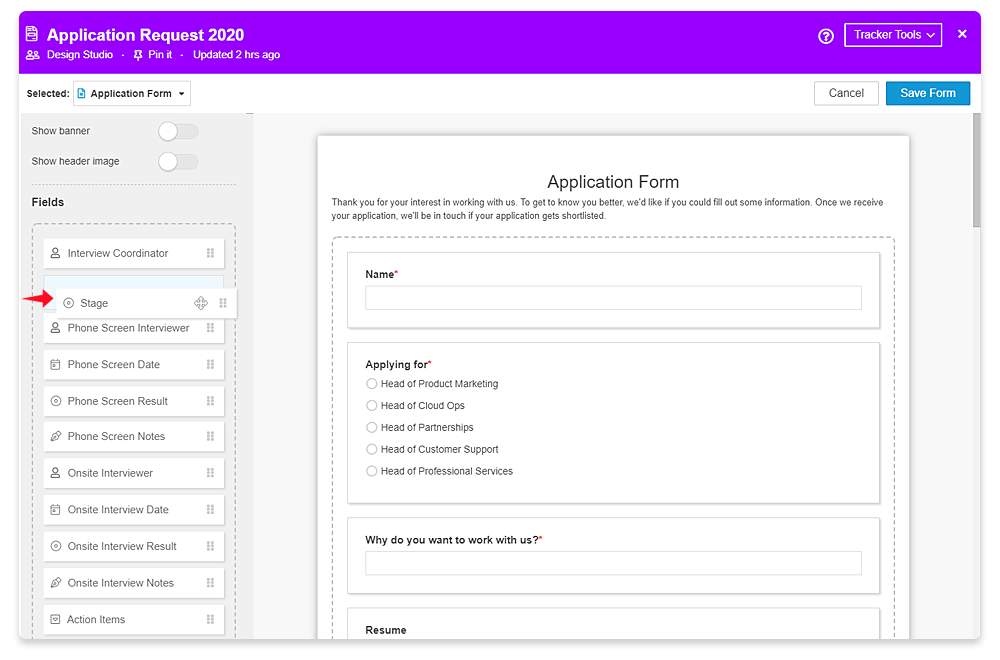
- Forms provide the ability to rearrange and remove fields
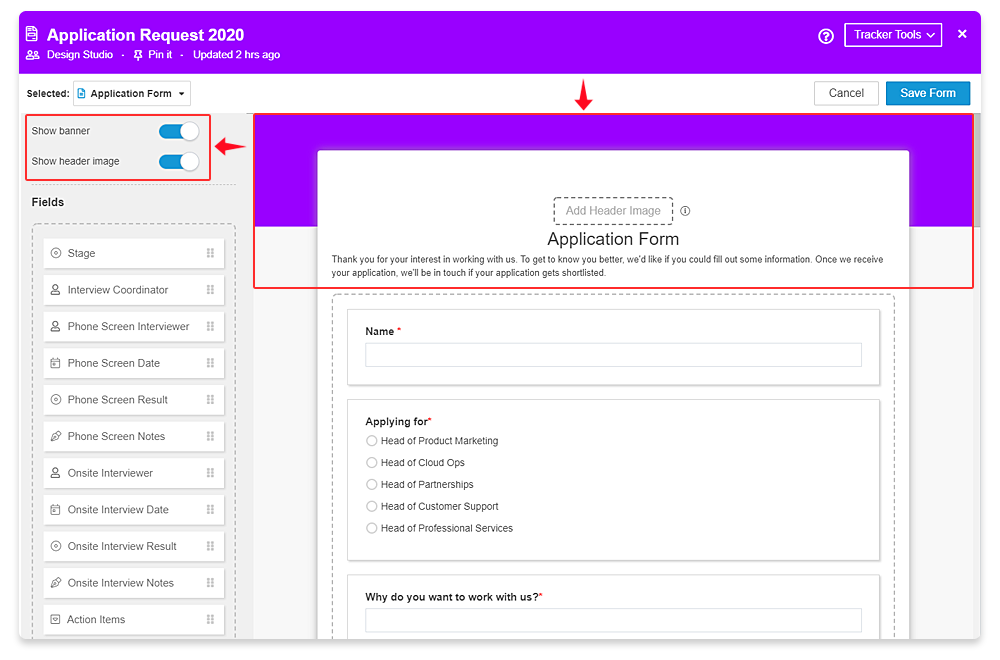
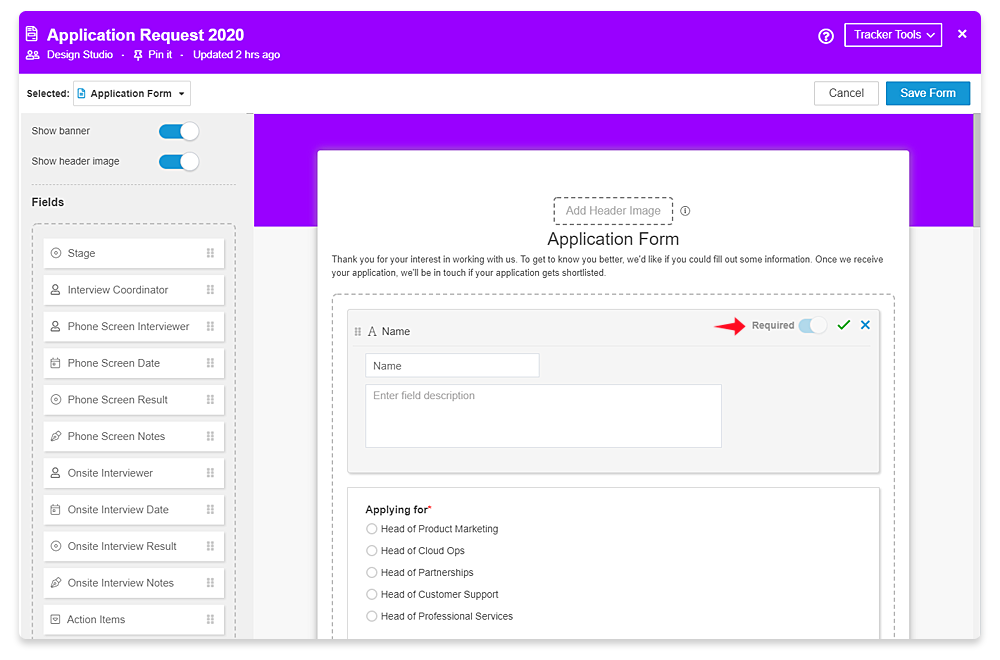
- Customize your forms with a colored banner, header image/logo and the form submission button
- Clicking on any of the fields in the form allows you to customize how a field displays on a form. You can edit the field’s name as it will appear on the form (without impacting the tracker behind it), add some help text, or make a field required in order for the form to be successfully submitted.
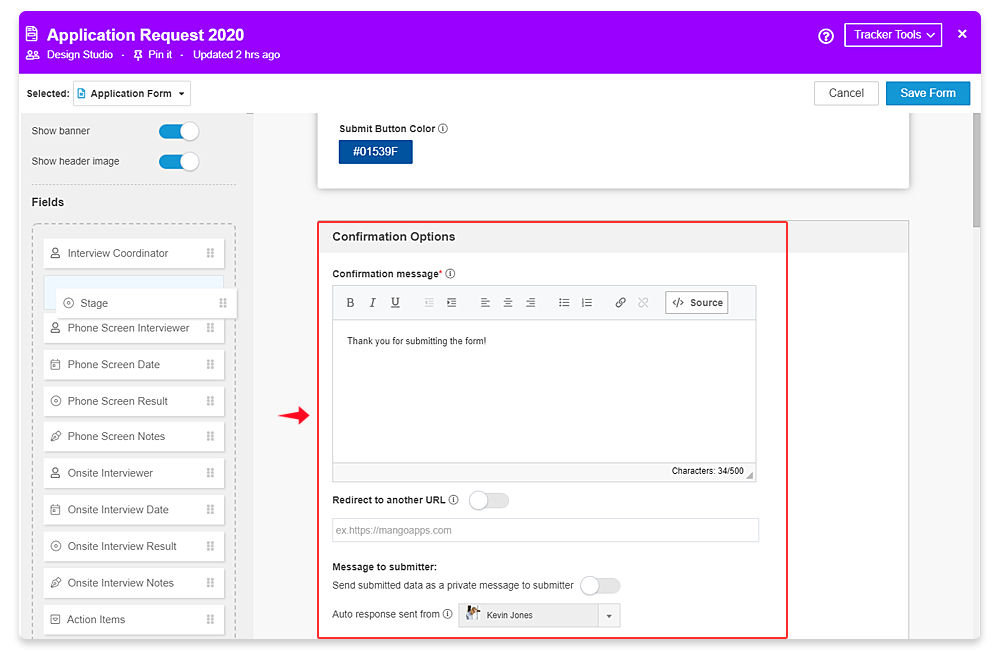
- Forms allow you to customize the following confirmation options
- Message the user sees on successfully submitting the form
- URL the user will be redirected to after submitting the form (optional)
- Private message back to the submitter with a record of the submitted form values (optional)
- Any number of forms can be created for a tracker

Row/Entry Actions
- Rows/Entries can be added to a tracker via one of these ways
- Use a form to add rows
- Use add new entry action in the tracker to add rows
- Import entries from a Microsoft excel, Google spreadsheet or CSV to add new rows
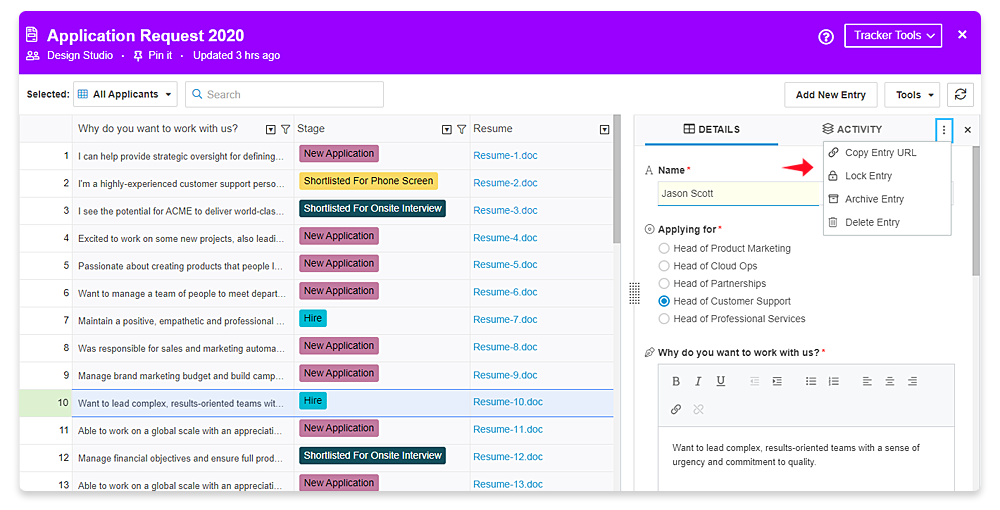
- Right click on a row/entry to get the following actions (depending on the permissions you have)
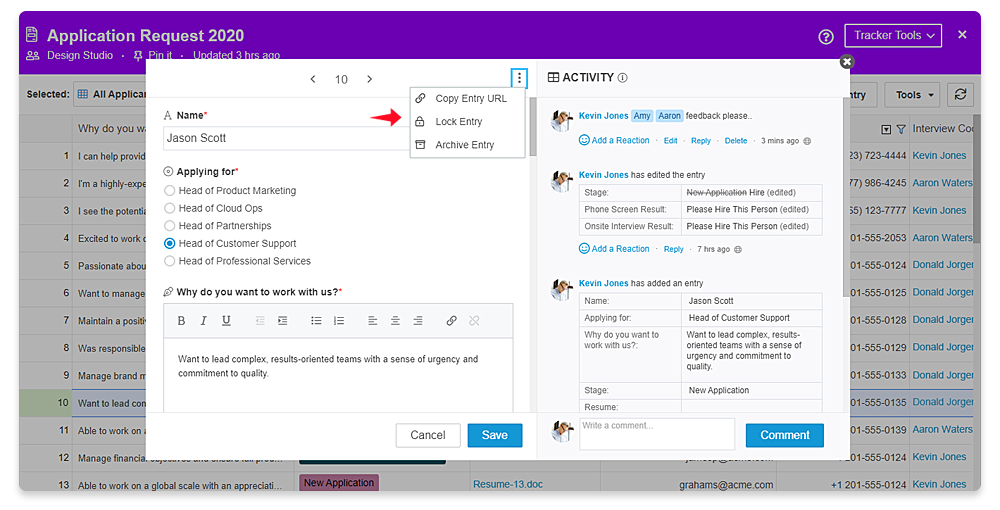
- Expand the entry – This will open the entry in a popup
- Copy entry URL – This will copy a unique URL to this entry
- Duplicate entry – This will duplicate and create a new entry
- Lock/Unlock entry – This will lock the entry and no further edits can be made to it. Unlock will reverse it and allows edits to be made to the entry
- Archive/Unarchive entry – This will hide the entry from all the tables and move it to the ‘Archived Entries’ table in the tracker. Unarchive will bring the entry back
- Delete entry – This will delete the entry permanently and it can’t be restored back
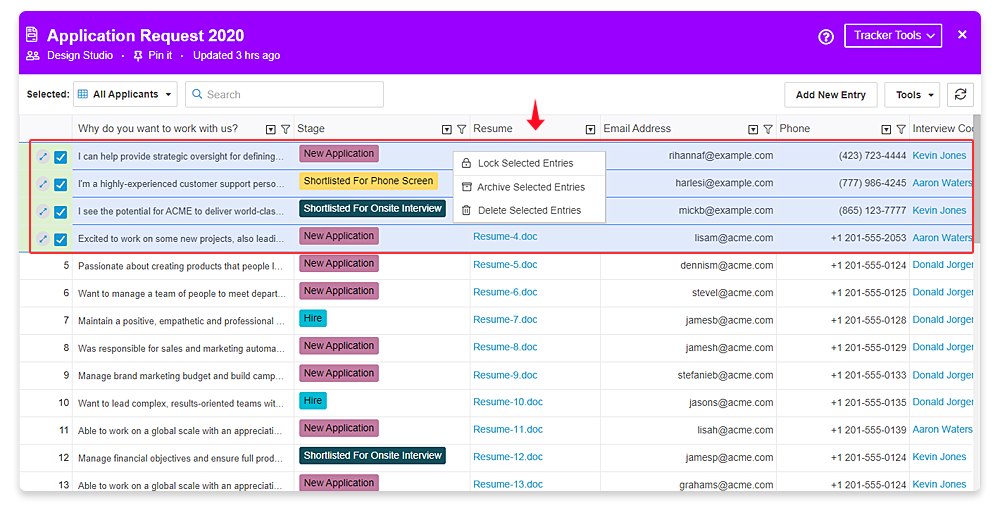
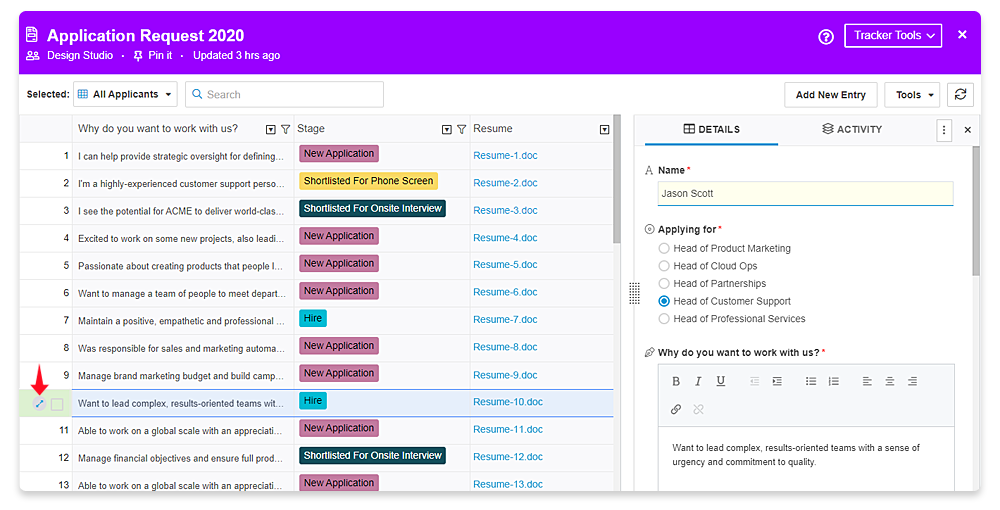
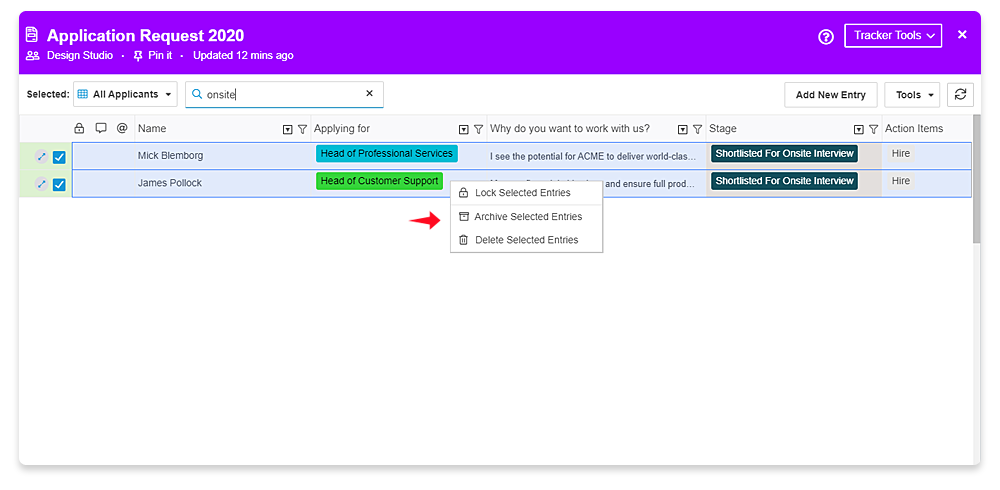
- Bulk actions on the rows/entries can be taken by selecting multiple entries using the checkbox in front of the entries. Based on your permissions you will get the following actions on right click
- Lock/Unlock selected entries – This will lock all the selected entries and no further edits can be made to them. Unlock selected entries will reverse it and allows edits to be made to them
- Archive/Unarchive selected entries – This will hide the selected entries from all the tables and move them to the ‘Archived Entries’ table in the tracker. Unarchive selected entries will bring them back
- Delete selected entries – This will delete the selected entries permanently and they can’t be restored back


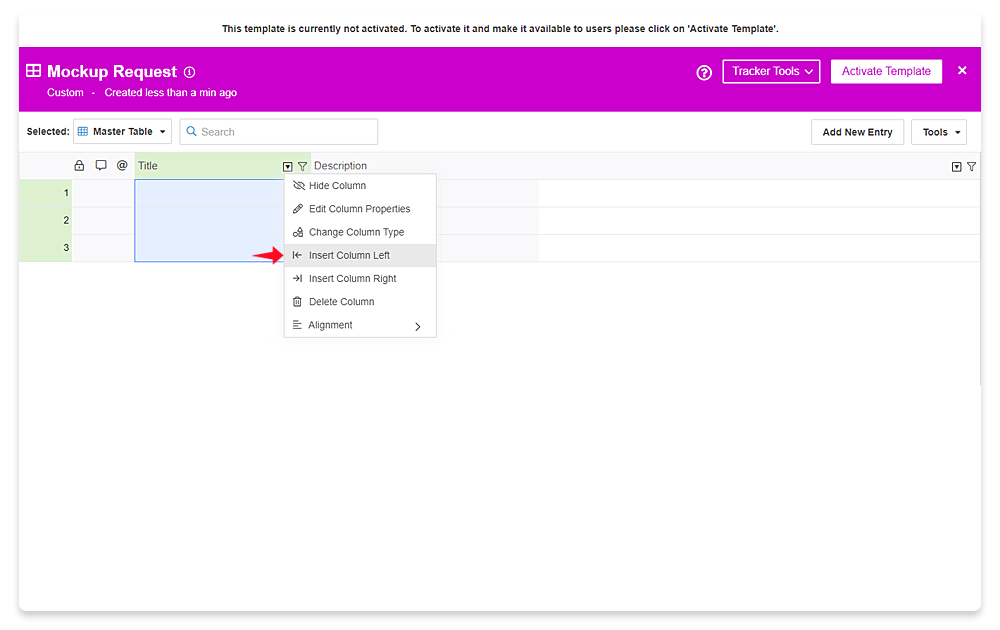
Column/Field Actions
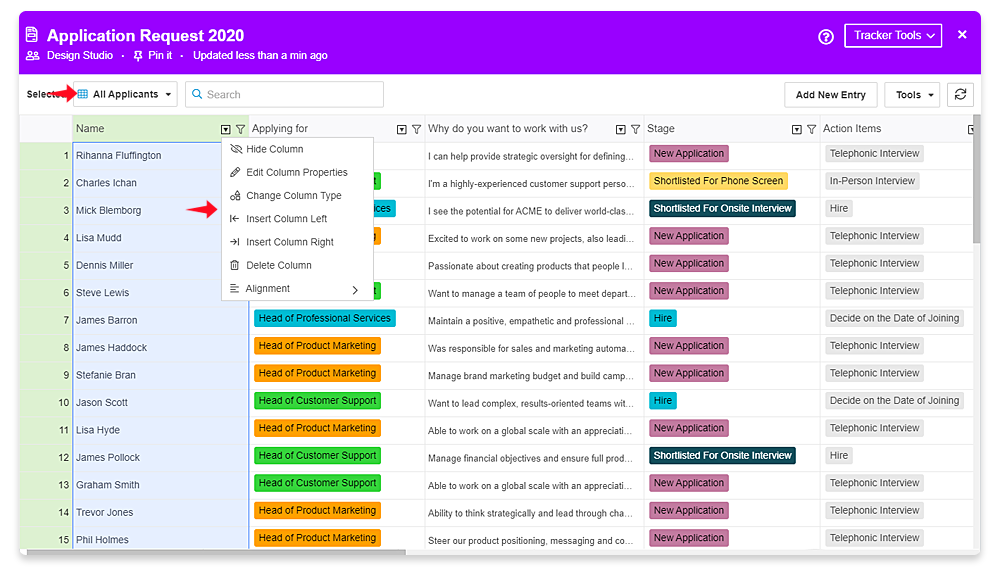
- Column/Fields can be added to a tracker using the ‘Insert column left’ or ‘Insert column right’ actions on any column in the ‘Master Table’
- Columns has a set of customizable properties. The properties can be customized from the ‘Master Table’ and will apply to all the tables & forms in the tracker. These properties are:
- Label & Description – The name & description of the column. The description will appear on hover of the info icon which appears next to the column label
- Min & Max values – The min and max values allowed in the column can be set. This property is valid for text, number, date and price column types only
- Default value – The value to automatically set if no value is entered when a row/entry is added
- Options/Behaviour
- Required – Column value can’t be empty
- Read only – Column value can only be set/edited by team admins
- Required & unique – Column value is required & the same value can’t be present in this column in another row
- Show column to
- All users – If the column is added to the table it will be visible to all the team members
- Team admins only – If the column is added to the table it will be visible to only the team admins
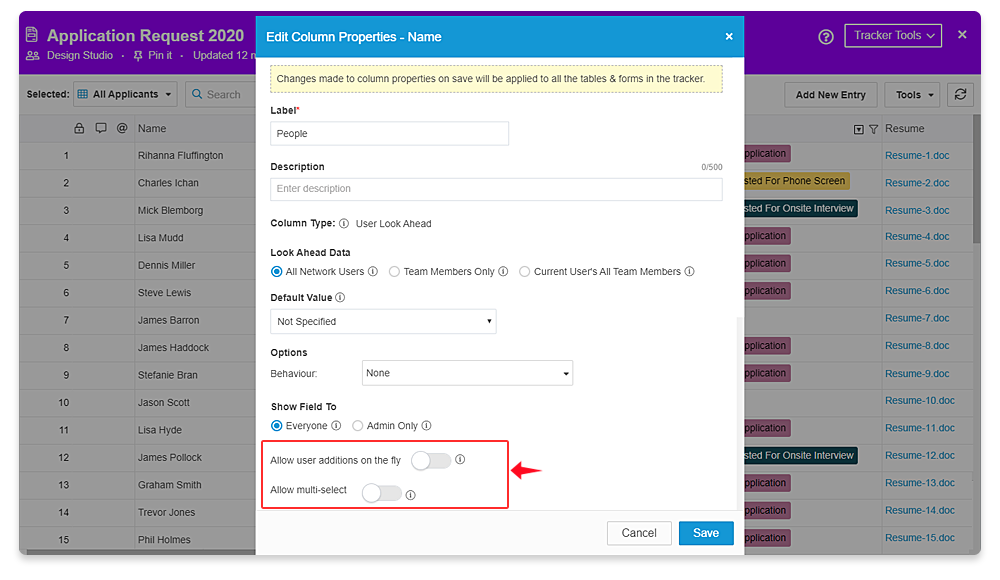
- Allow add on the fly
- Enabling this will allow the users to enter a value that is not in the pre-defined list of choices
- This property is valid for dropdown & user look ahead column types only
- Allow multi-select
- Enabling this will allow the users to select multiple values in this column
- This property is valid for user look ahead & tracker lookup column types only
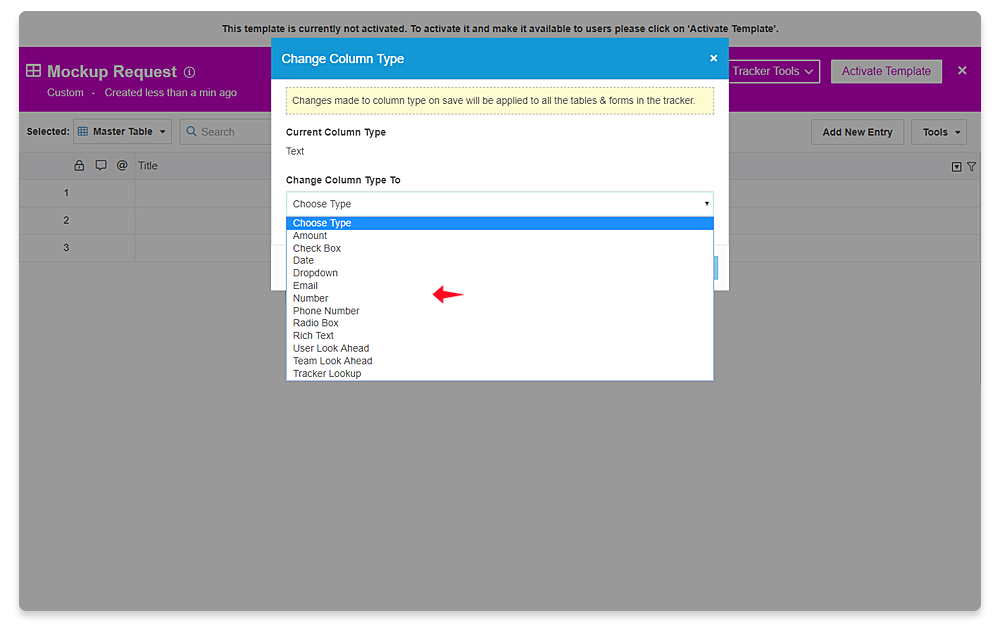
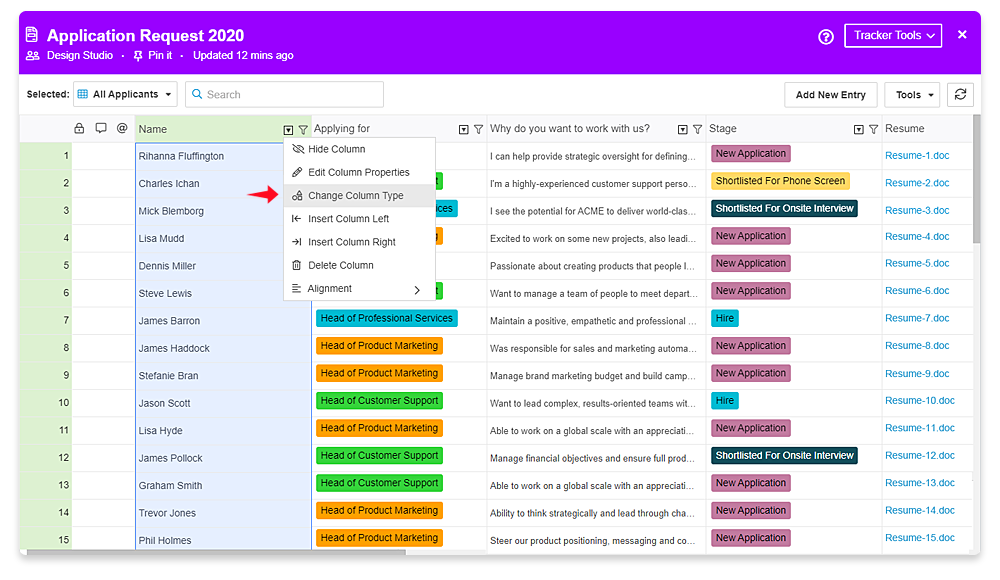
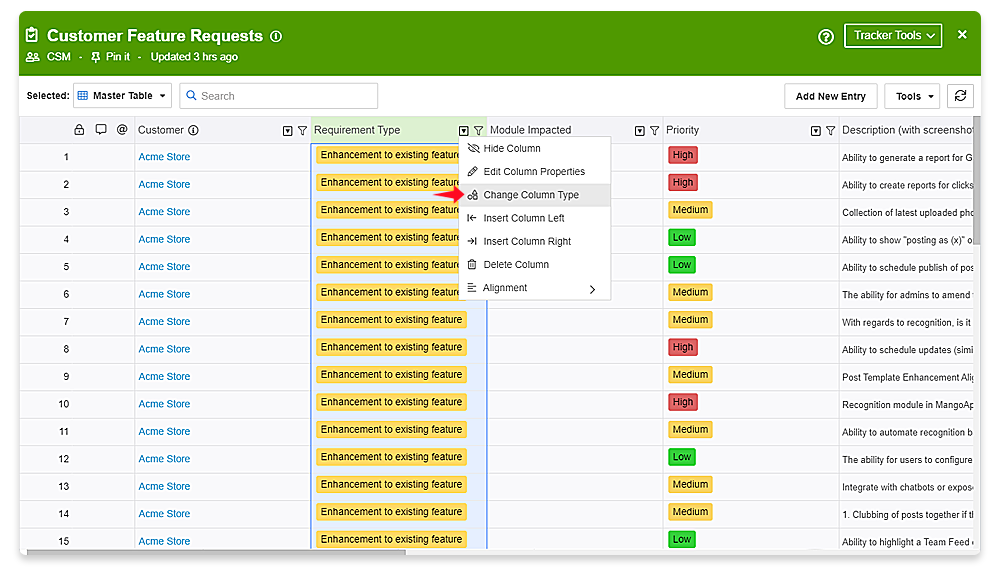
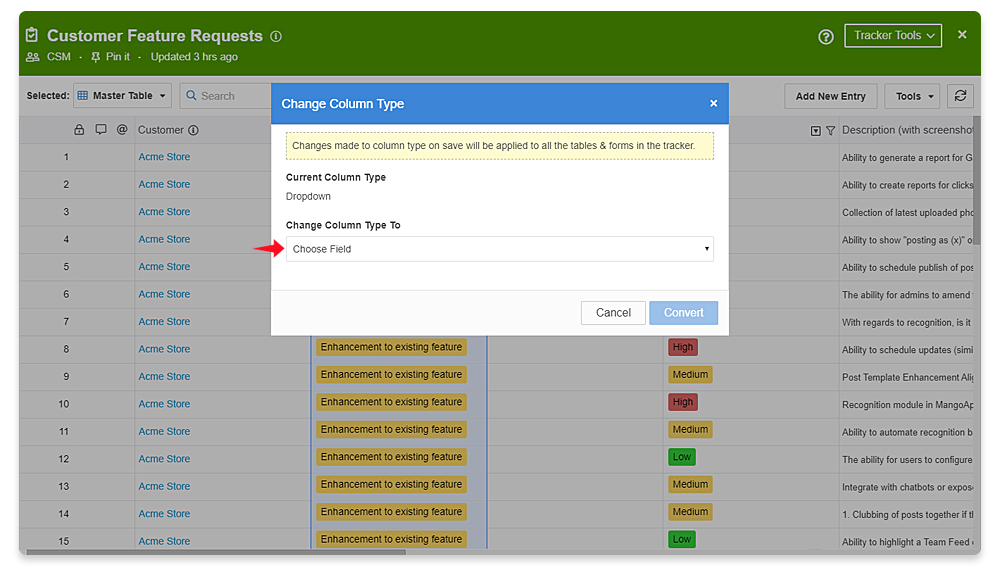
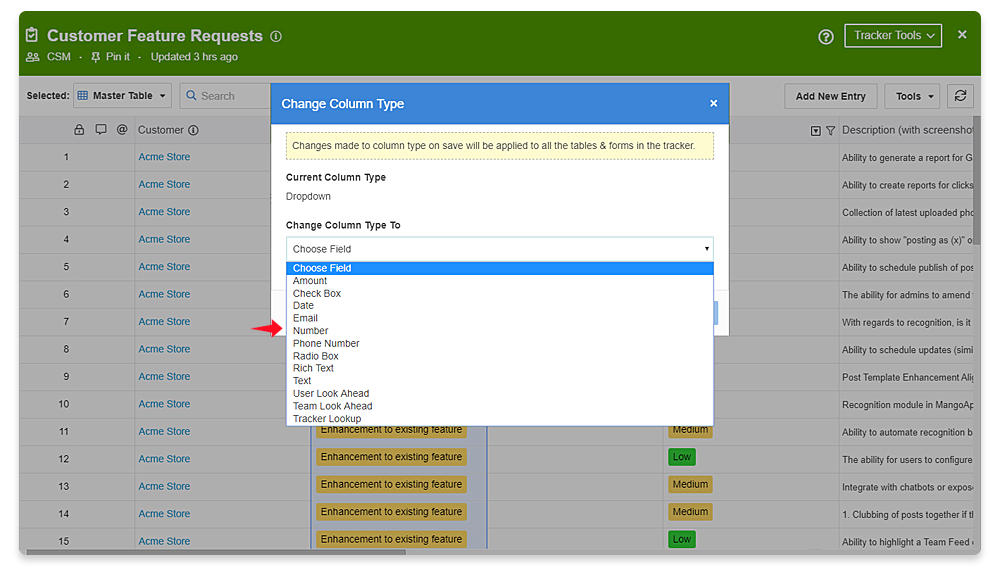
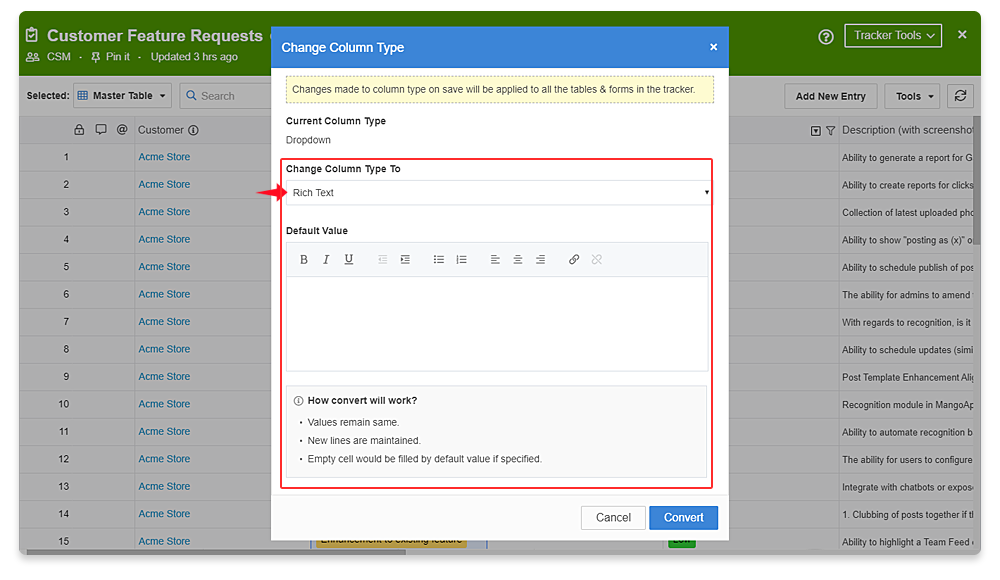
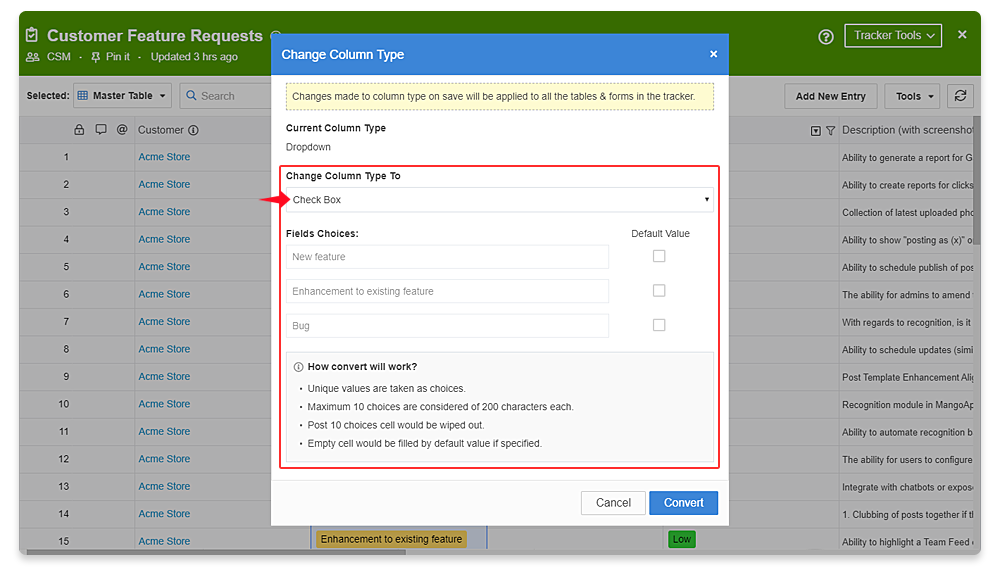
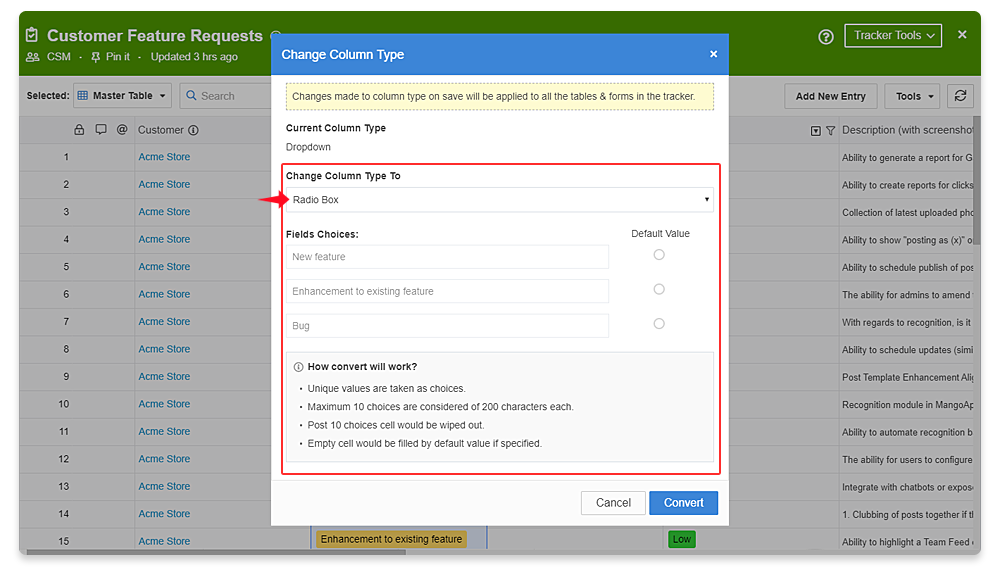
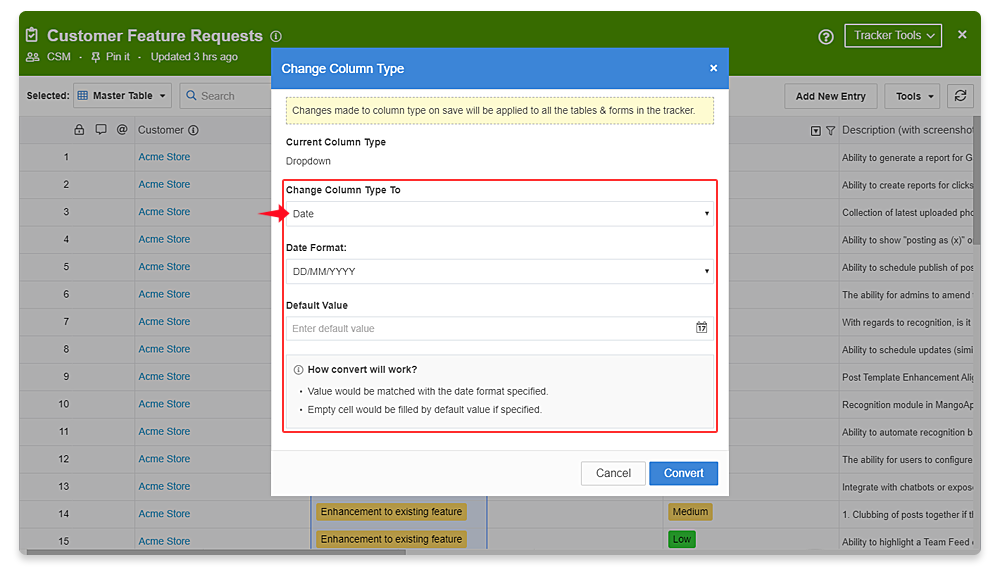
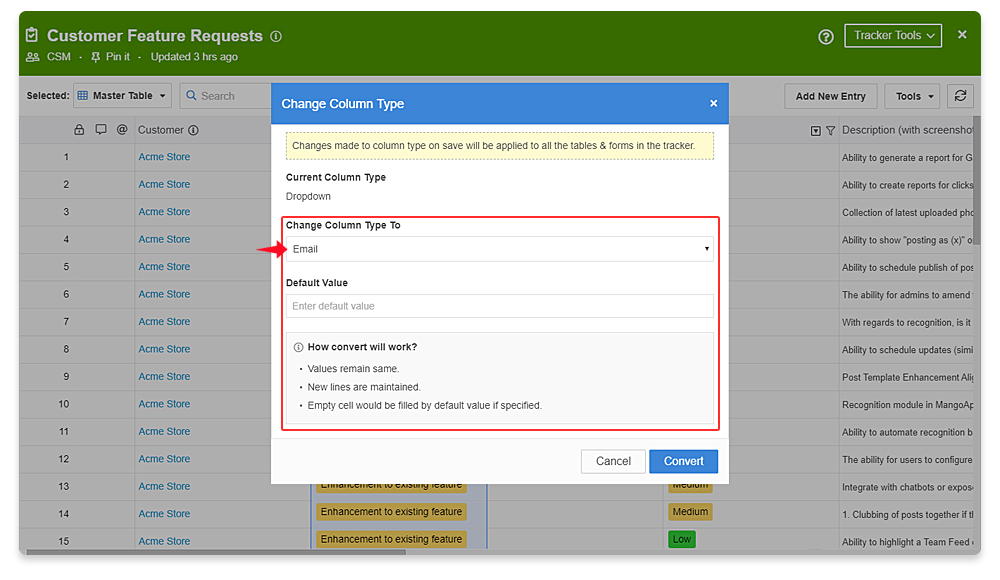
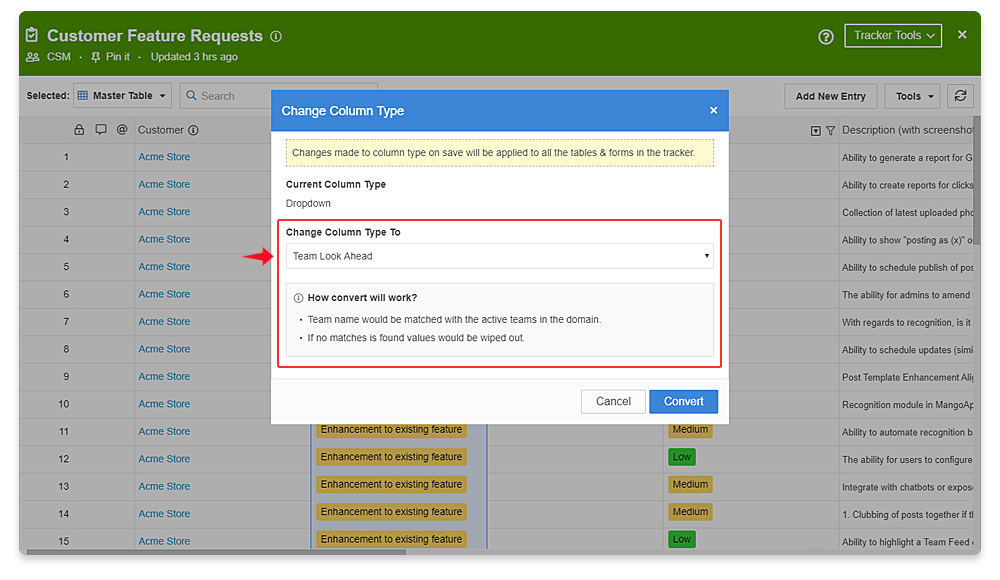
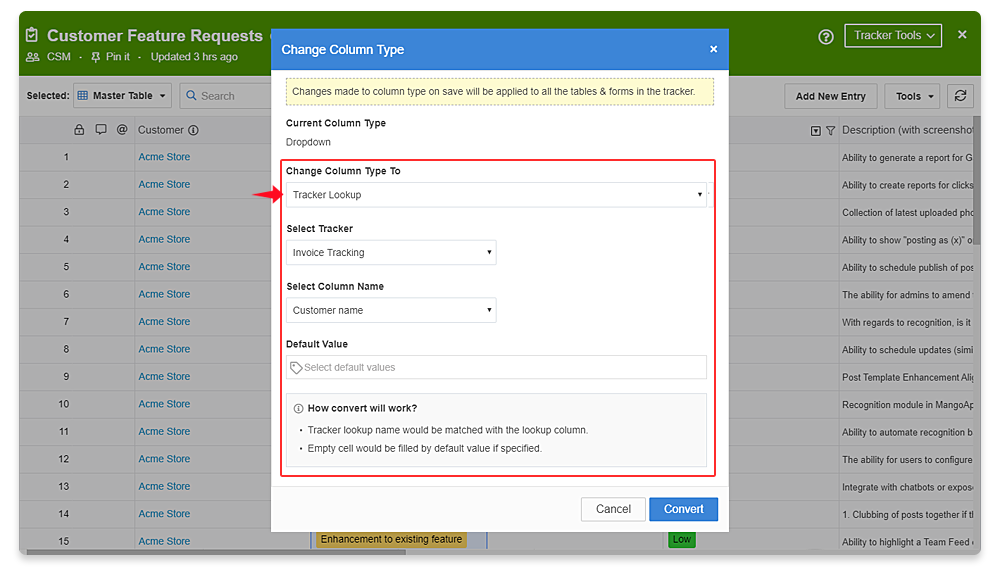
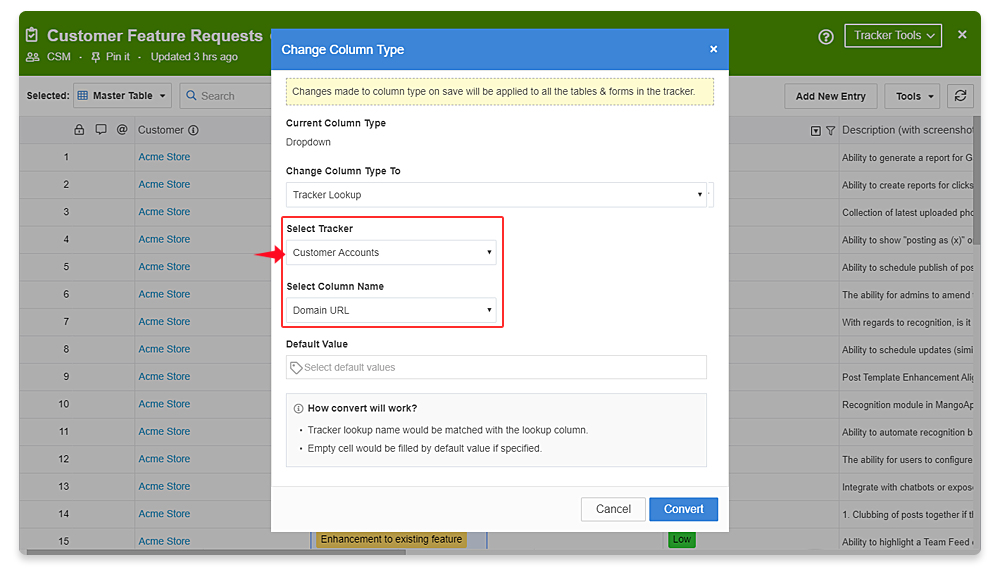
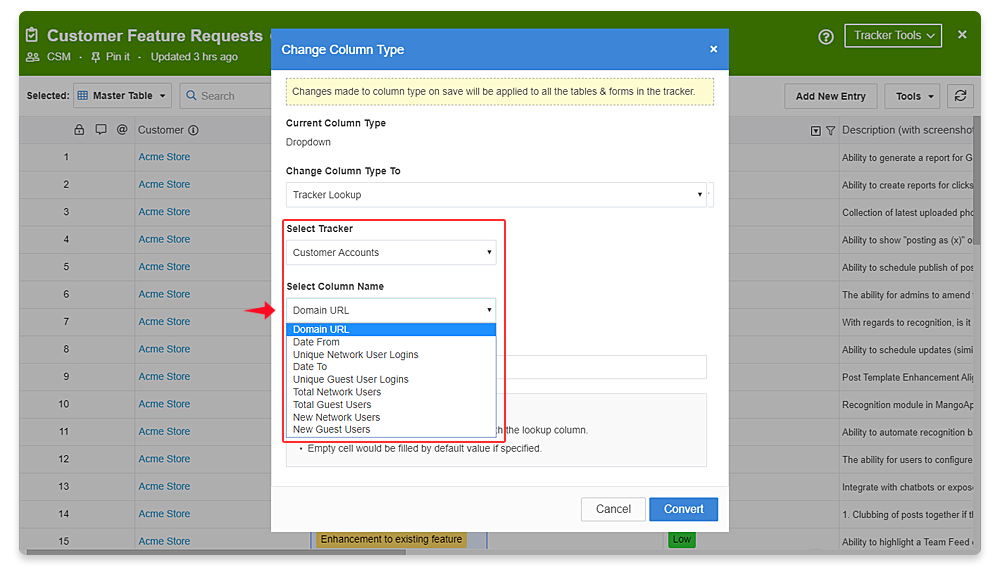
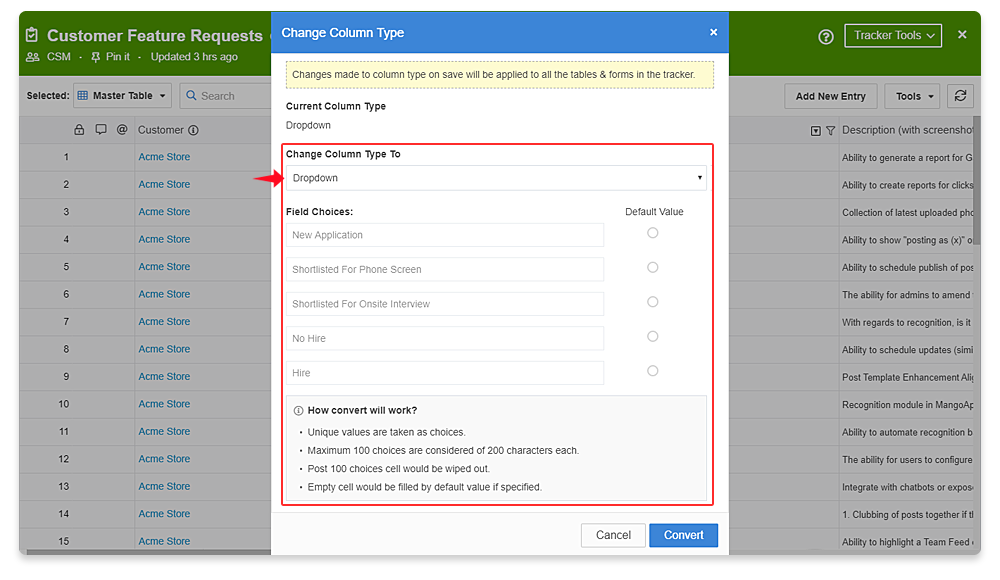
- Changing the column type
- View the current column type and change it to another type.
- If you change a column with existing cell values into a new column type, MangoApps does its best to convert those existing cell values to the new type. For example, you can convert a text column into a dropdown column with single choice or a date column if the cell value has a valid date format. However, note that some conversions are not possible with certain types. For example, converting a text column to an attachment column is not allowed.
- This column type change can be made from the ‘Master Table’ view only and will apply to all the tables & forms in the tracker.
- Deleting a column
- This will remove the column & the column data permanently from the tracker (all the tables & forms)
- Column can be deleted from the ‘Master Table’ view only and it will be removed from all tables & forms in the tracker
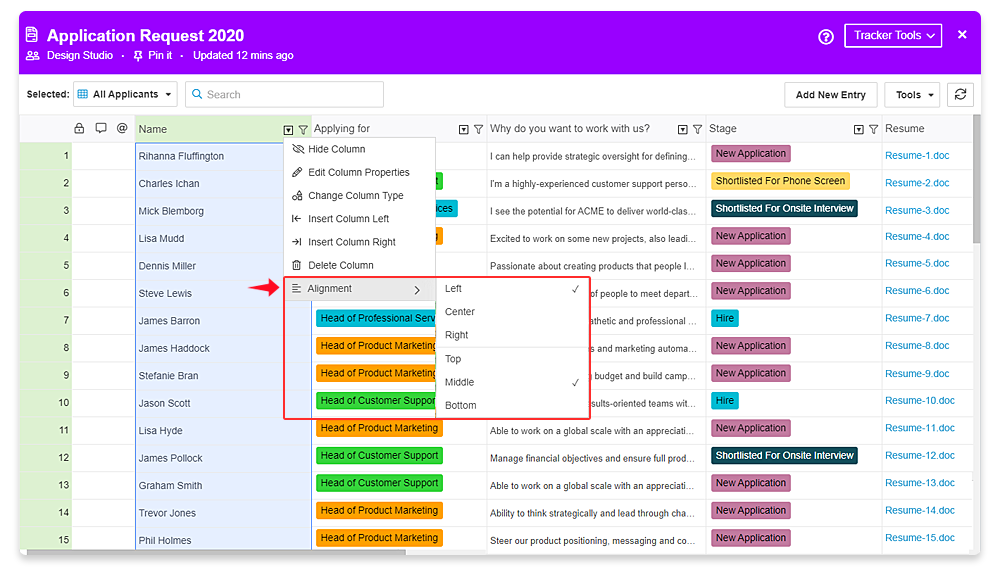
- Alignment of cell values in the column
- This allows you to specify the alignment (left/center/right and top/middle/bottom) of the cell values
- Alignment can be set from the ‘Master Table’ view only and will apply to all the tables in the tracker
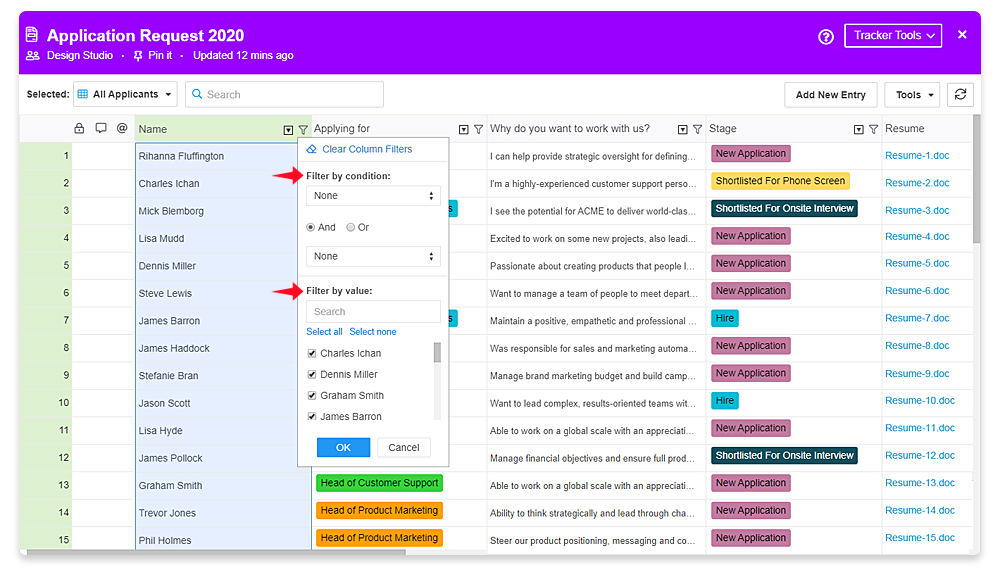
- Filtering on columns
- All users can filter the entries using the filter icon on each column
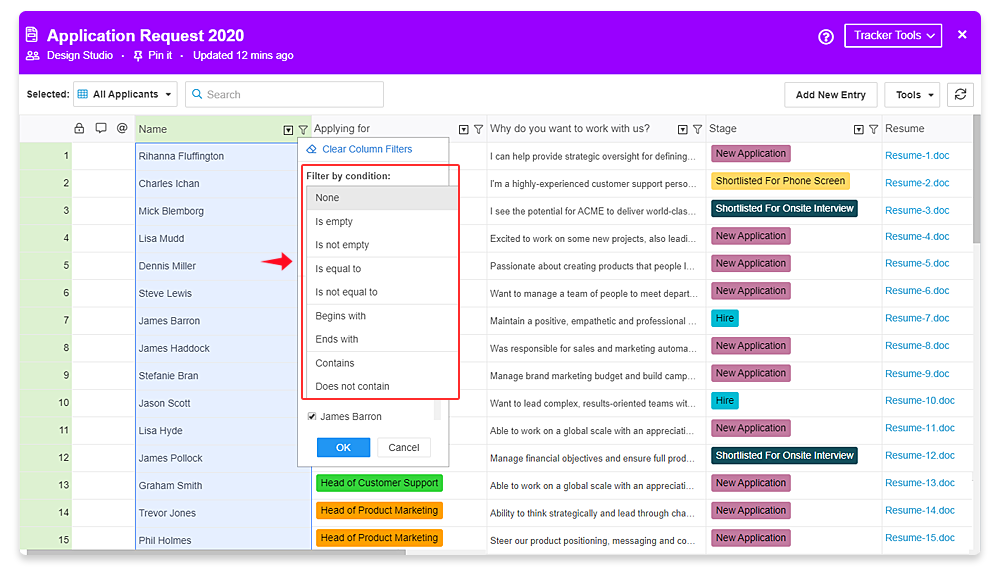
- Two types of filters are supported
- Filter by condition: Use a range of pre-defined conditions to view the matching entries in the selected table
- Filter by value: Select specific cell values to view the matching entries in the selected table
- Filtered entries are hidden from the user until the user either clears the column filter or refreshes the table
- Filters can be set on multiple column also
- The filter set is only for the current user and will not impact other users
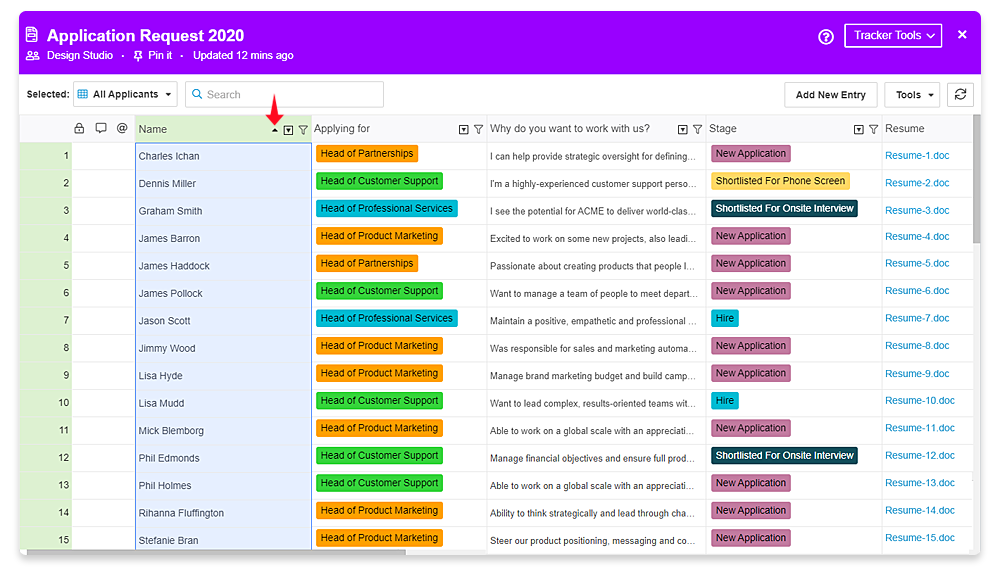
- Sorting on columns
- All users can sort the entries by clicking on the column label
- Entries are sorted until the user either clears the column sort or refreshes the table
- The sort set is only for the current user and will not impact other users
- All column actions listed above (except for ‘Filter on columns’ and ‘Sort on columns’) requires the user to be creator of the tracker or the team admin


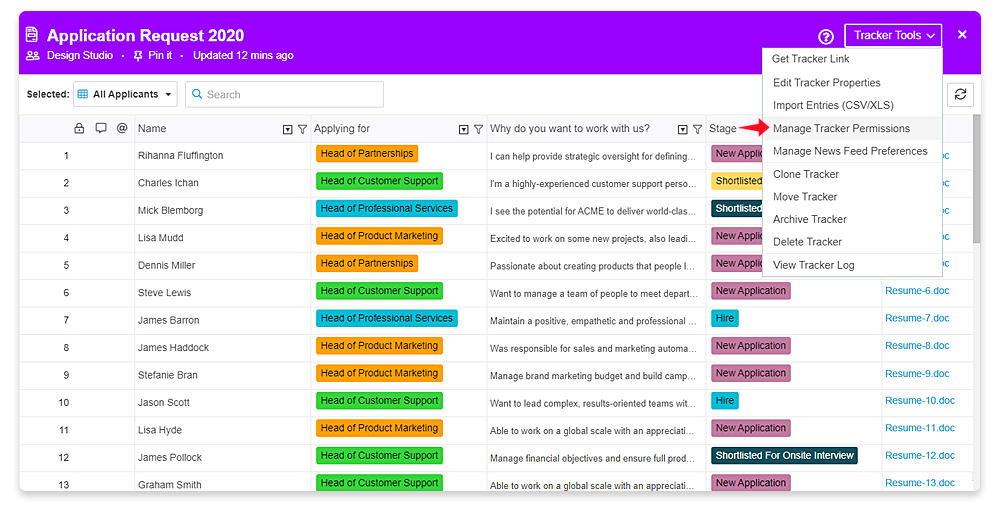
Tracker Permissions
- Team members based on their role can be given specific permissions that determine what they can and cannot edit in the tracker. Permissions are an important part of healthy team and with the right permissions, you can ensure that only certain people are permitted to change the information in your tracker.
- Permission users have on a tracker can be different than the permission on another tracker in the team.
- In a project, group or department the following permissions by role are supported
- Creator
- User who creates the tracker has full access on all tracker actions
- There can be only one user with creator permission
- Creator can grant permissions to team members on the tracker
- Creator permission can’t be transferred at this time
- Team Admin
- All team admins have full access on all tracker actions
- There can be multiple team admins in a team
- Team admins can grant permissions to team members on the tracker
- Team admin permission can be given / removed from a team member
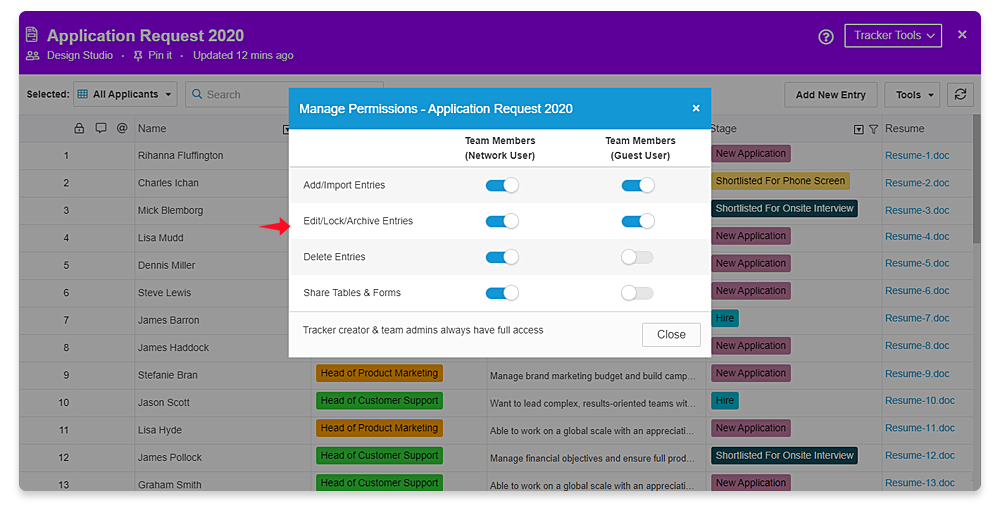
- Team Member who is a Network User
- By default can add or import entries in the tracker
- By default can edit, lock and archive any entry in the tracker
- By default can delete any entry in the tracker
- By default can share table & share form with non team members
- Tracker creator/ team admins can give or revoke the above 4 permissions from all team members who are network users
- Team Member who is a Guest User
- By default can add or import entries in the tracker
- By default can edit, lock and archive any entry in the tracker
- By default cannot delete any entry in the tracker
- By default cannot share table & share form with non team members
- Tracker creator/team admins can give or revoke the above 4 permissions from all team members who are guest users
- Non Team Members
- By default in a private or unlisted project, group or department, non team members have no access to the tracker
- By default in a public project, group or department non members have a view only access to the master table only
- Refer the “Sharing” section below for how to give non-members permissions to specific tables & forms
- Creator

Sharing
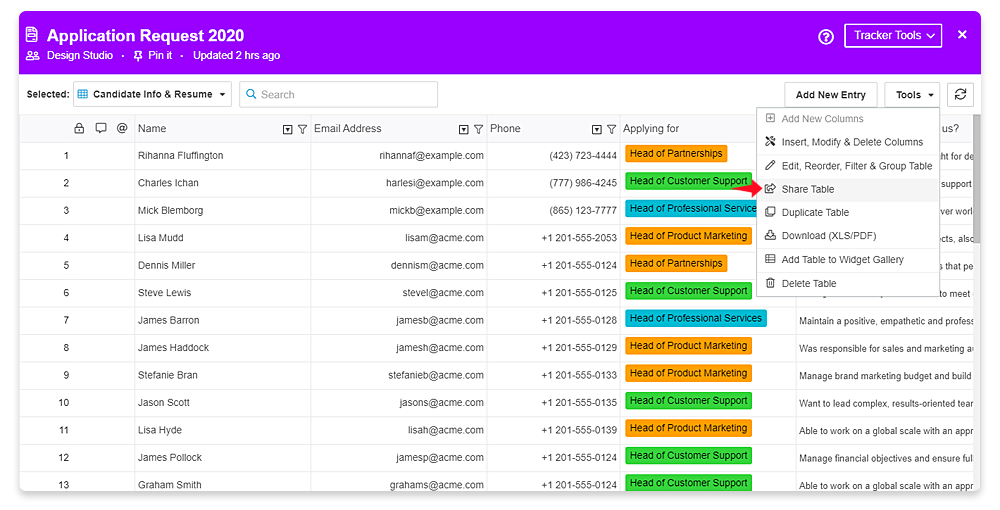
- You can create a share link to just a specific table or form within a tracker—as opposed to the entire tracker. You can create a share link even for the master table
- Share links are a great way to give access to a specific table to non members of the team because they will not see the entries and columns that are hidden in the shared table.
- In the event that you change cell values, add entries or columns, or otherwise change which columns and entries are visible in the table, the link will automatically update in real time to show the most up-to-date version of the table.
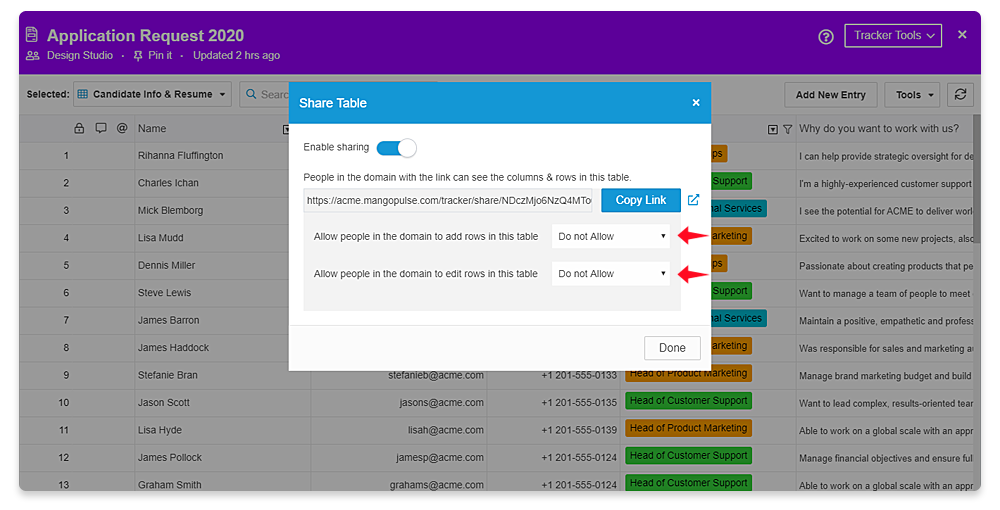
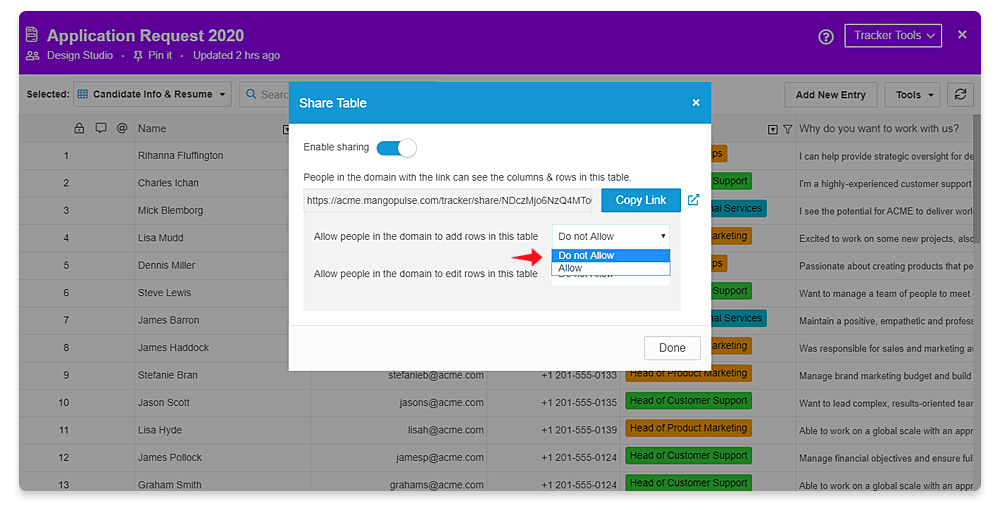
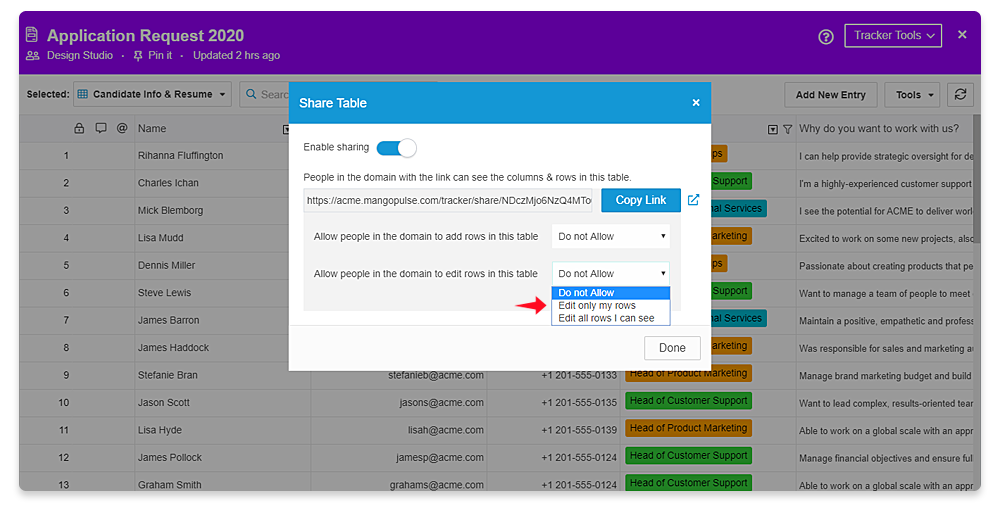
- Share link for a table
- As part of creating a share link for a table you can customize to make it a view only table or a editable table
- If you make it a editable table, then you can additionally customize whether the non team members can edit
- Only the rows/entries they have submitted -OR-
- All rows/entries they see in the table
- Public sharing of table is not supported at this time
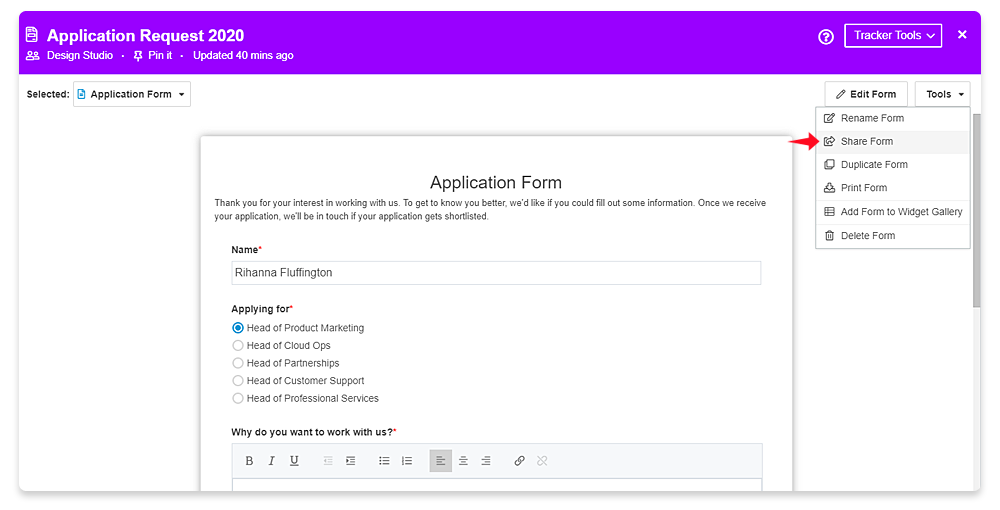
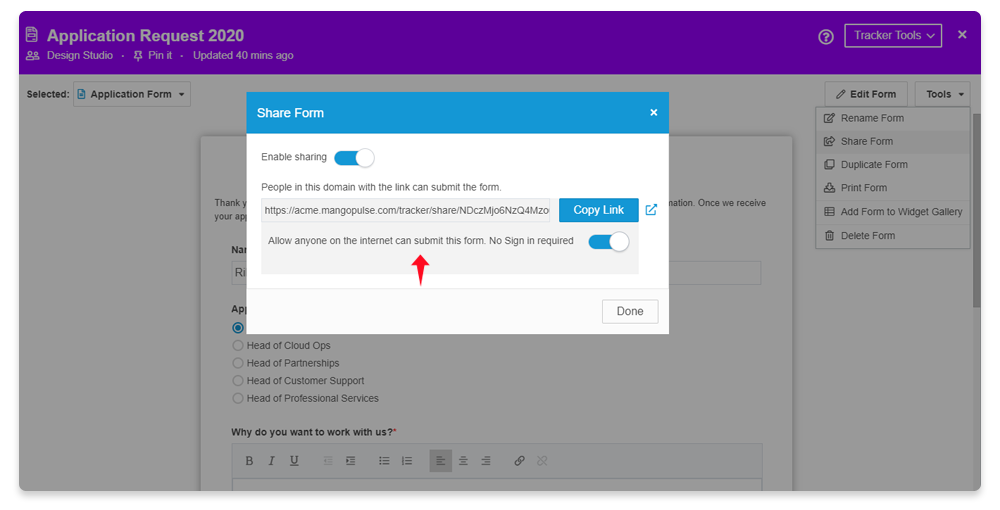
- Share link for a form
- As part of creating a share link for a form you can customize to make the form publicly accessible
-
If you make the form publicly accessible, then anyone on the internet can submit the form. No signing in into MangoApps is required
- If you turn OFF sharing on a table or form, the earlier shared link automatically becomes invalid. Turning the sharing back ON makes the same link valid again
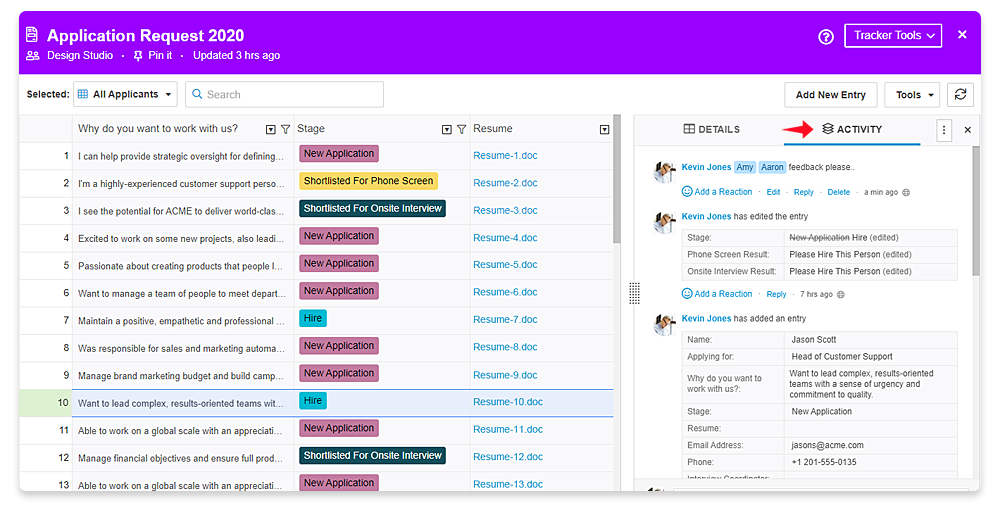
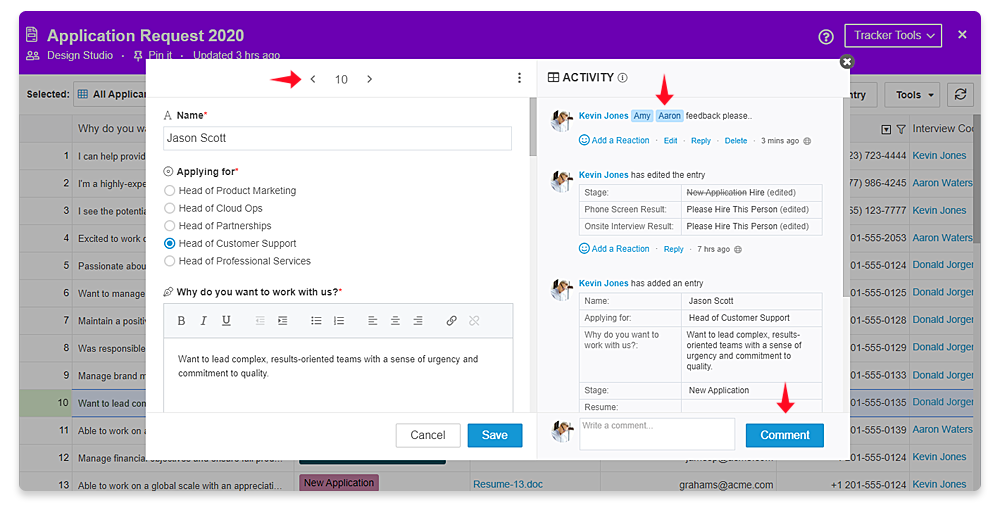
Split & Popup View For Entries
- There are two options you have to view the full details of an entry, see its revision history, post a comment or @mention a team member. The options are,
- Click on the row to open the split view for the entry on the right
- Click on the expand icon in the front of the entry to open a popup
- With both the split view and pop view you can
- View & edit (based on your permissions) the columns in the entry/row
- Comment, reply, share a reaction on the entry
- Mention a team member on the entry
- Perform actions like lock, archive and more on the entry
- Get a shareable link to the entry
- In the popup view you can click on the right or left arrows on the top of the popup to go to the next / previous entry
- In the split view you can use the key-board up and down arrows to go to the next / previous entry

Specialized Column Types
- MangoApps columns (fields) have specific “types” that allow you to store rich content in each row. For example, a tracker can contain entries (rows) with attachments, long text notes, checkboxes, and links to entries in another tracker
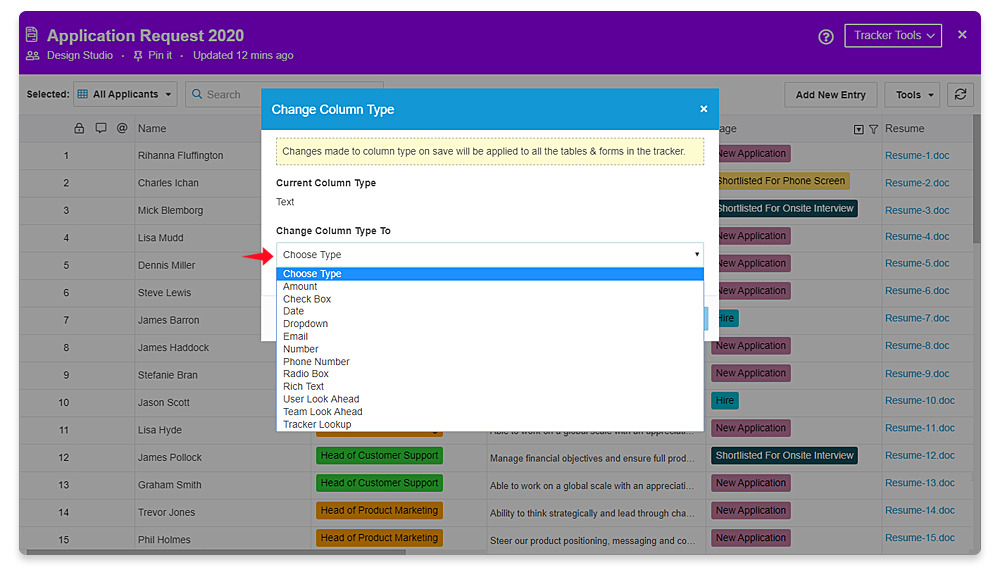
- With all of these different column types, you can configure a tracker to perfectly fit your needs. You configure the column type as part of either
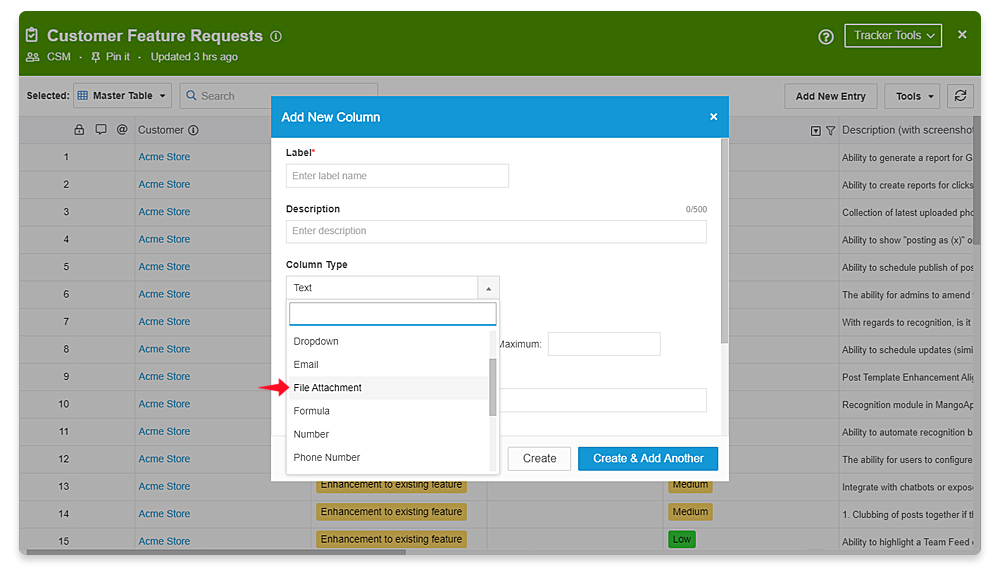
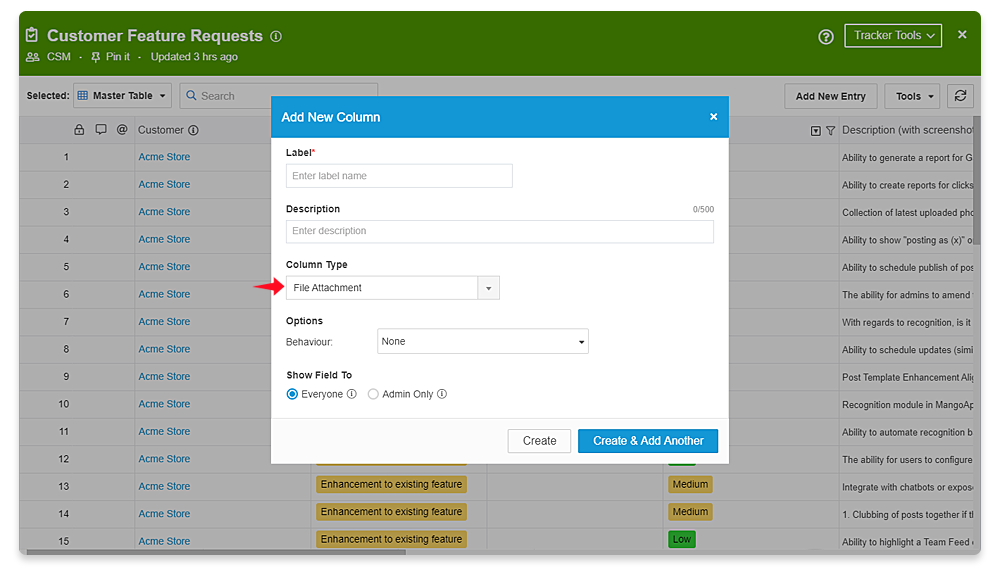
- Adding a new column
- Using the change column type action on the column
- Here’s a brief overview of each column type you can use to make the perfect tracker for your use case:
- Text based columns – Following are the text based column types that trackers support
- Text: A text column accepts a single line of text for each cell. You can put any text value you want into each cell. The text column is best for short pieces of text. If you notice that you’re repeating the same text values frequently in a column, you may want to consider using one of the ‘Select based columns’ listed below.
- Rich Text: A rich text column accepts multiple lines of text for each cell with ability to format it. You can enter new lines into a rich text field, have heading text, bold text, bulleted list, links and more.
- Email: A email text column is intended to store a single email address in each cell.
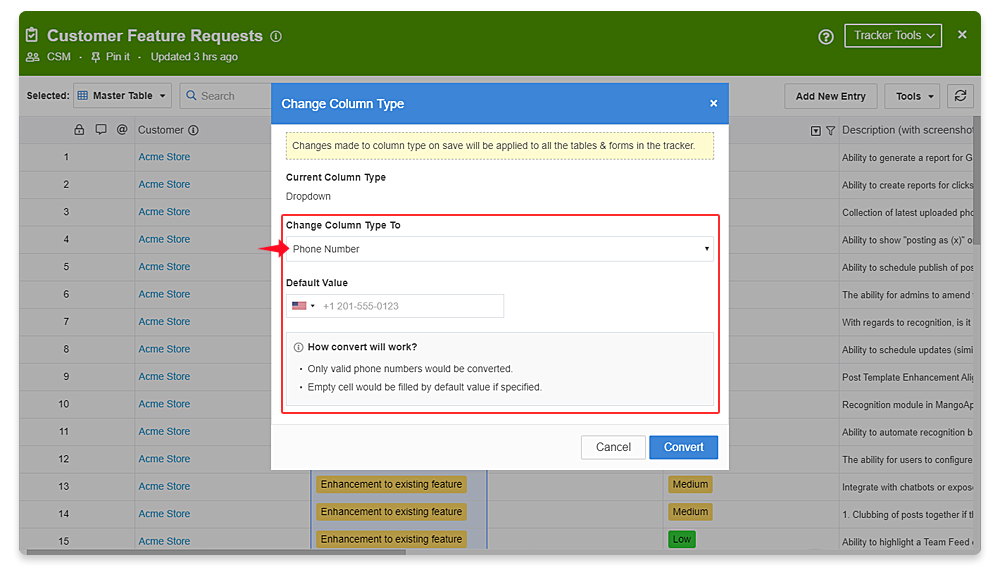
- Phone Number: A phone number field will format a 10-digit string of numbers. For example if the country is US the phone number will be in the form + 1 XXX-XXX-XXXX.
- Number based columns
- Number: The number column type is a field type designed to hold numbers. The number column type is a general-purpose column type for most numerical values. Number columns should be used in cases where the values are referenced for computation, such as in formulas performing arithmetic. Negative numbers and decimal values are supported.
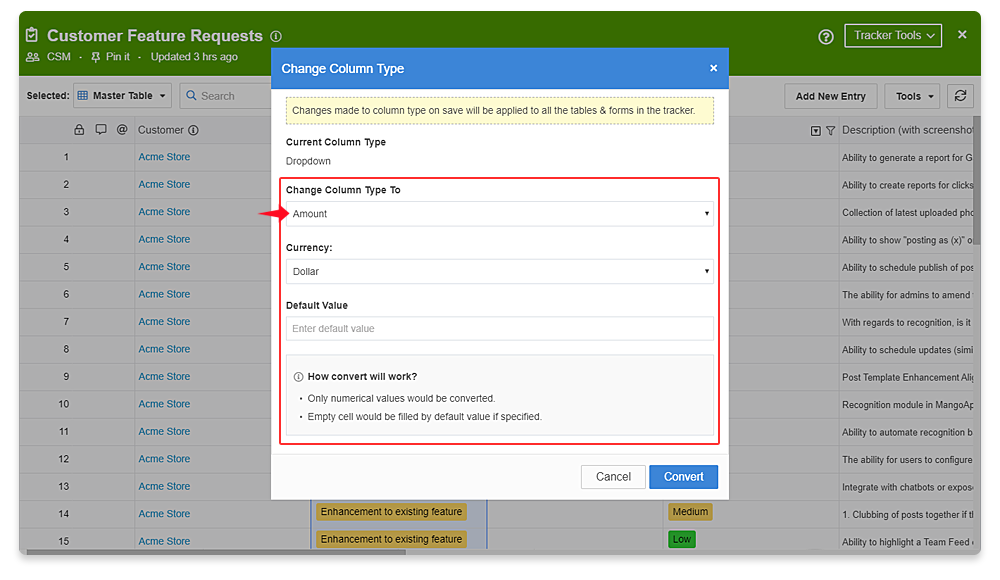
- Amount: A amount column is a specific type of number column that formats the number as a currency amount. So if you’re looking to store an amount of money, try the amount column type. It supports current amounts with up to two places of decimal. Negative amount values are not supported.
- Select based columns
- Dropdown: A dropdown column is ideal when you want to be able to select a single option from a preset list of options/choices. You can select the desired option from the dropdown menu, or type to narrow down the list of option. In the edit mode you can drag & drop to re-order the options/choices and choose from a list of 40 different colors. Up to a max of 100 options/choices can be present in the dropdown. For > 100 options/choices consider using the ‘Tracker Lookup’ column type under the ‘Lookup based columns’ section listed below
- Checkbox: A checkbox column is ideal when you want to be able to select multiple options from a present list of options/choices. In the edit mode you can drag & drop to re-order the options/choices and choose from a list of 40 different colors. Up to a max of 10 options/choices can be added for a checkbox column type.
- Radio box: A radio butto column is ideal when you want to be able to select a single option from a laid out list of options/choices. In the edit mode you can drag & drop to re-order the options/choices and choose from a list of 40 different colors. Up to a max of 10 options/choices can be added for a radio button column type.
- Look ahead based columns
- User Look Ahead: A user look ahead column allows you to select one or more users from an automatically generated list of users. A user look ahead field can be set to allow only one user or to allow multiple users.
- Team Look Ahead: A team look ahead column allows you to select one or more teams from an automatically generated list of teams. There is an option to set a current team as the default value for the column
- Tracker Lookup: A tracker lookup column allows you to represent the relationship between related trackers by creating a relation between them. This is particularly helpful when you have multiple trackers of related items or concepts—for example, if you have a tracker of contacts and a tracker of companies, you can use a tracker lookup column field to link each contact to the company that they work for. A tracker lookup field can be set to allow multiple values in it. At this time trackers within the same team can be referenced via the tracker lookup column.
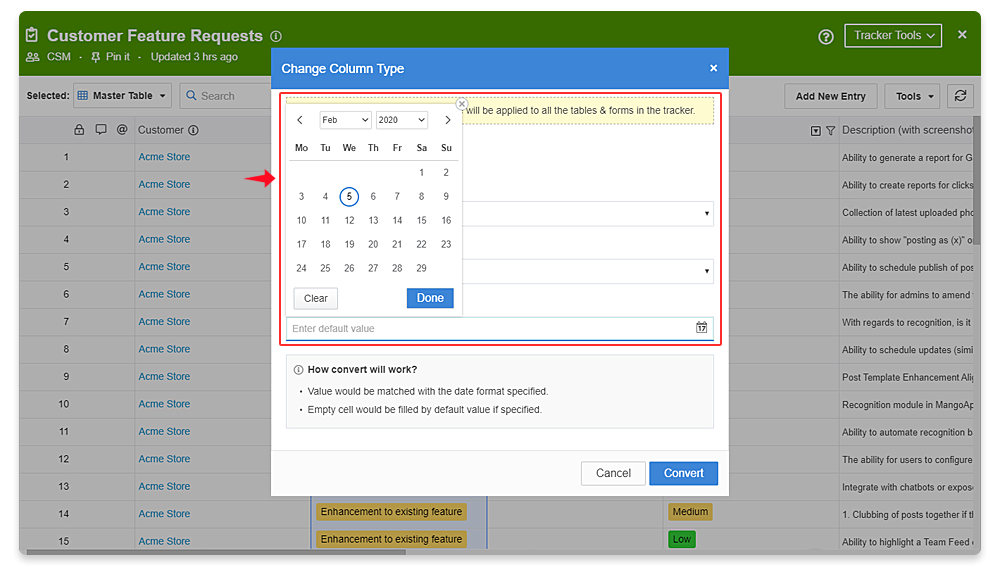
- Date column
- A date column allows you to easily enter a date and optionally a time into a cell. When editing a date time, you will be presented with a calendar widget that makes it easy to select a specific date.
- There is an option to set a current date as the default value for the column
- File attachment
- File attachment column allows you to attach a file to the entry
- File attachment column can be marked as required ensuring that users who submit a new entry to the tracker are required to upload a file
- At this time only one file can be uploaded per entry
- Clicking on the attachment opens the file in the viewer with file actions as per the team member’s permission on it
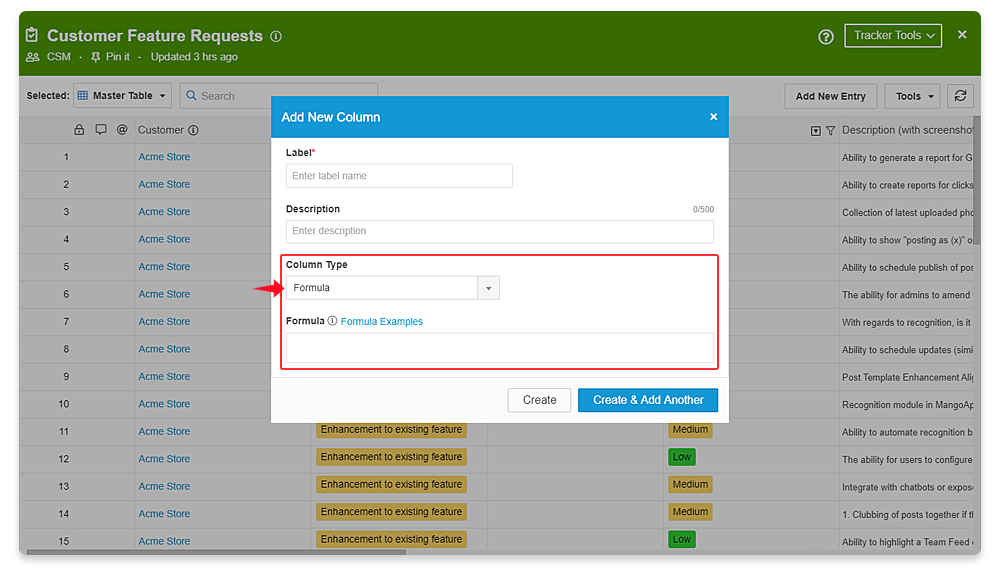
- Formula
- Formula column allows you to compute a value in each row/entry based on other cells in that same row/entry. For example, if you have a tracker of product orders, you can create a column that computes the Total Cost for each record based on the Price and Quantity.
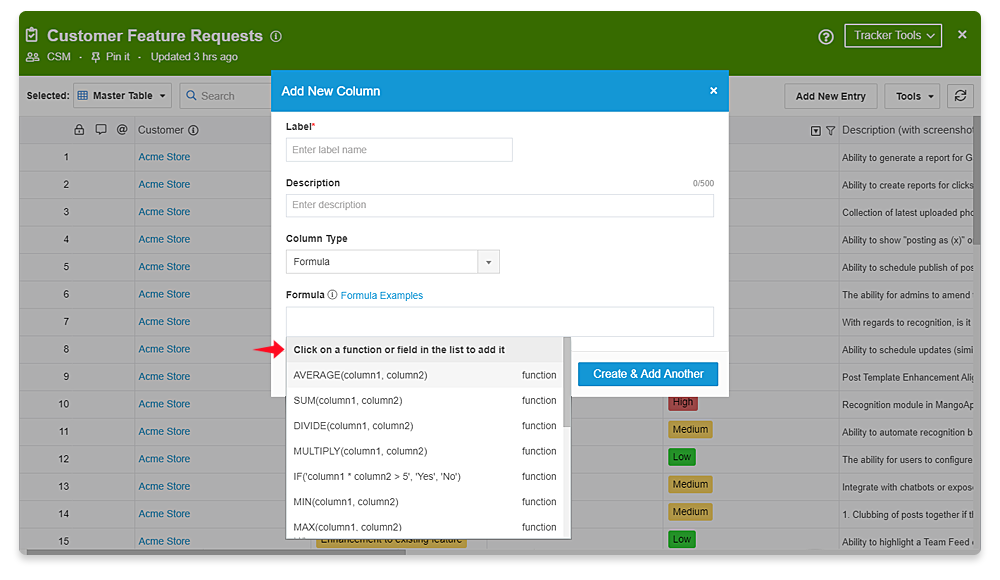
- A formula can be composed of functions (e.g. SUM, AVERAGE, IF), operators (e.g. >, <, =), and other columns from the same tracker
- Refer the section below on ‘Formulas’ for more details
- Text based columns – Following are the text based column types that trackers support


Formulas
- To configure a formula add a new column and pick column type as ‘Formula’. From there, you can enter the formula into the text box as you would in a spreadsheet, except you use the names of fields instead of cell ranges
- When you start entering your formula, you will see suggestions of functions and fields you can click on and use in the formula
- In trackers, formulas are applied for the entire column so the same formula applies to every entry in that column
- Essentials of formulas are listed below
- Basic calculation using a formula
- Adding
- You can add multiple columns together by using SUM function and columns separated with a ‘,’ symbol
- In the example, several columns are added together to find the final total – SUM( %{legal_fees}% , %{retainer_fees}% , %{miscellaneous_fees}% )
- Multiplying
- You can multiply columns together by using MULTIPLY function and columns separated with a ‘,’ symbol
- In the example, two columns are multiplied together to find the final value – MULTIPLY( %{hourly_fees}% , %{hours_billed}% )
- Dividing
- You can divide columns together by using DIVIDE function and columns separated with a ‘,’ symbol
- In the example, two columns are divided together to find the final value – DIVIDE( %{total_fees}% , %{hours_billed}% )
- Adding
- Comparing numeric, date & text strings using a formula
- Compare numeric, date & text column using the IF function
- IF function will return one of two values depending on whether the logical argument is true or not – IF ( ‘logical argument)”, “value1”, “value2”)
- In the following examples, two columns are compared with different logical operators together
- IF(‘%{column1} > %{column2}’, “Yes”, “No”)
- IF(‘%{column1} == %{column2}’, “Yes”, “No”)
- IF(‘%{column1} != %{column2}’, “Yes”, “No”)
- IF(‘%{column1} < %{column2}’, “Yes”, “No”)
- IF(‘%{column1} + %{column2} > 5’, “Yes”, “No”)
- IF(‘%{column1} – %{column2} < 5 ‘, “Yes”, “No”)
- IF(‘%{column1} * %{column2} > 5’, “Yes”, “No”)
- IF(‘%{column1} / %{column2} < 5 ‘, “Yes”, “No”)
- IF(‘%{column1} > %{column2}’, ‘%{column1}’, ‘%{column2}’)
- IF(‘%{column1} < %{column2}’, ‘%{column3}’, ‘%{column4}’)
- Date field formula
- Calculate the duration between two date columns using the DATETIME_DIFF formula
- In the example, two date columns are used to calculate the duration in days – DATETIME_DIFF( %{end_date}% , %{start_date}% , ‘days’)
- Basic calculation using a formula
Importing, Exporting & Printing
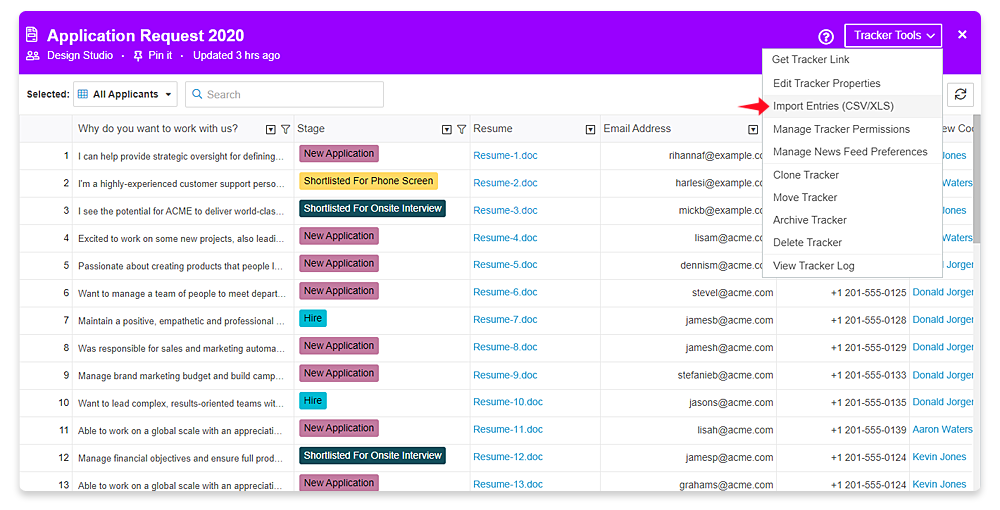
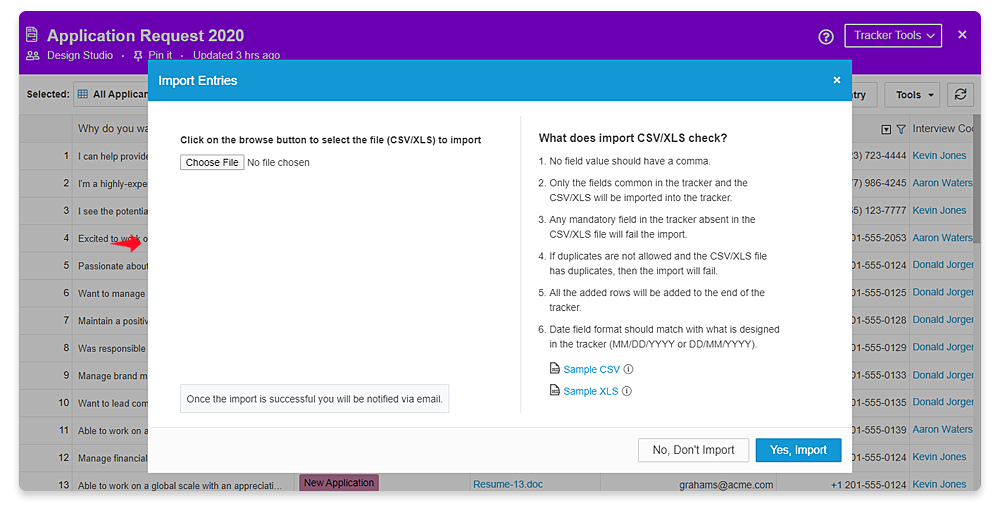
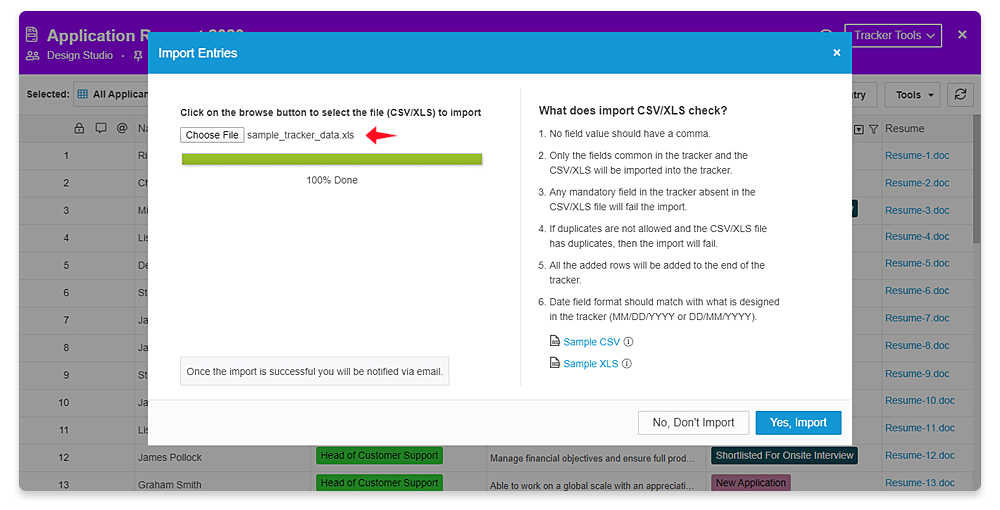
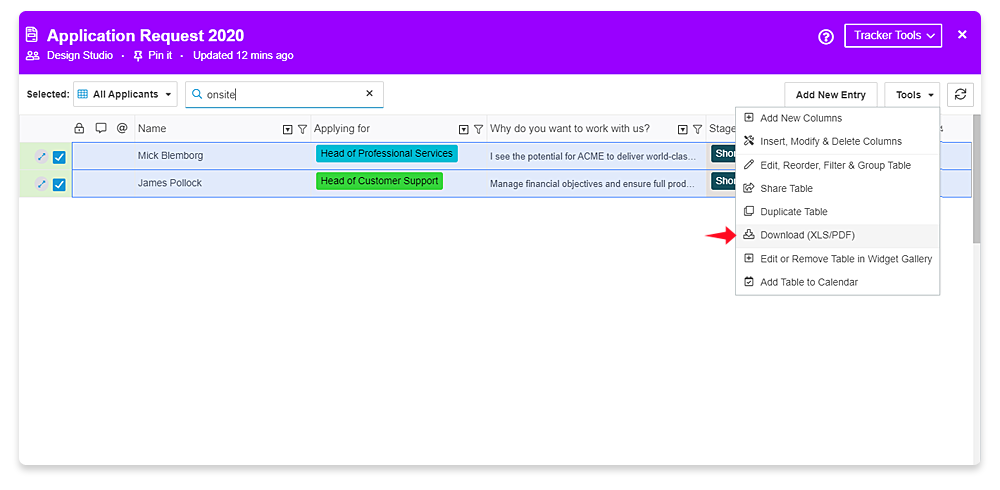
- MangoApps makes it easy to get started with data from an existing spreadsheet or CSV file. You can upload a CSV file from ‘Tracker Tools > Import Entries’
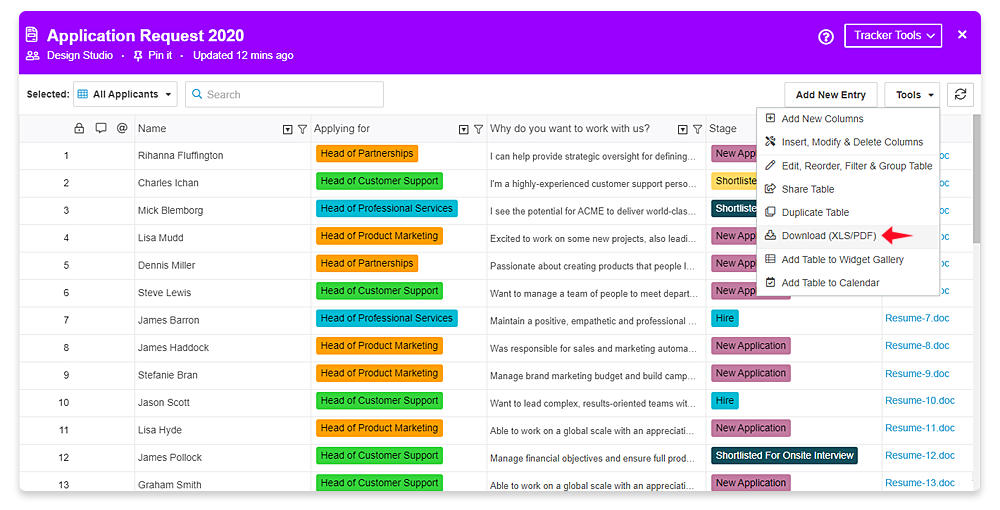
- Exporting entries can be done for a table (including master table) from ‘Tools > Download (XLS/PDF)’
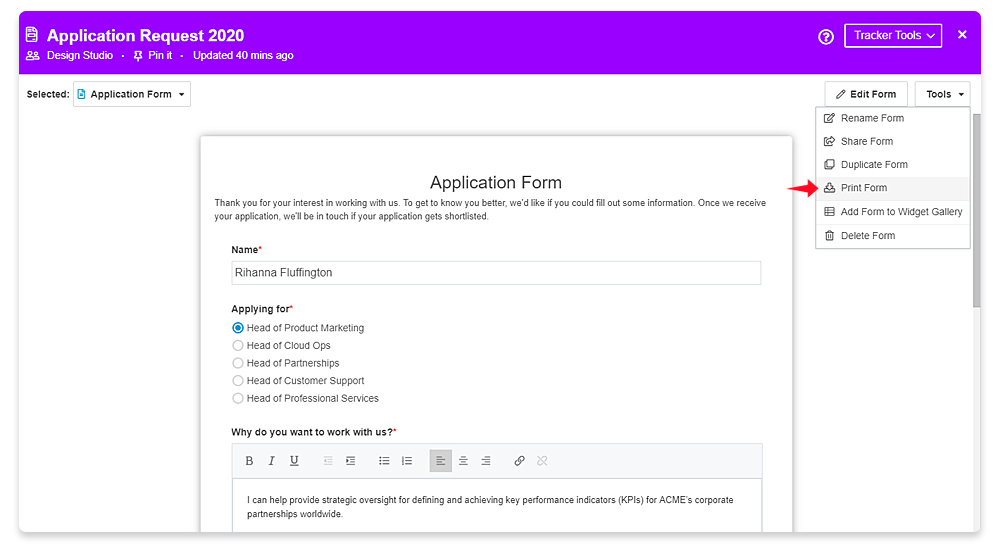
- Form view of the tracker can be download & printed from ‘Tools > Print Form’

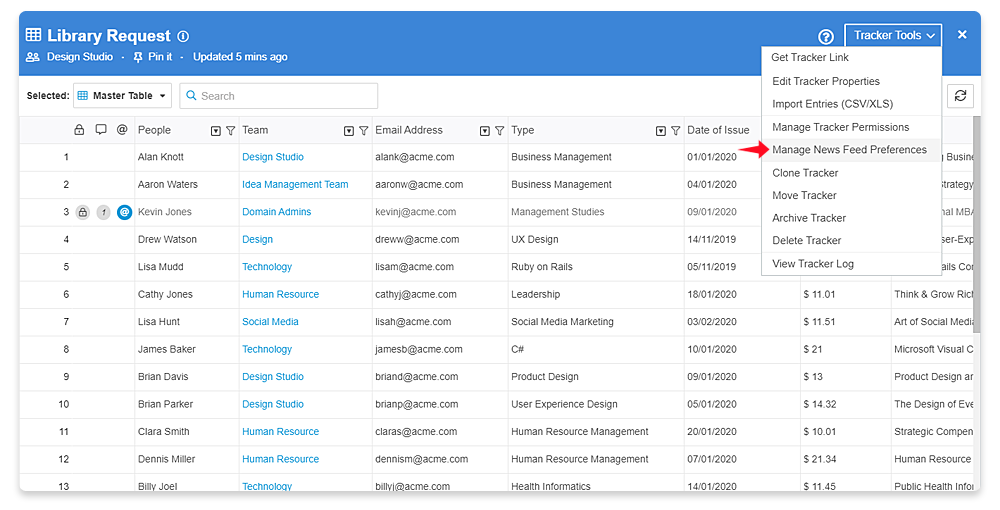
Tracker News Feed Preferences
- Tracker creator and team admins can customize how they would be communicate to team members when
- New entries are added
- Entries are edited
- Entries are deleted
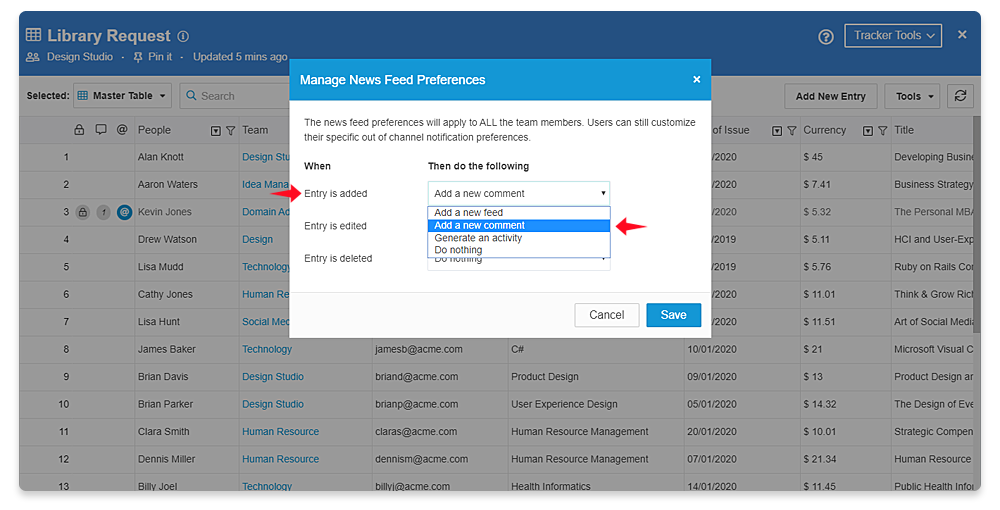
- Customization options to choose from when a new entry is added are
- Generate a new feed in the team or
- Generate a new comment on the tracker feed or
- Generate an activity only or
- Do not generated anything
- Customization options to choose from when an entry is edited are
- Generate a new comment on the original feed or
- Generate an activity only or
- Do not generated anything
- Customization options to choose from when an entry is deleted are
- Generate a new comment on the original feed or
- Generate an activity only or
- Do not generated anything
- Team members can control if they would like to receive out of channel notifications for add/edit/remove of rows/entries. Refer the section below on ‘Tracker Out of Channel Notifications” for details

Tracker Out of Channel Notifications
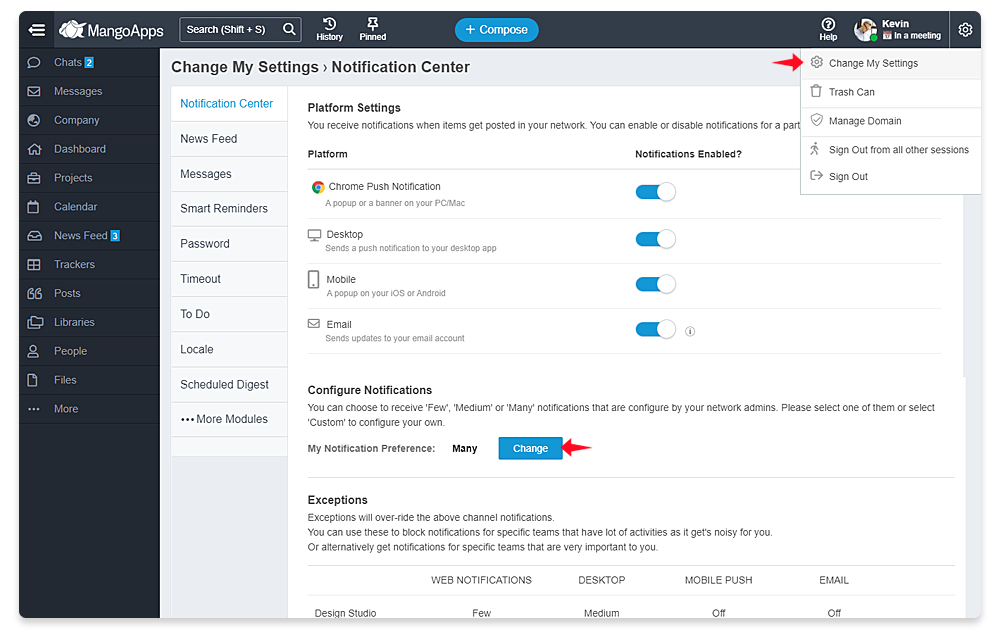
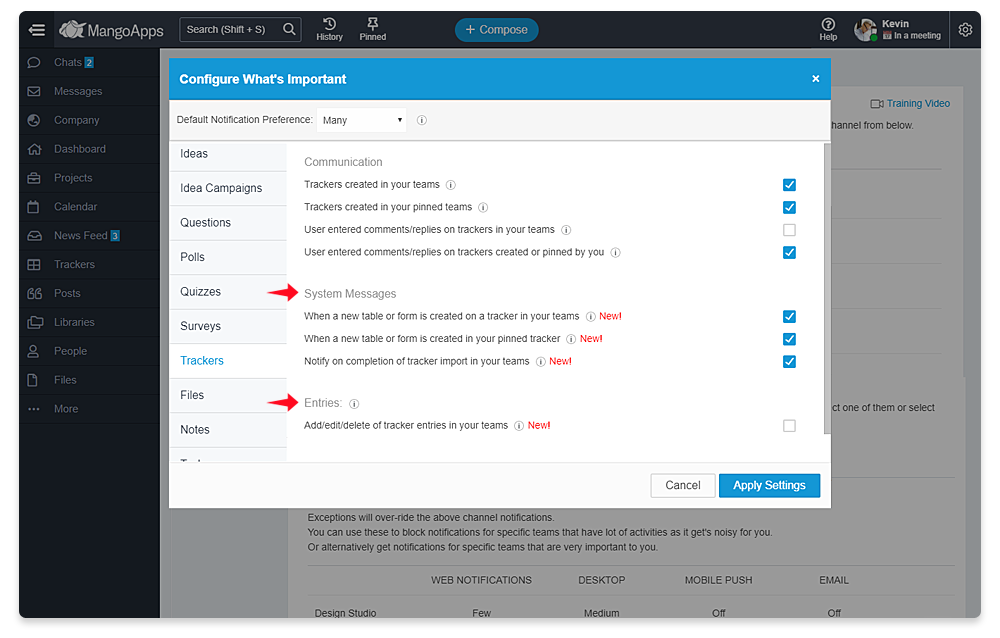
- Like all modules in MangoApps, the tracker module also allows users to customize their out of channel notifications for trackers across web, mobile & desktop.
- Under ‘Change My Settings > Notification Center > Configure Notifications > Trackers’
- Ability to change what notifications user would like to receive on the web browser, mobile and desktop can be customized
- User can customize it they want notification for comments/replies on entries and for add/edit/delete of entries
Team Views of a Tracker
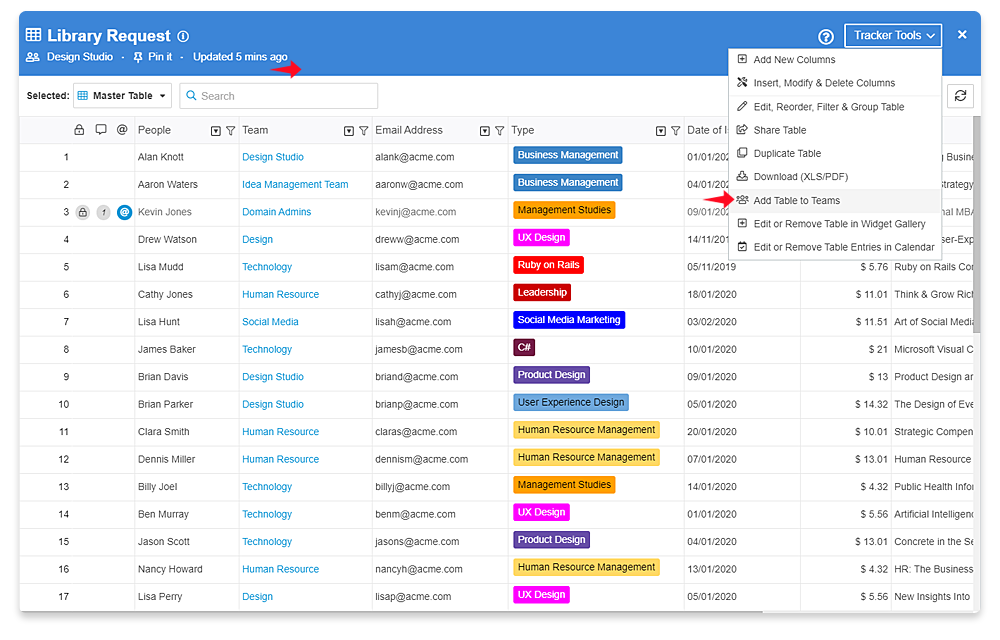
- A tracker that has a team column can be made available to the team admins / tracker creators of all other teams in MangoApps without the need for them to create duplicate trackers to see their team specific data.
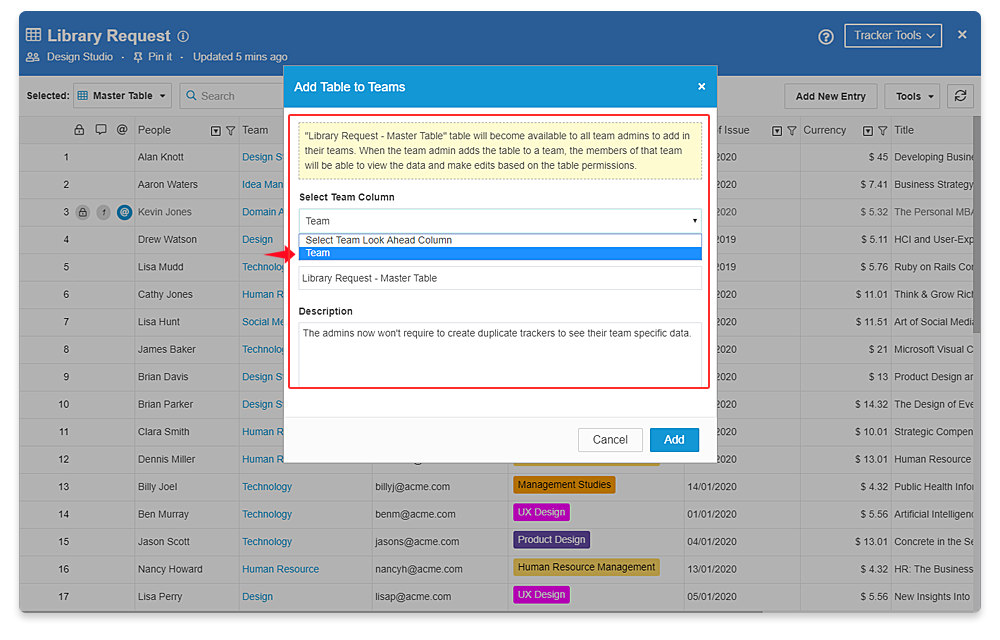
- Select the table or a form in the tracker (with the team column) and using ‘Tools > Add Table/Form To Teams’ action the team admin / creator can make it available to all team admins / trackers creators of other teams.
- Performing the ‘Add Table/Form To Teams’ operations will automatically share the table/form as read only
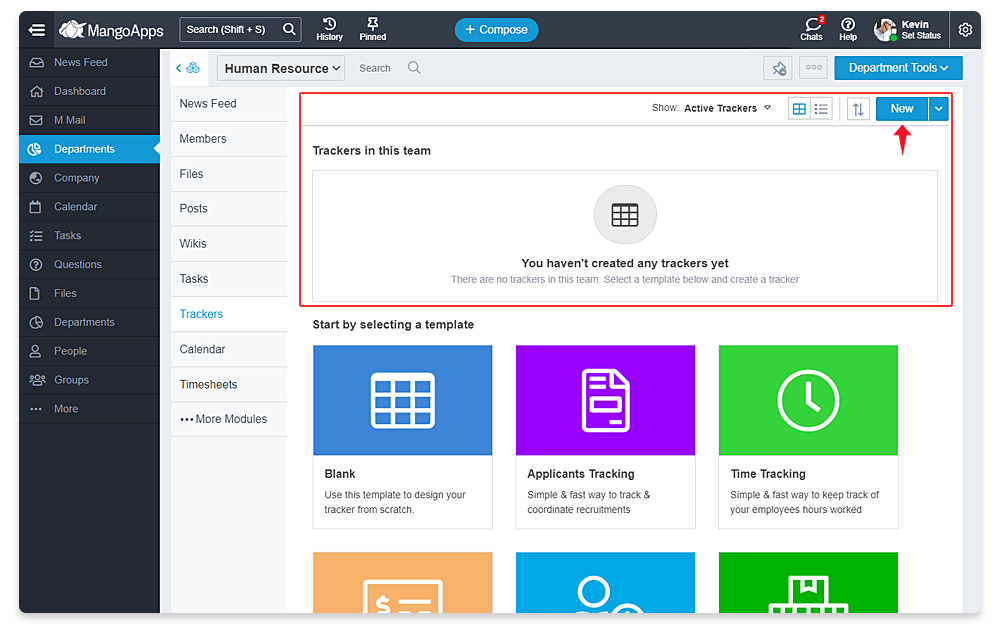
- Once the table/form is made available it appears in the ‘New Tracker’ dialog under the tab called “Shared Trackers” for team admins / tracker creator to add it to their team
- The shared table will show ONLY entries that have the current team value in them. This results in the team members getting a team view into a central tracker without being part of the team where the central tracker exists.
- The team members can add / edit / delete entries in the shared table view based on the share permissions given to them (in the central tracker)
- Team admin / tracker creator where the tracker was created can edit or remove the table from all teams at anytime.


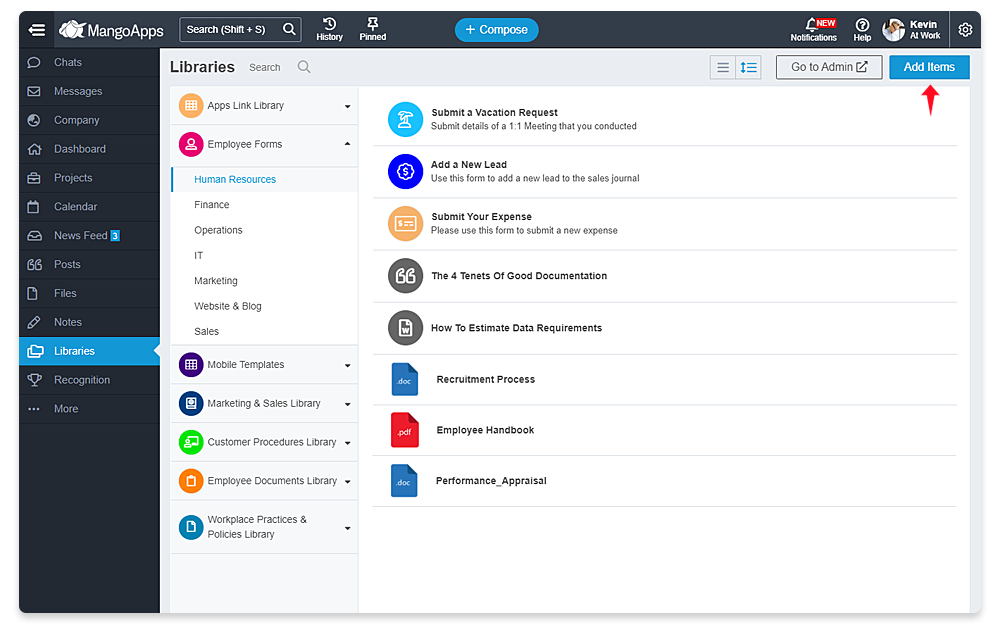
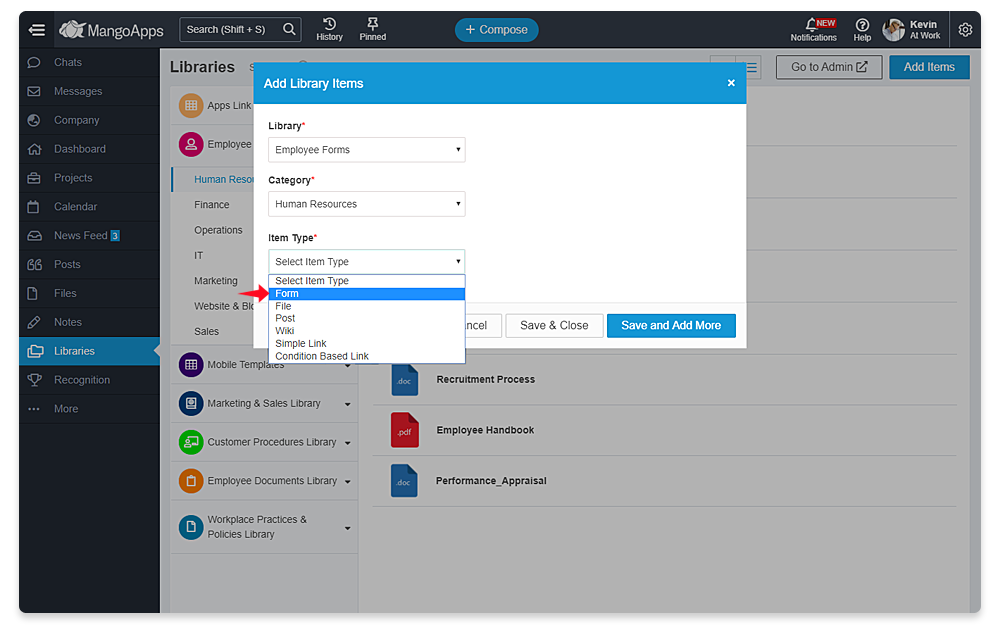
Integrated with Libraries
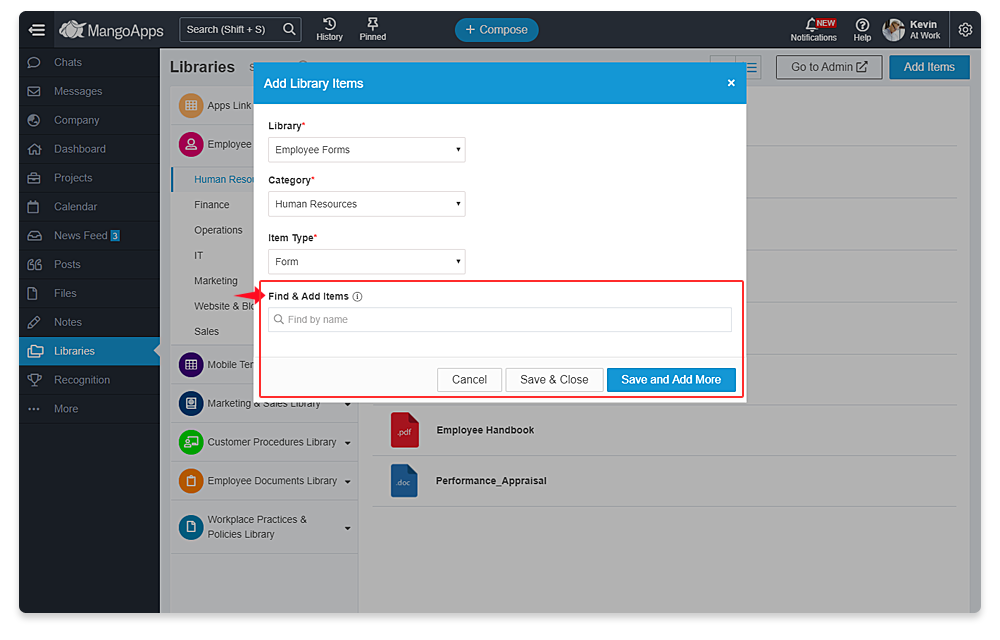
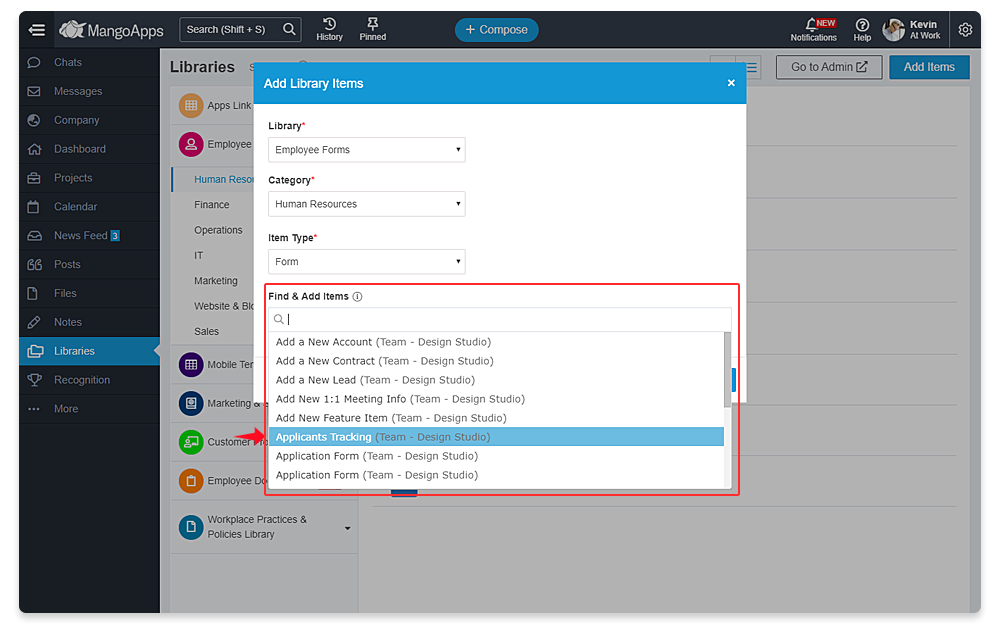
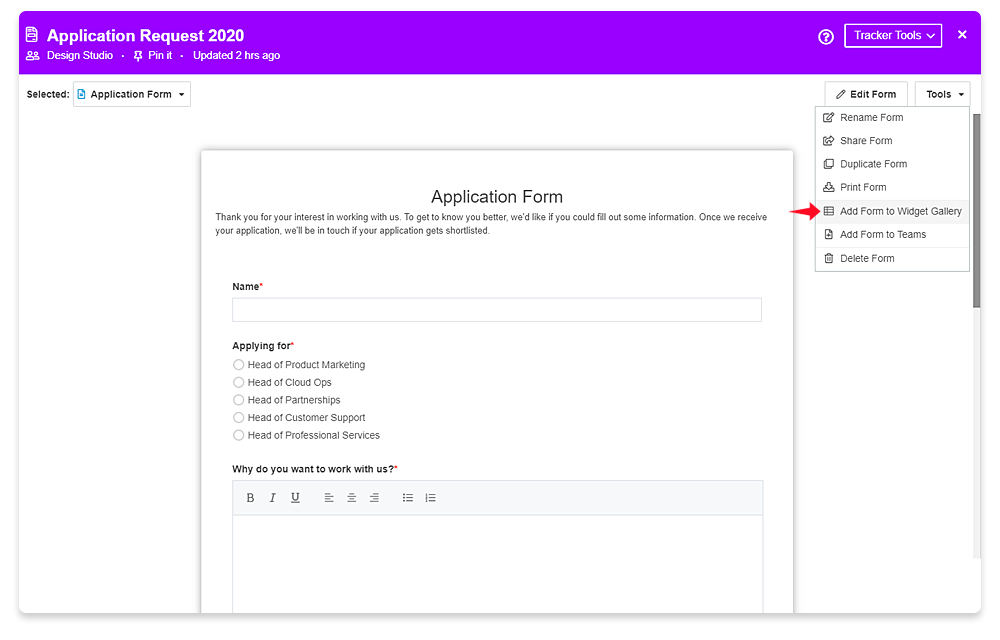
- You can add forms to the ‘Library’ module using the ‘Add Items’ action and selecting ‘Item Type’ as form
- Use the ‘Find & Add Item’ to find the list of forms that you wan’t to add to the library. One ore more forms can be added at the same time
- Form needs to be shared for it to be available to be added to the library. Learn more about the library module here

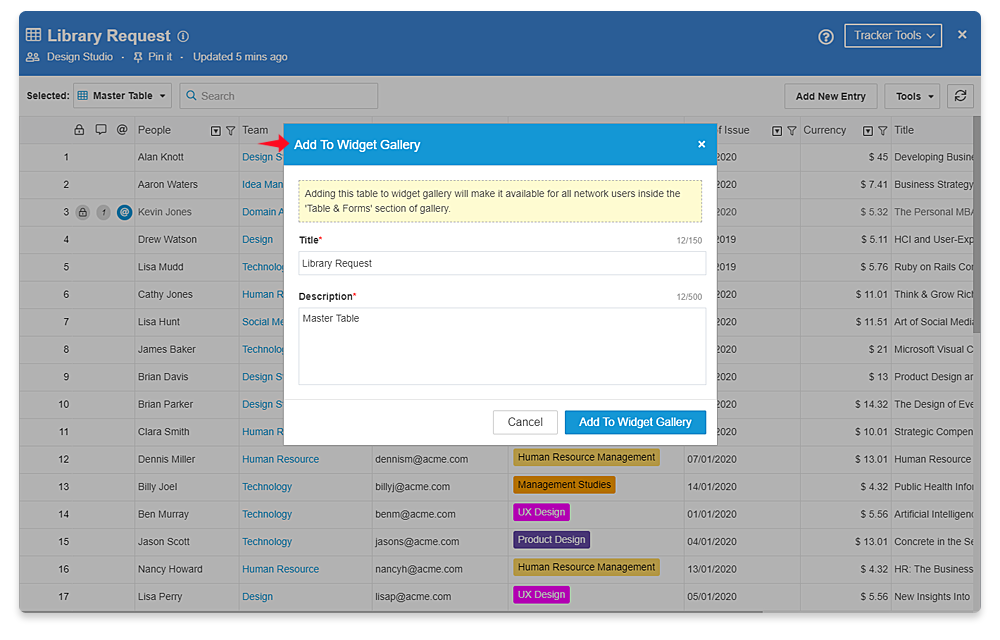
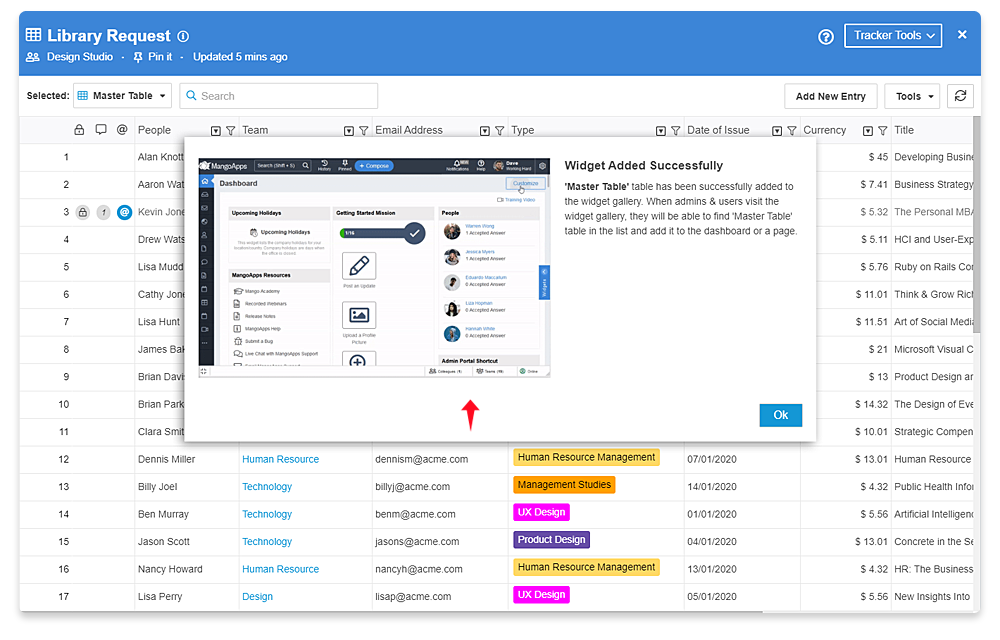
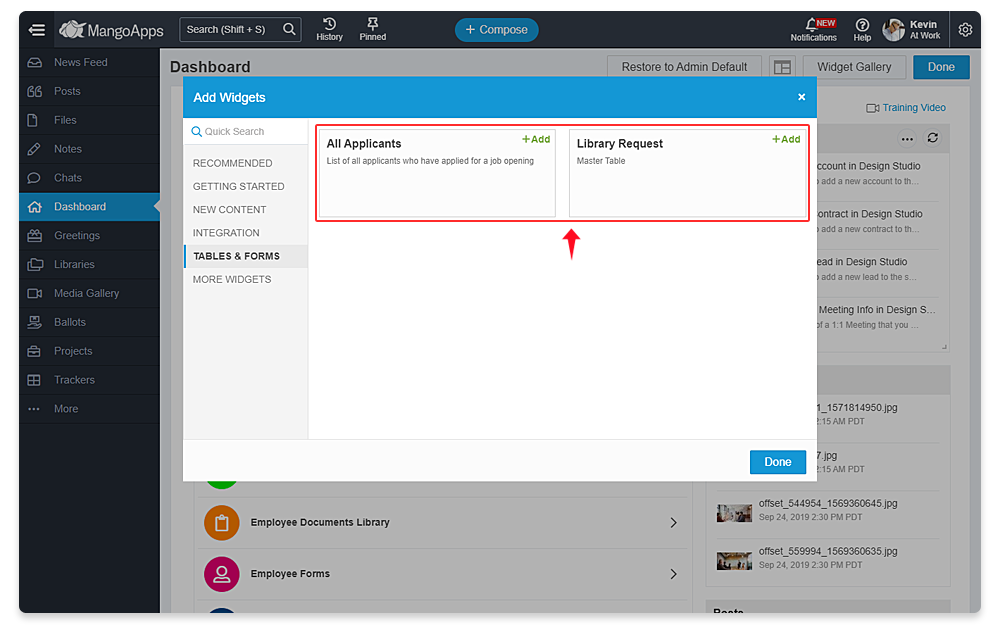
Integrated with Dashboard
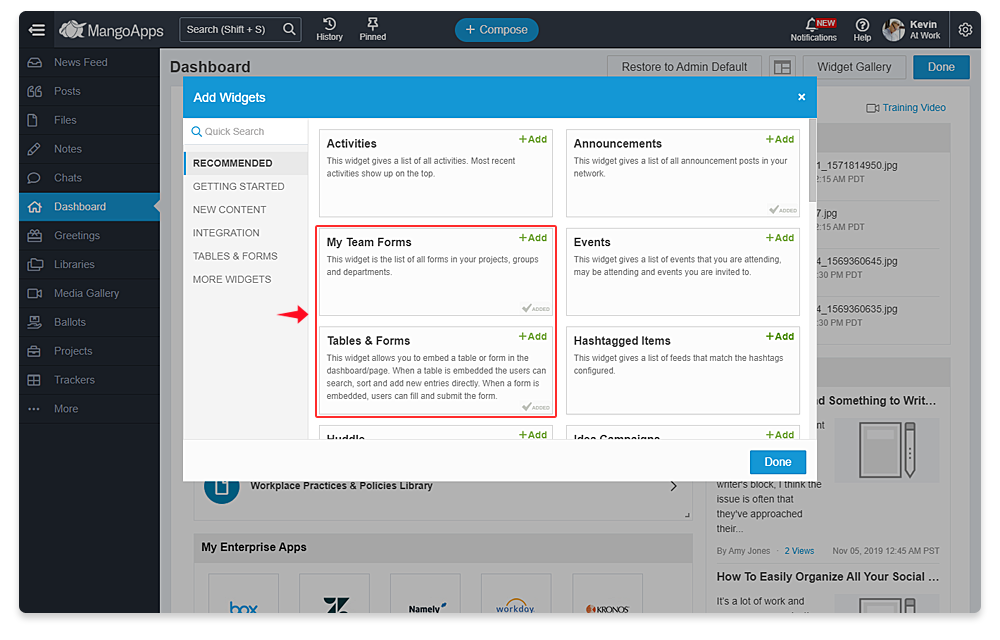
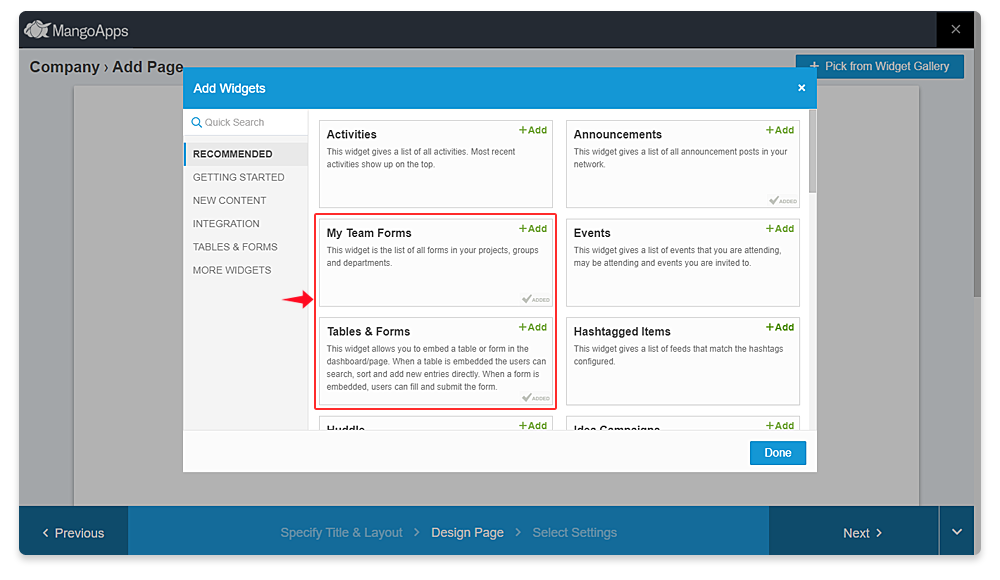
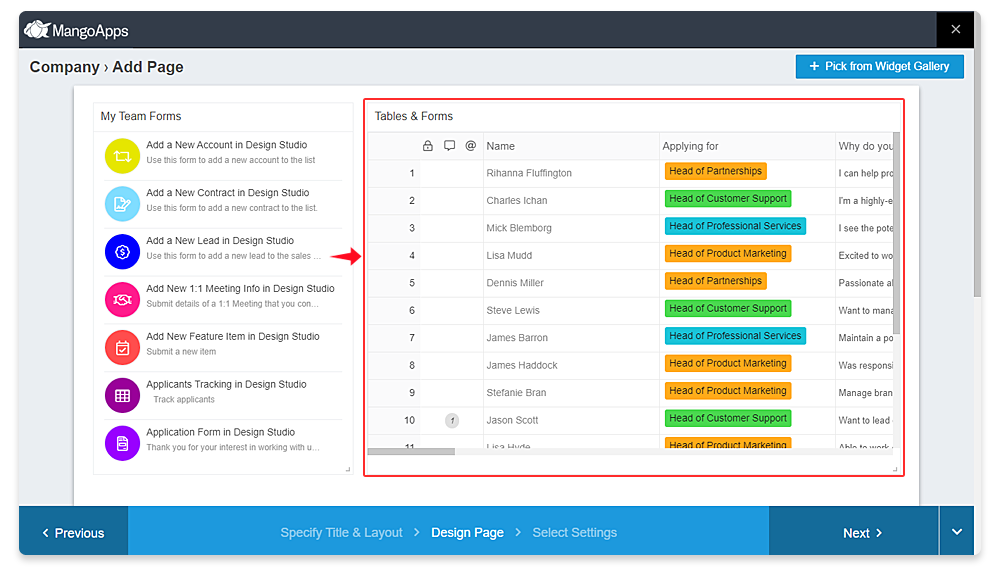
- Admins and users can embed forms & tables (of a tracker) directly on the dashboard using the Widget Gallery.
- Widget gallery comes with the following widgets
- My Team Forms – List of all forms from all the teams you are part of
- Tables & Forms Widget – A table or form that has been shared by the creator / team admin can be selected in this widget and be embedded on the user’s dashboard
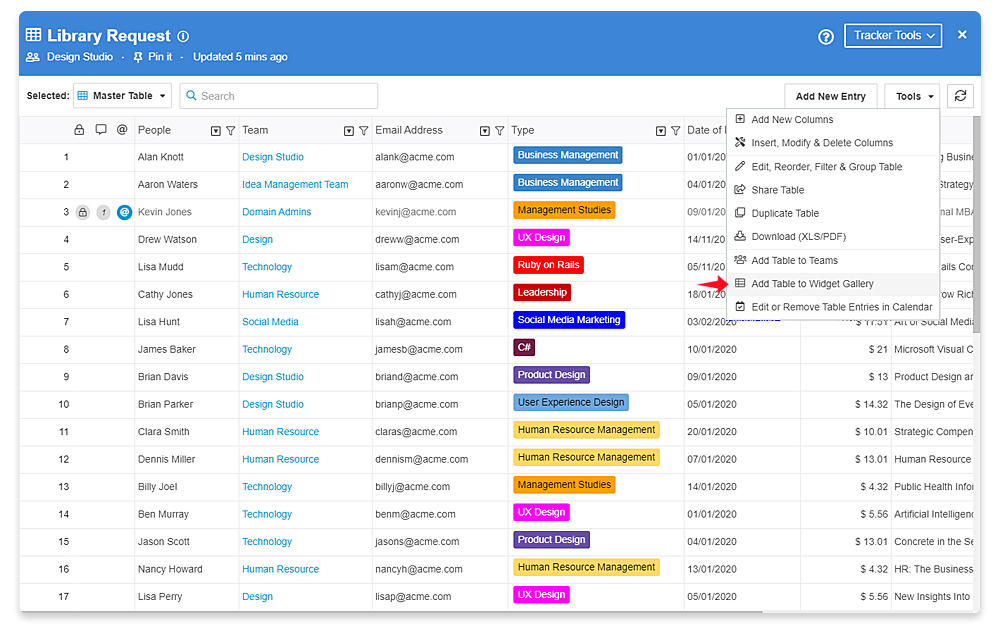
- Forms added to the widget gallery – A form that has been added & made available in the widget gallery for admins / users to add to the dashboard.
- Tables added to the widget gallery – A table that has been added & made available in the widget gallery for admins / users to add to the dashboard.
- Using any of the above widgets the trackers are integrated & made available on the user’s dashboard


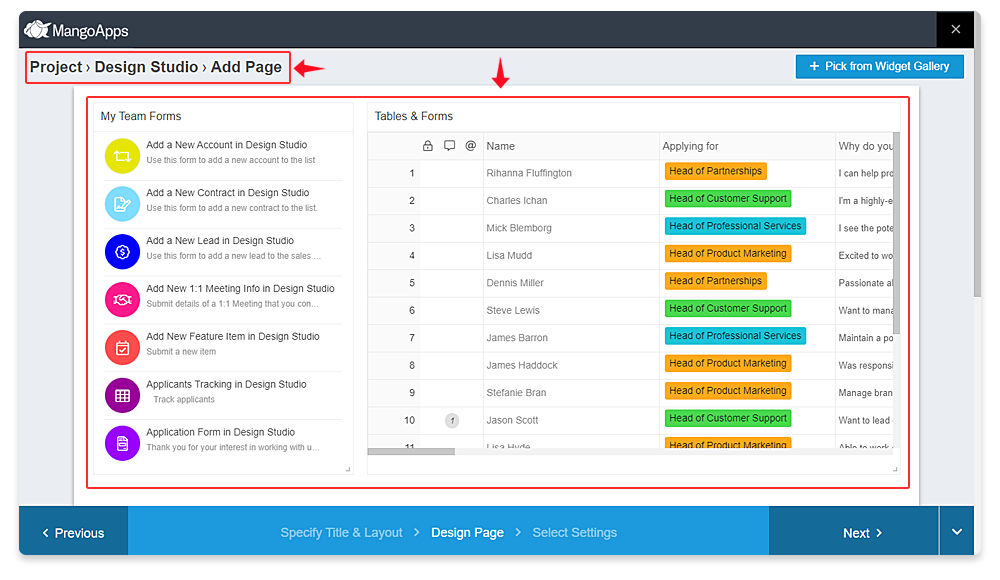
Integrated with Company & Team Pages
- Intranet admins in company pages and Team admins in team pages can embed forms & tables (of a tracker) directly using the Widget Gallery.
- Widget gallery for comes with the
- My Team Forms
- In the company page, it would be the list of all forms from all the teams you are part of
- In the team page, it would be the list of all forms from the team
- Tables & Forms Widget – A table or form that has been shared by the creator / team admin can be selected in this widget and be embedded on the company/team page
- Forms added to the widget gallery – A form that has been added & made available in the widget gallery for admins to add to the company/team page.
- Tables added to the widget gallery – A table that has been added & made available in the widget gallery for admins to add to the company/team page.
- My Team Forms
- Using any of the above widgets the trackers are integrated & made available on company & team pages
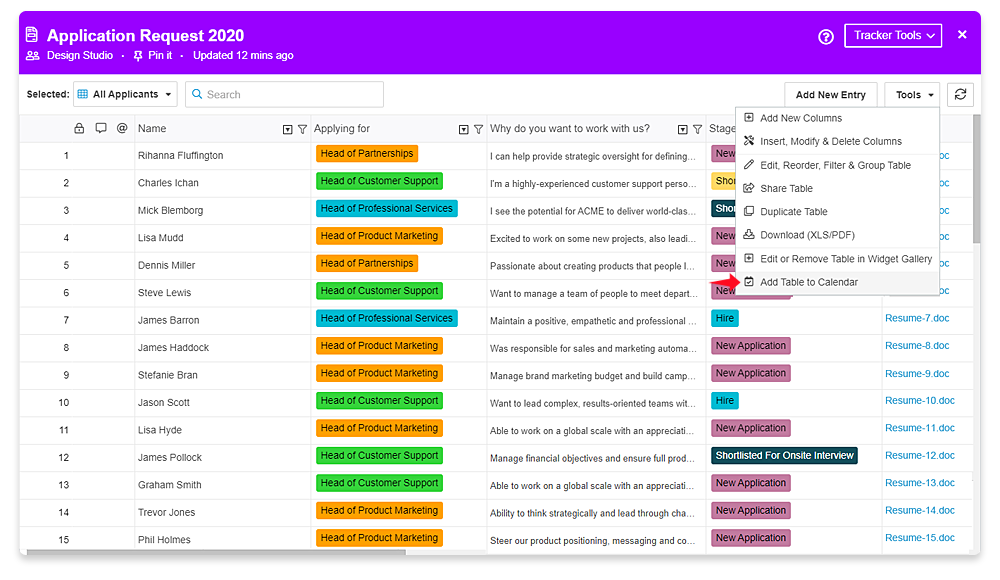
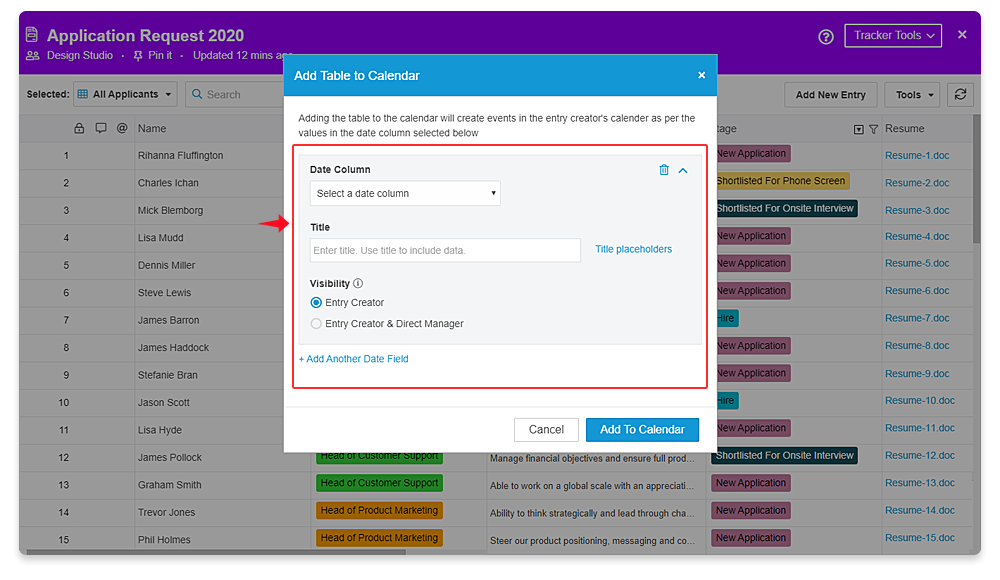
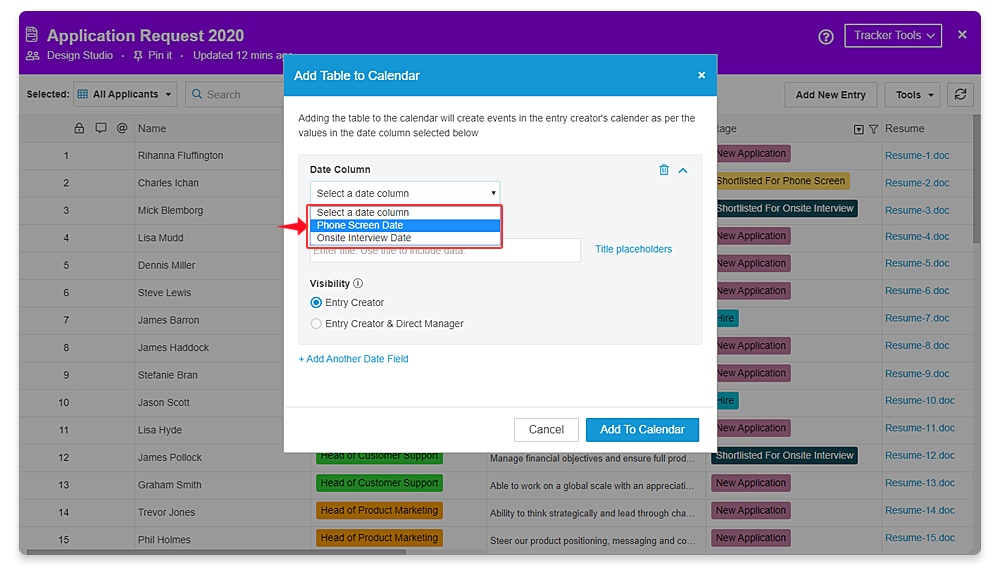
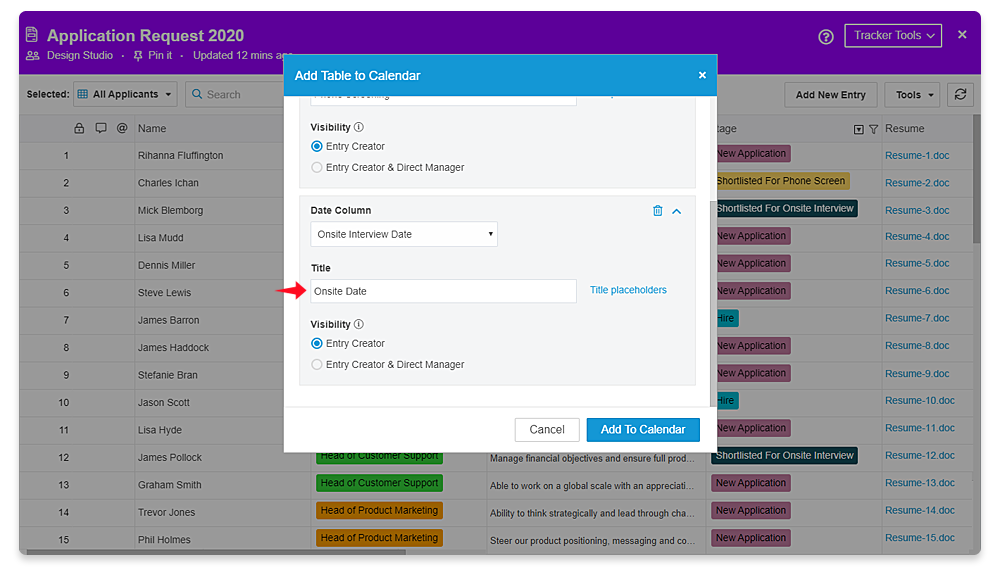
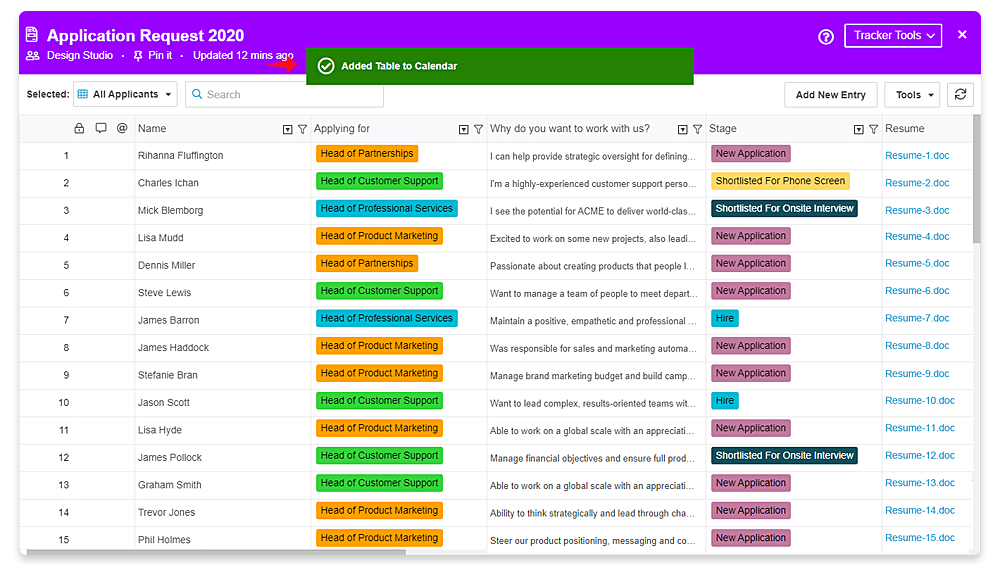
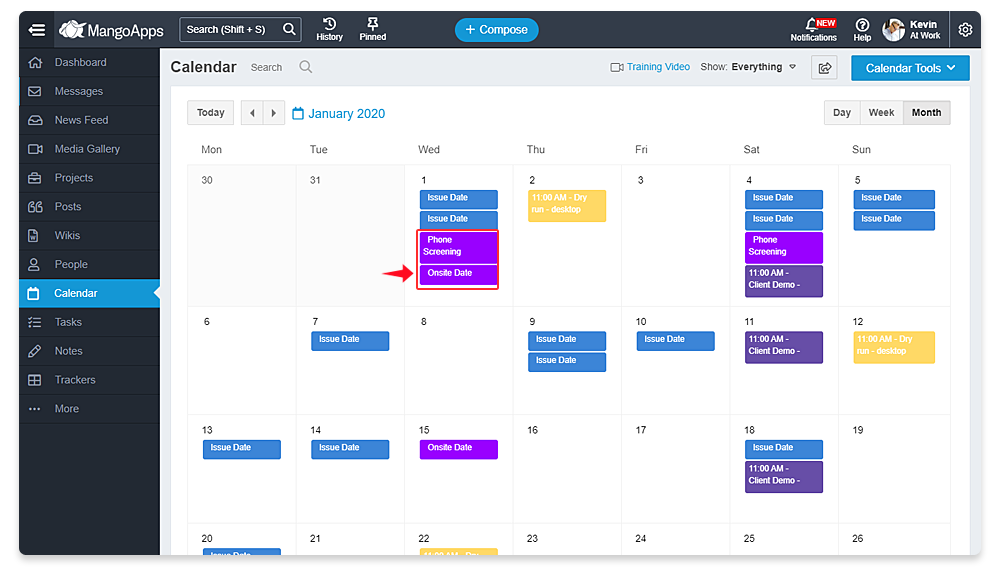
Integrated with Calendar
- A table (in a tracker) that has 1 (or more) date fields can be added to the calendar
- The entries will be visible as a calendar event in the main calendar to the
- Person who submitted the entry -OR-
- Person who submitted the entry and their direct manager (based on org chart)
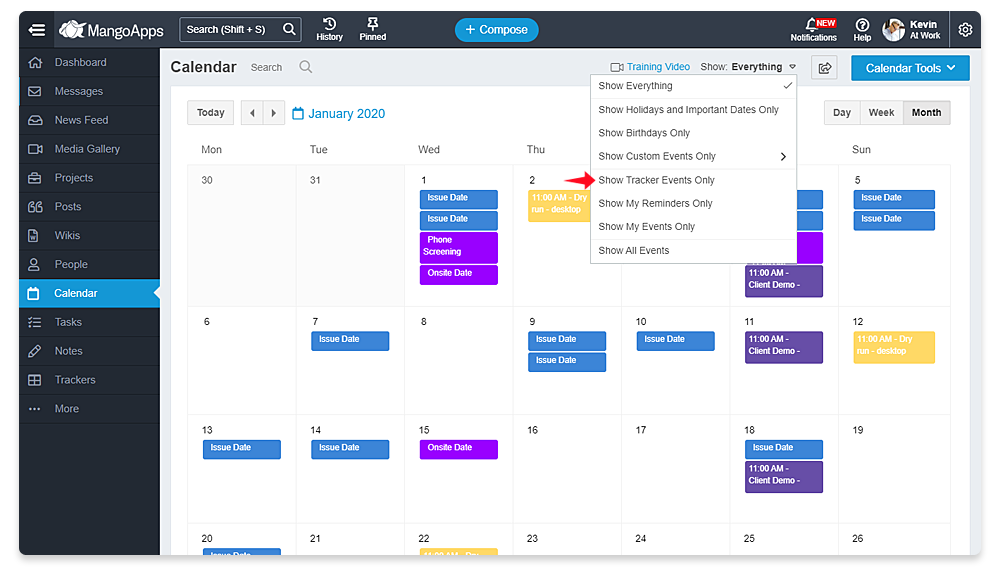
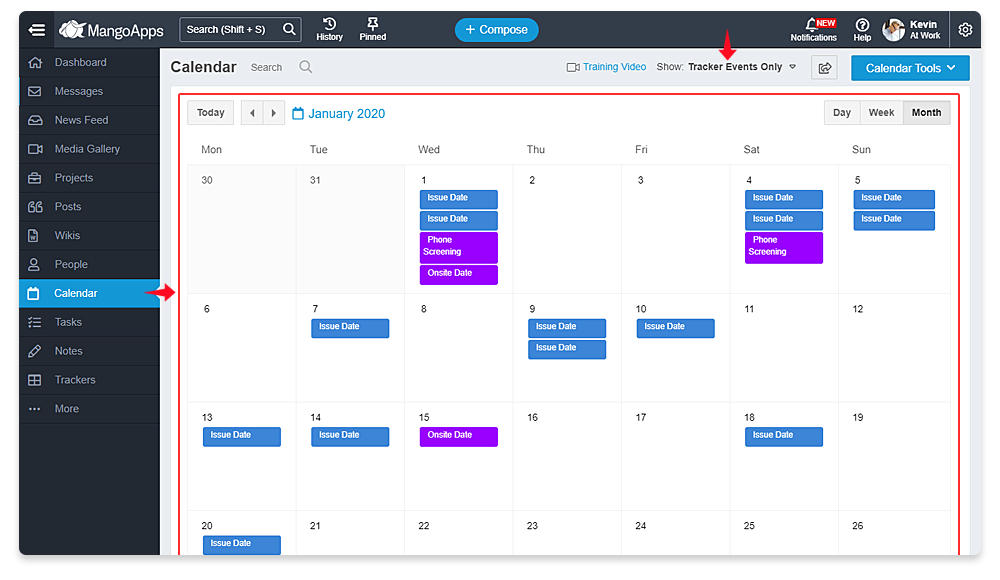
- A new filter in the top level calendar lets you view only the tracker events on your calendar


Integrated with Wikis, Pages & Posts
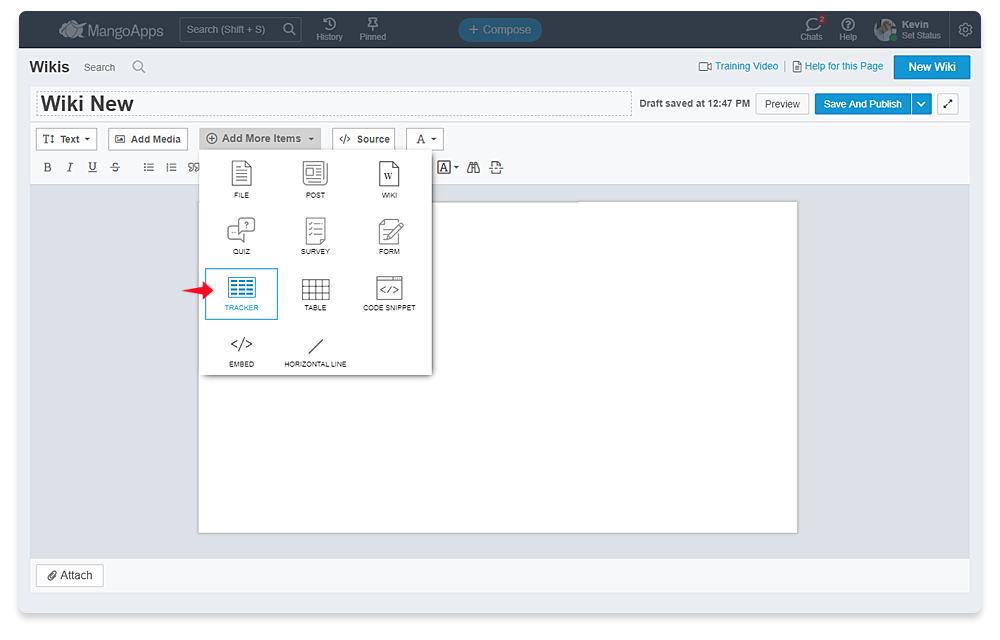
- Wikis
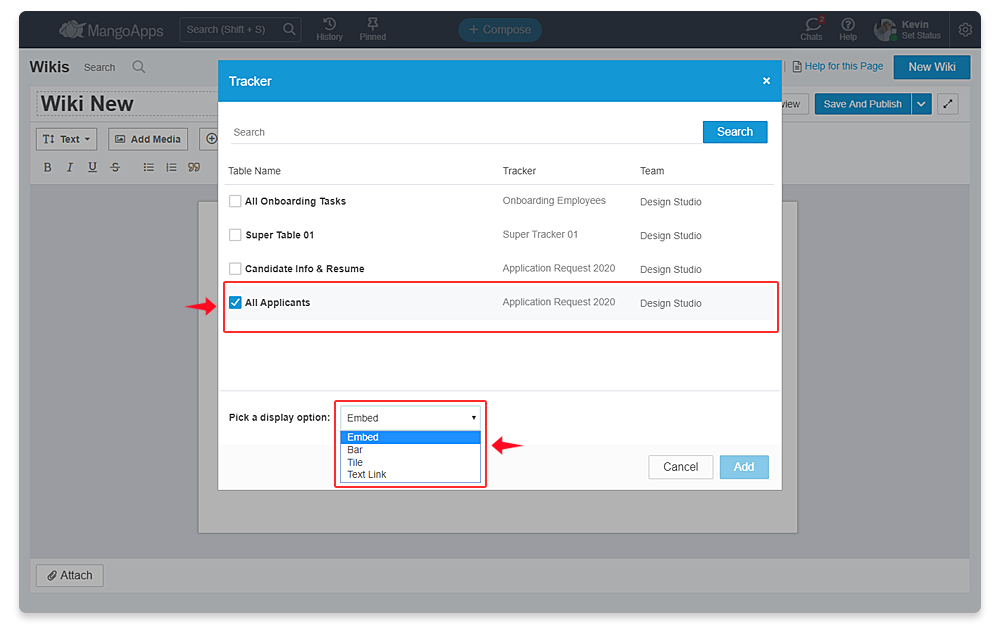
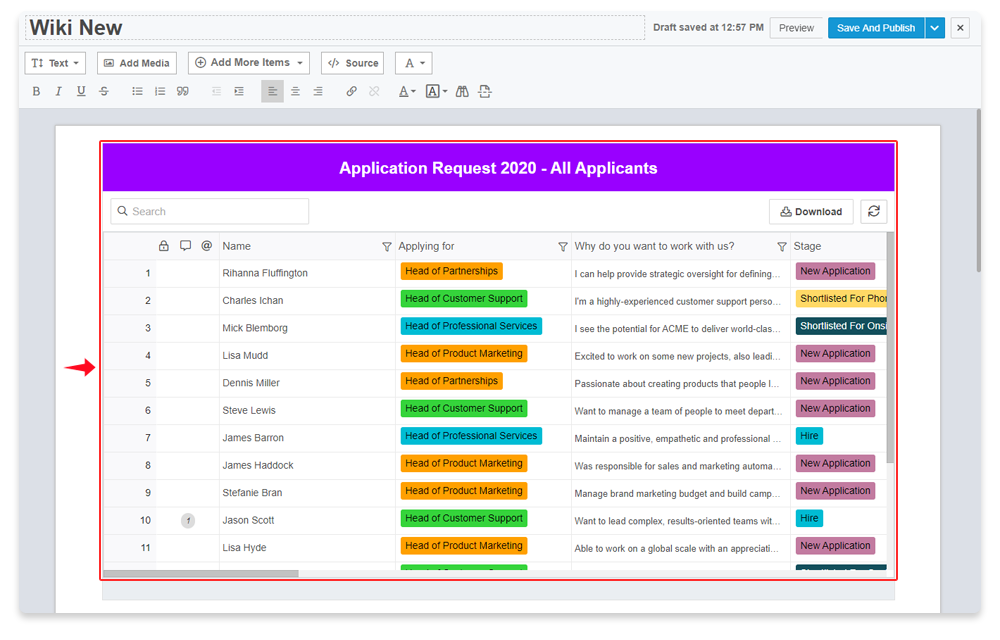
- Wikis can embed forms and tables of a tracker in them using the ‘Add More Items > Tracker / Form’
- Tracker/Forms list here shows the list of tables & forms that have been shared by the creator or team admin
- When adding the tracker/form you get options to choose the style
- Embed (default)
- Bar
- Link
- Text Link
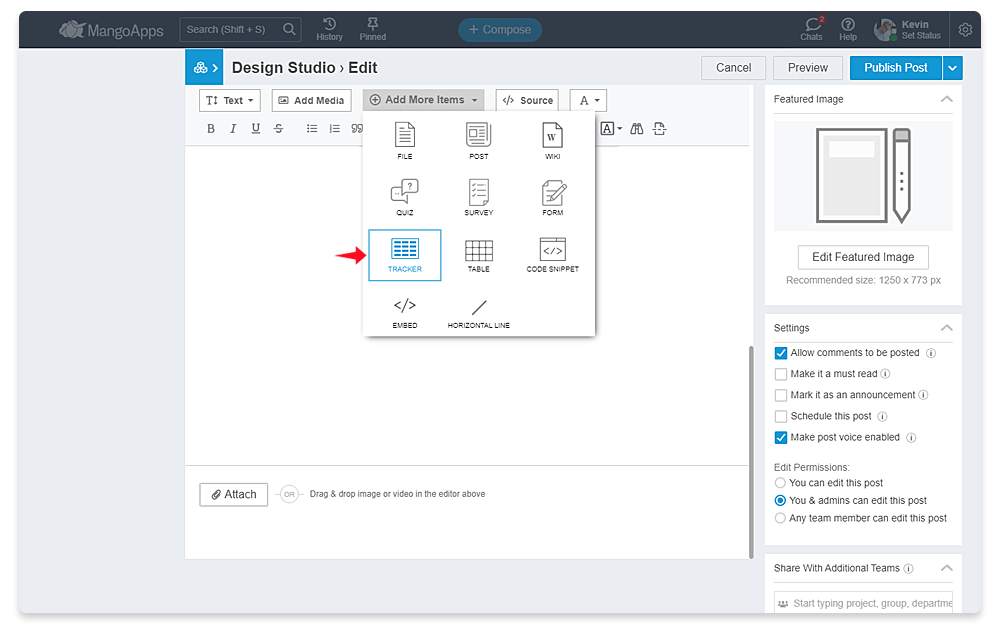
- Posts
- The blank template of posts supports the same functionality for trackers/forms like the wiki
- Pages
- Refer the section above ‘Integrated with Company & Team Pages’ section for how it works
Data Recovery & Deletion
- Entries that are deleted get permanently removed and can’t be recovered. Archive the entries/records instead of deleting them if you have a need to restore them back in future.
- Columns that are deleted get permanently removed and can’t be recovered. Hide the columns instead of deleting them if you have a need to keep the data in the column.
- Tables and forms in the tracker that are deleted get permanently removed and can’t be recovered. No data is deleted in this case.
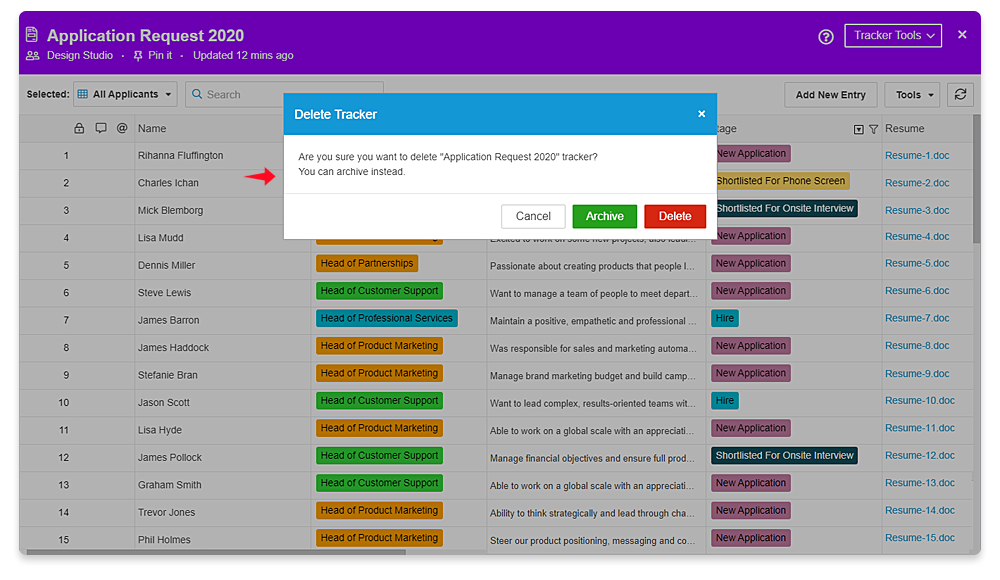
- Tracker that is deleted will be present in the trash can and can be recovered until the trash can preservation limit (default of 90 days) has not expired.


Search
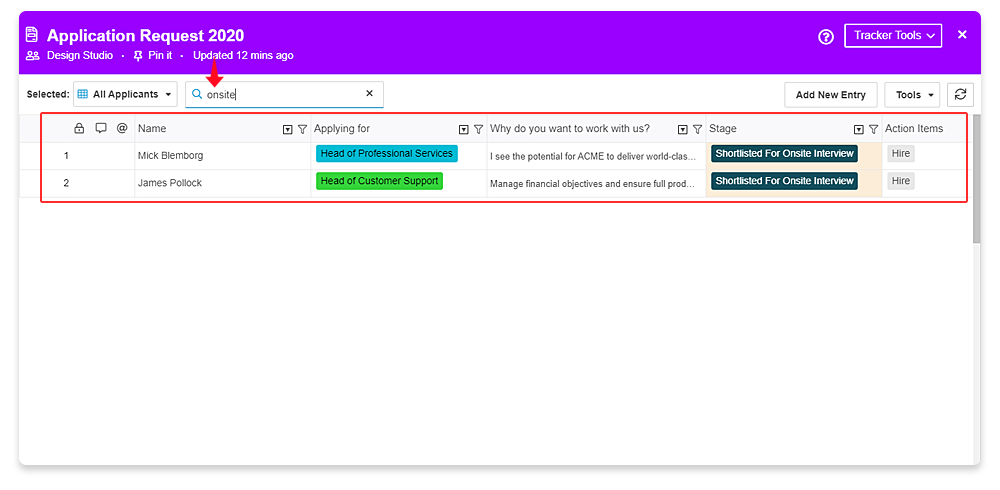
- Users have the capability to do a quick search and find a specific entry using the ‘Search bar’ on top of each tracker
- The search automatically looks for the searched text in all the columns of the table
- The matching results are limited to the selected table view of the tracker making it easier to get to the matching entries quickly
- On the matched results you can perform bulk actions on the entries or download an XLS for more detailed analysis.
Mobile
- Trackers module is available in MangoApp iOS & Android Apps
- The tracker features available on mobile include
- Ability to view, sort & search the tracker data
- Ability to submit forms
- Ability to view tables
- View the table embedded on the dashboard / company page / team page
- For more details go to Mobile App features section in this release